Say hello to this Sushi Balls Recipe, the cutest and tastiest way to enjoy sushi. Imagine the wonders of delicious rice balls, fresh ingredients, and an explosion of flavors, all rolled into adorable bite-sized spheres. Whether you serve them as appetizers or make them the star of your meal, get ready for a fun and very tasty sushi experience.
This Sushi Balls Recipe transforms traditional sushi into something more accessible and interactive. No rolling mat required, no special techniques needed, just simple ball-shaping that anyone can master. The result looks professional and impressive while being surprisingly easy to create.
Sushi just got a whole lot tastier with this creative approach. The individual portions make serving easy, eating neat, and customizing simple. Each ball delivers all the flavors you love from sushi in a compact, adorable package that’s perfect for parties or casual dinners.
What makes this Sushi Balls Recipe special is how it democratizes sushi-making. Traditional sushi rolls can be intimidating, but forming rice balls is something everyone can do successfully. The technique is forgiving, the results are consistent, and the presentation is always impressive.
Why This Recipe is Special
This Sushi Balls Recipe stands out because it captures authentic sushi flavors without requiring advanced skills or special equipment. The combination of creamy avocado, smoky salmon, crisp cucumber, and perfectly seasoned rice creates harmony in every bite.
The individual ball format makes these perfect for parties. Guests can pop entire portions in their mouths without struggling to cut rolls. The uniform size ensures everyone gets equal amounts of each ingredient, and the presentation is Instagram-worthy.
Key Ingredients Overview
Creating perfect Sushi Balls Recipe results requires quality ingredients. Properly prepared sushi rice provides the foundation with its slightly sweet, vinegary flavor. Fresh smoked salmon adds richness and protein, while creamy avocado contributes smooth texture.
Crisp cucumber provides refreshing crunch, and the sauce combination of mayonnaise, soy sauce, sriracha, and sesame oil creates complex flavor. Sesame seeds add nutty notes and visual appeal. These simple components combine to create something extraordinary.
Understanding Sushi Rice
The foundation of exceptional Sushi Balls Recipe is properly prepared sushi rice. Understanding what makes sushi rice special and how to prepare it ensures your balls hold together and taste authentic.
Sushi rice is short-grain Japanese rice seasoned with a mixture of rice vinegar, sugar, and salt. This seasoning creates the characteristic slightly sweet, tangy flavor that defines sushi. The short grains contain more starch than long-grain varieties, making them sticky enough to hold shapes.
Cooking Sushi Rice Perfectly
Rinse the sushi rice thoroughly before cooking to remove excess surface starch. This prevents the rice from becoming gummy or overly sticky. Rinse under cold water until the water runs clear, which usually takes four to five rinses.
Cook the rice according to package directions, typically using slightly less water than regular rice. The goal is tender grains that stick together but remain distinct rather than mushy. Let the cooked rice rest covered for ten minutes after cooking.
While the rice is still warm, fold in the seasoning mixture of rice vinegar, sugar, and salt. Use a cutting motion rather than stirring to avoid crushing the grains. Fan the rice while mixing to help it cool and develop that characteristic glossy appearance for your Sushi Balls Recipe.
Rice Temperature Matters
Work with sushi rice when it’s still warm but cool enough to handle comfortably. Warm rice is pliable and shapes easily into balls. Cold rice is stiff and doesn’t compress properly, making it difficult to form cohesive spheres.
If your rice cools too much before shaping your Sushi Balls Recipe, cover it with a damp towel to maintain moisture and warmth. Never refrigerate unseasoned or unformed sushi rice, as cold temperatures make it hard and unworkable.
Stickiness Balance
Perfect sushi rice for balls should be sticky enough to hold together when compressed but not so sticky that it becomes gluey or pasty. The rinsing and proper water ratio during cooking create this ideal texture.
If your rice is too sticky, it was over-stirred during seasoning or not rinsed enough before cooking. If it’s too dry and won’t hold together, you used too little water or didn’t let it steam properly after cooking.
Choosing the Right Ingredients
Quality ingredients make the difference between good Sushi Balls Recipe results and exceptional ones. Each component plays a specific role in building authentic sushi flavor and texture.
Sushi Rice Selection
Use genuine sushi rice or short-grain Japanese rice for authentic results in your Sushi Balls Recipe. Brands like Nishiki, Kokuho Rose, or Tamaki Gold are widely available and produce excellent results. These varieties have the proper starch content for sticky texture.
Never substitute long-grain rice like basmati or jasmine, which remain separate and fluffy rather than sticky. Medium-grain rice can work in a pinch but won’t have quite the same texture as proper sushi rice.
Smoked Salmon Quality
High-quality smoked salmon makes a significant difference in your Sushi Balls Recipe. Look for salmon with vibrant color, moist appearance, and fresh ocean smell. Avoid salmon that looks dry, dull, or smells overly fishy.
Cold-smoked salmon has more delicate flavor and silky texture compared to hot-smoked varieties. Either works, but cold-smoked is more traditional for sushi applications. Buy from the refrigerated section rather than shelf-stable vacuum packs for superior quality.
If smoked salmon isn’t available or you prefer raw fish, use sushi-grade salmon specifically labeled as safe for raw consumption. Freeze it at proper temperatures if preparing at home to kill any parasites.
Avocado Ripeness
The perfect avocado for Sushi Balls Recipe is ripe but still slightly firm. It should yield to gentle pressure without feeling mushy. Overripe avocados turn brown quickly and have unpleasant texture, while underripe ones are hard and flavorless.
To check ripeness, remove the stem end. If it comes off easily and reveals green underneath, the avocado is ready. If it’s brown underneath, the avocado is overripe. If the stem doesn’t budge, it needs more time to ripen.
Hass avocados work best for sushi because they have creamy texture and rich flavor. Other varieties tend to be more watery and less flavorful.
Cucumber Selection
Use English cucumbers or Japanese cucumbers for your Sushi Balls Recipe. These varieties have thin, edible skins and fewer seeds than regular cucumbers. The flesh is crisp and sweet without bitterness.
If using regular cucumbers, peel them and remove the seeds with a spoon before slicing. The seeds contain excess moisture that can make your rice balls soggy over time.
The cucumber should be firm and crisp when you cut it. Soft or rubbery cucumbers indicate age and won’t provide the refreshing crunch this dish needs.
Sauce Components
Japanese mayonnaise like Kewpie is ideal for the sauce in your Sushi Balls Recipe. It has richer flavor and creamier texture than American mayonnaise thanks to extra egg yolks and rice vinegar. If unavailable, regular mayonnaise works but add a tiny bit of rice vinegar.
Use naturally brewed soy sauce for the best flavor. Tamari is a good gluten-free option if needed. Low-sodium soy sauce allows you to control salt levels more precisely.
Sriracha sauce adds heat and flavor. Adjust the amount based on your spice tolerance. Sesame oil should be toasted rather than plain for that characteristic nutty aroma in your Sushi Balls Recipe.
Step-by-Step Instructions
Follow these detailed steps to create perfect Sushi Balls Recipe every time.
Preparing the Rice
Cook the sushi rice according to package directions. While it cooks, prepare the seasoning mixture by combining rice vinegar, sugar, and salt in a small bowl. Microwave for thirty seconds and stir until the sugar and salt dissolve completely.
When the rice finishes cooking, transfer it to a large, shallow bowl. Pour the seasoning mixture over the hot rice and use a rice paddle or wooden spoon to fold it in with cutting motions. Fan the rice while mixing to help it cool and develop shine.
Let the seasoned rice cool to warm room temperature before using. Cover with a damp cloth to prevent drying while you prepare the other ingredients for your Sushi Balls Recipe.
Preparing the Filling Ingredients
Dice the avocado into small cubes about quarter-inch in size. Cut the smoked salmon into similar-sized pieces. Dice the cucumber into the same size as well. Uniform sizing ensures even distribution throughout your Sushi Balls Recipe.
Place all the diced ingredients in separate small bowls. Keep them refrigerated until ready to use to maintain freshness and food safety, especially for the salmon and avocado.
Making the Sauce
In a small bowl, whisk together mayonnaise, soy sauce, sriracha, and sesame oil until smooth and well combined. Taste and adjust the flavors according to your preference. The sauce should have balance between creamy, salty, spicy, and nutty notes.
This sauce serves double duty in your Sushi Balls Recipe. You’ll mix some into the filling and use the rest as a drizzle on top. Make extra if you want more for serving alongside the finished balls.
Combining Rice and Fillings
In a large bowl, combine the prepared sushi rice with diced salmon, avocado, and cucumber. Add about half of the prepared sauce and fold everything together gently. Mix until the ingredients distribute evenly but avoid overmixing, which can mash the avocado.
The mixture should hold together when pressed but not be mushy or pasty. The sauce helps everything bind while adding flavor throughout your Sushi Balls Recipe.
Forming the Balls
Wet your hands with water to prevent sticking. Scoop about two tablespoons of the rice mixture into your palm. Cup your hands together and compress gently while rotating to form a sphere.
The balls should be compact enough to hold together but not squeezed so hard that they become dense. You want them cohesive yet still light and tender. Each ball should be roughly the size of a golf ball for your Sushi Balls Recipe.
Place formed balls on a serving platter as you work. Re-wet your hands between each ball to prevent sticking. This process goes quickly once you get into a rhythm.
Adding Finishing Touches
Drizzle the remaining sauce over the formed balls using a spoon or squeeze bottle. The drizzle adds visual appeal and extra flavor to your Sushi Balls Recipe. Don’t drench them, just create attractive lines of sauce.
Sprinkle sesame seeds generously over all the balls. The seeds add nutty flavor, pleasant crunch, and beautiful visual contrast. White or black sesame seeds both work, or use a combination for dramatic effect.
Serving
Arrange the finished Sushi Balls Recipe on a serving platter. Provide small plates and chopsticks or forks for guests. Include extra soy sauce and wasabi on the side for those who want additional flavor.
Serve immediately or refrigerate for up to two hours before serving. These taste best at cool room temperature rather than straight from the refrigerator, which dulls flavors.
Professional Tips
These expert techniques will help you create the best possible Sushi Balls Recipe every time you make them.
Rice Moisture Control
Keep a bowl of water nearby when forming balls so you can wet your hands frequently. This prevents rice from sticking to your palms and makes shaping much easier. Change the water if it gets too starchy or cloudy.
Use the right amount of pressure when forming the balls. Too little and they fall apart, too much and they become dense and heavy. Practice with a few until you find the perfect balance for your Sushi Balls Recipe.
Uniform Sizing
Use a cookie scoop or measuring spoon to portion the rice mixture for perfectly uniform balls. Consistent sizing ensures they all look professional and contain equal amounts of ingredients.
Uniform balls also look better on the serving platter and make it easier for guests to judge portion sizes when serving themselves.
Preventing Avocado Browning
Toss diced avocado with a bit of lemon or lime juice to slow browning. The citric acid prevents oxidation that causes the brown color. This keeps your Sushi Balls Recipe looking fresh and appealing longer.
Alternatively, prepare and serve the balls within an hour or two to enjoy the avocado at peak freshness before any browning occurs.
Flavor Balance
Taste the rice mixture before forming balls and adjust seasonings as needed. Add more sauce for richness, soy sauce for saltiness, or sriracha for heat. Getting the seasoning right at this stage ensures every ball tastes perfect.
Remember that cold temperatures dull flavors, so season slightly more than seems necessary if serving the balls chilled.
Make-Ahead Strategy
You can prepare components several hours ahead for your Sushi Balls Recipe. Cook and season rice, dice ingredients, and make sauce. Keep everything separate and refrigerated until ready to assemble and form balls.
Form the balls no more than two hours before serving for the best texture and freshness. Rice balls formed too far in advance can dry out or become too firm.
Common Mistakes to Avoid
Learning from these common errors will help you achieve perfect Sushi Balls Recipe results every time.
Using Wrong Rice Type
The most common mistake is using long-grain rice instead of proper sushi rice. Long-grain varieties don’t stick together properly, and your balls will fall apart. Always use short-grain Japanese rice for authentic texture.
Even within short-grain varieties, quality matters. Generic brands sometimes don’t have the same starch content as quality sushi rice brands.
Overworking the Rice
Stirring or mixing the rice too vigorously crushes the grains and creates gummy, pasty texture. Use gentle folding motions when seasoning rice and combining with fillings for your Sushi Balls Recipe.
The grains should remain distinct and slightly separated even though they stick together. Overworked rice looks and feels more like mashed potatoes than proper sushi rice.
Forming with Dry Hands
Trying to form balls with dry hands results in rice sticking everywhere and frustration. The rice adheres to your palms instead of to itself. Always wet your hands thoroughly before handling the rice mixture.
Keep water nearby and re-wet between each ball. This simple step makes the entire process dramatically easier and more enjoyable.
Incorrect Rice Temperature
Rice that’s too cold won’t compress and form cohesive balls. It remains hard and the balls fall apart easily. Rice that’s too hot burns your hands and is difficult to work with safely.
Let the rice cool to warm room temperature, where it’s comfortable to handle and pliable enough to shape properly for your Sushi Balls Recipe.
Overseasoning or Underseasoning
Too much seasoning makes the rice wet and mushy. Too little makes it bland and boring. Follow the recipe proportions initially, then adjust future batches based on your preference.
The rice should taste pleasantly tangy and slightly sweet with the seasoning balanced and not overpowering the other ingredients in your Sushi Balls Recipe.
Variations to Try
Once you’ve mastered the classic Sushi Balls Recipe, these variations offer exciting new flavors to explore.
Spicy Tuna Variation
Replace the smoked salmon with diced sushi-grade tuna mixed with sriracha mayo. This creates spicy tuna balls reminiscent of popular sushi rolls. Add chopped scallions for extra flavor and color.
The spicy tuna variation is bolder and has more heat, perfect for those who love spicy sushi.
Vegetarian Version
Create vegetarian Sushi Balls Recipe using only vegetables. Increase the avocado and cucumber, and add shredded carrots, thinly sliced bell peppers, or pickled radish. Dice everything small for easy forming.
Add a bit of cream cheese for richness and to help bind everything together. The vegetarian version is just as satisfying as the original.
Tropical Variation
Add diced mango or pineapple along with the avocado and cucumber for tropical flair. The fruit sweetness contrasts beautifully with the savory salmon and tangy rice. This summer-inspired version is refreshing and unexpected.
A squeeze of lime juice in the sauce enhances the tropical theme and brightens all the flavors.
Crab and Cream Cheese
Use lump crabmeat and diced cream cheese instead of salmon for a rich, indulgent variation. This combination mimics Philadelphia rolls and creates incredibly creamy texture.
Add finely diced jalapeño for spicy crab balls that pack a punch alongside the richness.
Tempura Crunch Addition
Roll finished balls in panko breadcrumbs and pan-fry briefly for crispy tempura-style exterior. The crunchy coating contrasts wonderfully with the soft interior in this elevated version of Sushi Balls Recipe.
Serve these immediately after frying for maximum crispiness and temperature contrast.
Storage and Food Safety
Proper storage keeps your Sushi Balls Recipe fresh and safe for consumption.
Serving Timeline
Sushi balls with raw fish should be consumed within two hours if left at room temperature. After two hours, bacteria multiply rapidly and the fish becomes unsafe to eat. Always err on the side of caution with raw seafood.
For longer serving times, keep the balls refrigerated and bring out small batches as needed rather than leaving everything out at once.
Refrigeration Guidelines
Store leftover Sushi Balls Recipe in an airtight container in the refrigerator for up to twenty-four hours. The rice will firm up considerably when cold but remains safe to eat.
Let refrigerated balls sit at room temperature for fifteen minutes before serving to take the chill off and allow flavors to brighten.
Freezing Considerations
These balls don’t freeze well due to the fresh vegetables and rice texture changes. The avocado becomes mushy and discolored, the cucumber gets waterlogged, and the rice becomes hard and grainy when thawed.
Make only what you’ll consume within a day for the best quality and food safety.
Food Safety with Raw Fish
If using raw sushi-grade fish, ensure it’s been frozen at proper temperatures to kill parasites. Buy from reputable sources that specialize in sushi-grade seafood. Keep all ingredients and finished balls at proper cold temperatures.
Smoked salmon is safer than raw fish since the smoking process kills bacteria. However, it should still be handled carefully and kept properly refrigerated.
Frequently Asked Questions
Can I use regular rice instead of sushi rice?
Regular long-grain rice won’t work for this Sushi Balls Recipe because it doesn’t stick together properly. The balls will fall apart. Always use short-grain Japanese sushi rice for the proper sticky texture.
Do I need a bamboo mat?
No, that’s the beauty of this recipe. Sushi balls require no special equipment, just your hands. This makes sushi accessible to anyone without investing in bamboo rolling mats or other tools.
Can I make these ahead for a party?
You can prepare components ahead but should form the balls no more than two hours before serving. Form them, arrange on a platter, cover with plastic wrap, and refrigerate until ready to serve your Sushi Balls Recipe.
What if my balls keep falling apart?
Balls that fall apart usually indicate rice that’s too cold or not sticky enough. Make sure you’re using proper sushi rice and working with it while still warm. Wet your hands thoroughly and compress firmly but gently when forming.
Can kids help make these?
Absolutely. Forming rice balls is a fun, tactile activity that kids enjoy. They can help dice vegetables, mix ingredients, and definitely form the balls. It’s a great way to introduce children to sushi flavors in an approachable format.
How spicy are these?
The spice level depends entirely on how much sriracha you add to the sauce. Start with a small amount and increase gradually to your preference. You can make them completely mild or quite spicy for your Sushi Balls Recipe.
What can I serve alongside these?
Serve with miso soup, edamame, seaweed salad, or Asian-style cucumber salad. Pickled ginger and wasabi are traditional sushi accompaniments that work beautifully with these balls too.
Can I use cooked shrimp instead of salmon?
Yes, cooked shrimp works wonderfully in this Sushi Balls Recipe. Chop it into small pieces and mix with the other ingredients. Any cooked seafood like imitation crab also works well.
Final Thoughts
This Sushi Balls Recipe transforms traditional sushi into something more accessible, interactive, and fun. The individual portions make serving easy, eating neat, and customizing simple for guests with different preferences. Each adorable ball delivers complete sushi flavor in one perfect bite.
The technique is forgiving enough for beginners while producing results that look and taste professional. No special equipment or advanced skills required, just simple ingredients and basic shaping. This democratization of sushi-making means anyone can enjoy homemade sushi without intimidation.
Whether serving these as party appetizers, light lunch, or creative dinner, they satisfy completely. The combination of creamy avocado, smoky salmon, crisp cucumber, and perfectly seasoned rice creates harmony that makes these truly special.
The visual appeal matches the taste, making these Instagram-worthy while being incredibly delicious. Guests always reach for seconds and ask for the recipe, making this a true crowd-pleaser.
Gather your ingredients, prepare that sushi rice, and get ready to form the most adorable and delicious Sushi Balls Recipe you’ve ever tasted. This recipe is about to become your new favorite way to enjoy sushi at home.
Start by cooking the sushi rice. After the rice is cooked, make sure to refrigerate it for at least 30 minutes.
Meanwhile, cut the smoked salmon into very thin slices, then place it in a bowl.
Add in the mayo, soy sauce, siracha and sesame oil. Mix it very well.
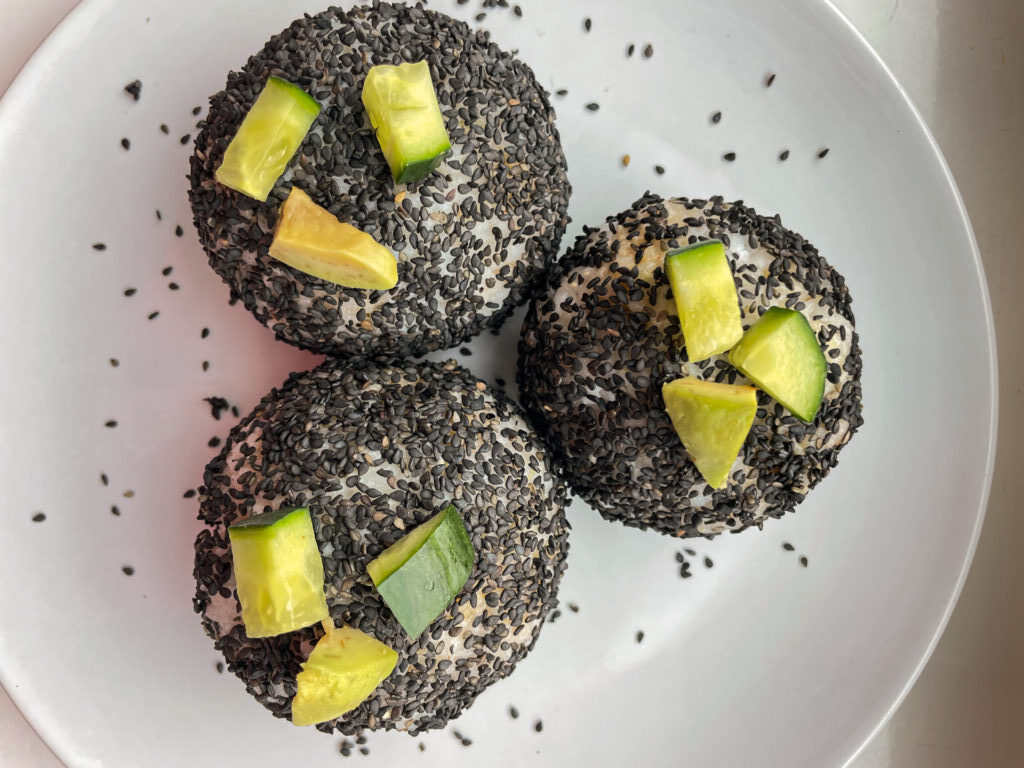
Cut the cucumber and avocado into small pieces.
On a board, place cling film on top and add one tablespoon of rice. Spread it and form a circle.
Add a tablespoon of the smoked salmon, topped with cucumber and avocado.
Repeat till you form 6 balls.
On a deep plate, pour the sesame seeds and roll the sushi balls on it.
Add some avocado and cucumber on top and enjoy!
If you've given this recipe a try and it won you over, please share your thoughts by leaving
a rating and comment below! If you have any questions about this recipe, don't hesitate to ask – I'm here to
help and will respond promptly.