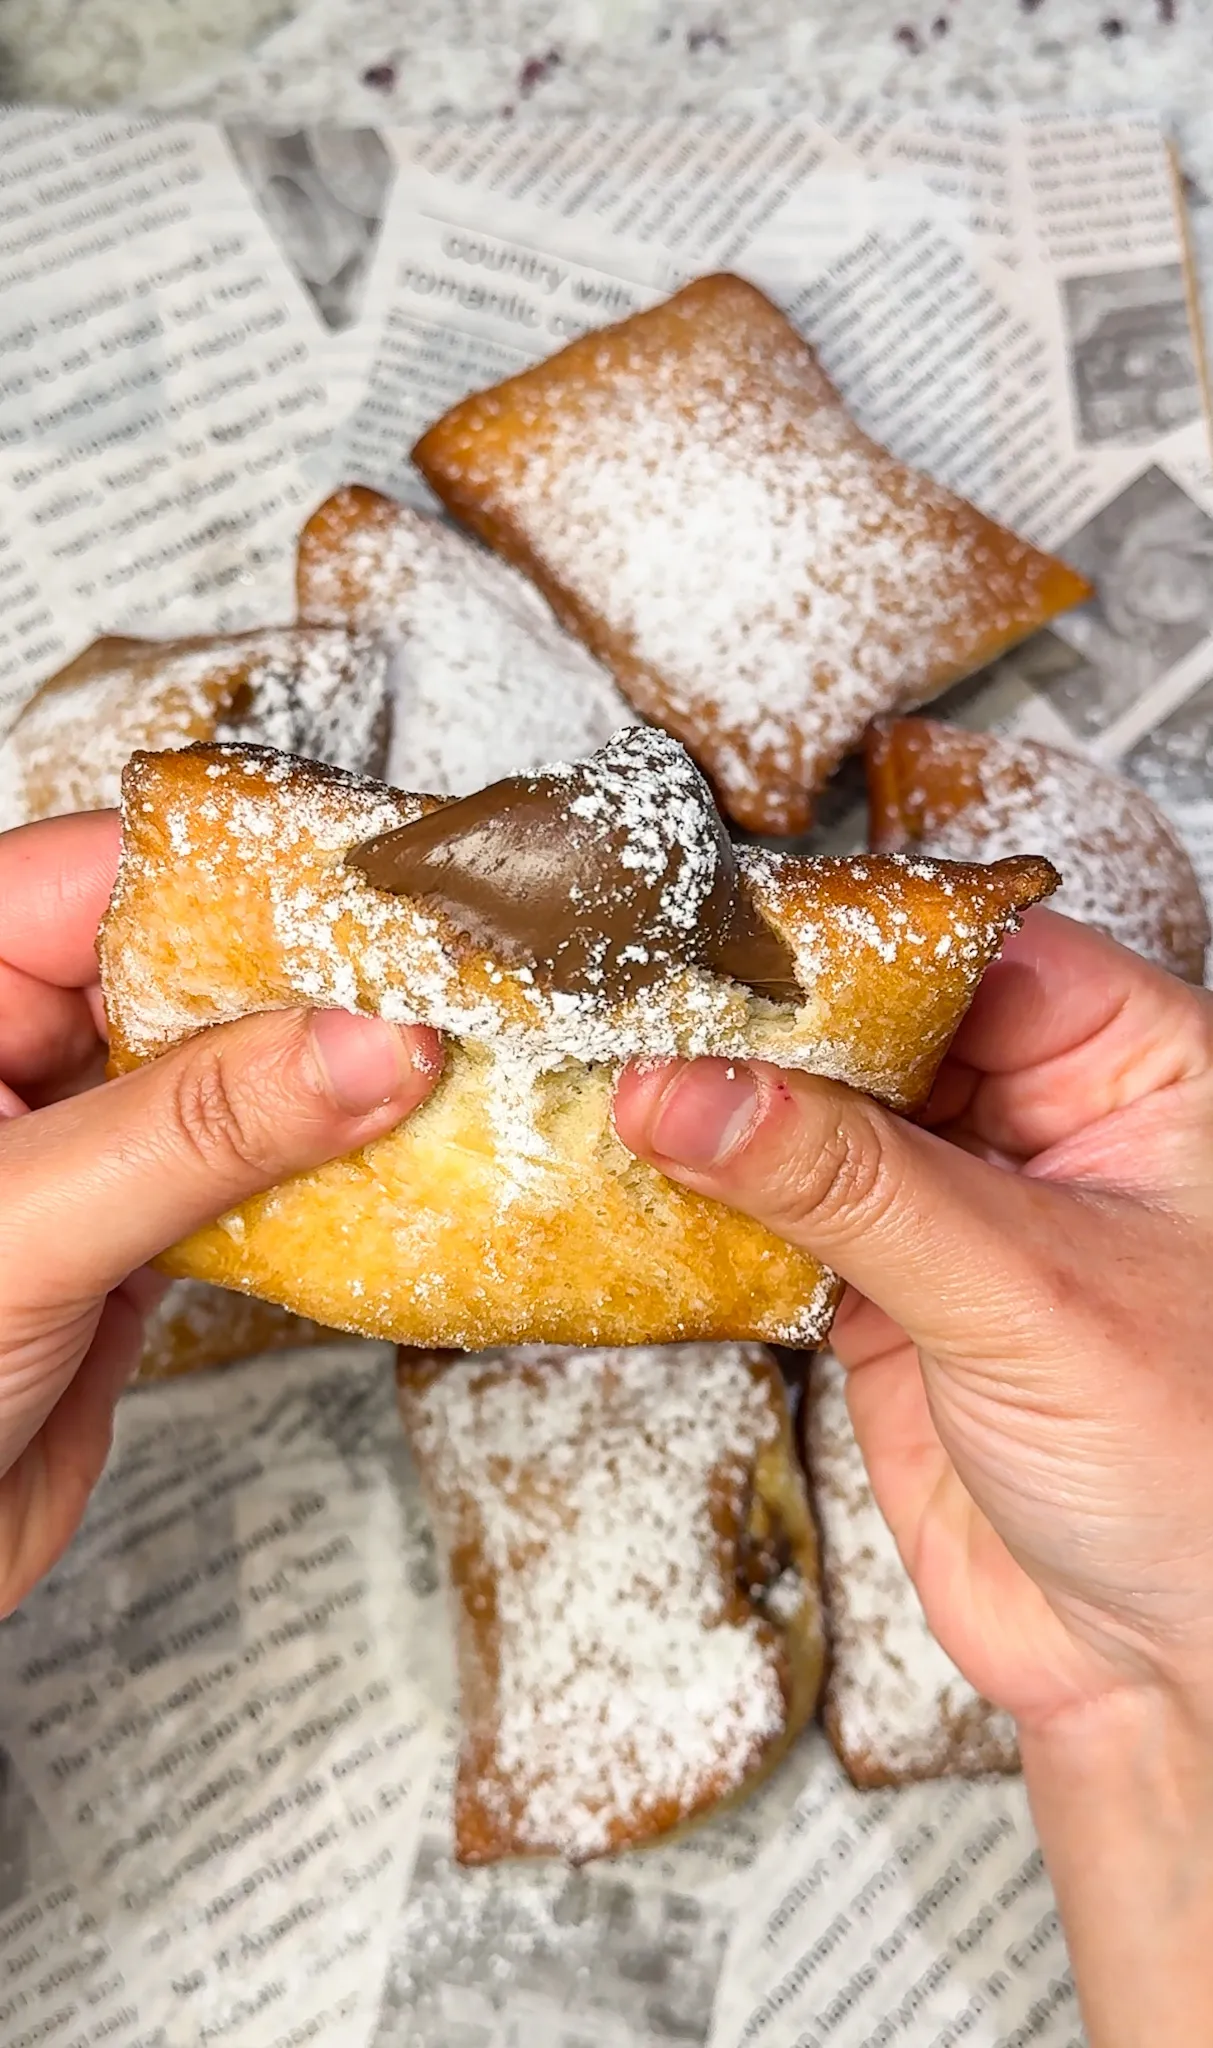
Discover the Romance of Delightful Love Letter Pastries
Searching for a sweet and romantic surprise that will make hearts flutter? Say hello to our adorable Love Letter Pastries that combine elegance, simplicity, and delicious flavor in every flaky bite. These Love Letter Pastries are crafted from delicate puff pastry and filled with a delightful dollop of jam, then folded into the charming shape of a love letter and baked until perfectly golden. Whether you’re celebrating Valentine’s Day, an anniversary, or simply want to show someone you care, these Love Letter Pastries deliver romance on a plate.
What makes these Love Letter Pastries truly special is their perfect balance of visual appeal and exceptional taste. The light, flaky puff pastry creates cloud-like texture that melts in your mouth with rich buttery flavor. Each Love Letter Pastries contains a burst of fruity goodness from the jam filling that surprises and delights with every bite. The charming envelope shape transforms ordinary pastries into edible love notes that communicate affection in the sweetest way possible.
The beauty of Love Letter Pastries lies in their impressive appearance despite remarkably simple preparation. Using store-bought puff pastry eliminates complicated dough-making, allowing you to create bakery-quality results in minutes. These Love Letter Pastries work beautifully for romantic breakfasts in bed, elegant brunch gatherings, or thoughtful homemade gifts. The combination of buttery pastry and sweet jam filling creates comfort food satisfaction while the heart-shaped decorations add whimsical charm that makes these treats unforgettable.
Why This Recipe is Special
These Love Letter Pastries stand out for several compelling reasons that make them worth preparing for your loved ones. First, the visual presentation creates immediate emotional impact that shows thoughtfulness and care. The envelope shape with heart decoration communicates romance before anyone even takes the first bite. This attention to aesthetics makes Love Letter Pastries perfect for special occasions when presentation matters as much as flavor.
The flavor profile of these Love Letter Pastries achieves that coveted balance between sweet and buttery without overwhelming richness. The puff pastry provides neutral canvas that allows the jam flavor to shine while contributing its own delicate butteriness. You can customize the jam flavor to match personal preferences or seasonal availability, making these Love Letter Pastries adaptable for any occasion throughout the year.
Key Ingredients Overview
Success with these Love Letter Pastries depends on selecting quality ingredients that work together harmoniously. Store-bought puff pastry provides the foundation, offering convenience without sacrificing quality. Look for all-butter puff pastry when possible, as it delivers superior flavor and texture compared to versions made with vegetable shortening or margarine.
Quality jam creates the flavor center of these Love Letter Pastries. Choose jam varieties with high fruit content and minimal added ingredients for best results. Strawberry jam offers classic romantic appeal with its deep red color and familiar sweetness. Raspberry jam provides slight tartness that balances the rich pastry beautifully. Butter for brushing adds golden color and extra richness, while powdered sugar creates attractive finish that suggests homemade bakery quality.

Understanding Puff Pastry Basics
Before creating these Love Letter Pastries, understanding how puff pastry works helps ensure success even if you’re new to working with this versatile ingredient. Puff pastry consists of hundreds of thin layers created by repeatedly folding butter into dough. During baking, water in the butter creates steam that pushes the layers apart, resulting in dramatic rise and flaky texture.
Store-bought puff pastry saves hours of labor while delivering excellent results for these Love Letter Pastries. The pastry typically comes frozen in sheets that require thawing before use. Proper thawing is crucial for achieving optimal results. Pastry that’s too frozen cracks when you try to fold it, while pastry that’s too warm becomes sticky and difficult to handle.
Proper Thawing Technique
Thaw frozen puff pastry in the refrigerator overnight for best results with your Love Letter Pastries. This gentle thawing method prevents the pastry from becoming too warm or developing condensation. If you need faster thawing, leave the wrapped pastry at room temperature for thirty to forty minutes until it unfolds easily without cracking.
Never thaw puff pastry in the microwave, as this melts the butter layers and destroys the structure that creates flakiness. The pastry should feel cool to the touch and slightly firm but pliable when ready to use. If the pastry becomes too warm while you’re working with it, refrigerate it briefly to firm up before continuing with your Love Letter Pastries.
Working with Puff Pastry
Keep your work surface lightly floured when handling puff pastry for these Love Letter Pastries. Too much flour toughens the pastry, while too little causes sticking. Use just enough to prevent adhesion. Work quickly and confidently, as excessive handling warms the pastry and can cause the butter layers to merge rather than remaining separate.
If your puff pastry tears while shaping Love Letter Pastries, you can patch small tears by pressing the edges together gently. For larger tears, overlap the torn edges slightly and press firmly. The heat of the oven will fuse the layers during baking. Avoid overworking repaired areas, as this can create tough spots in the finished pastries.
Choosing the Right Ingredients
Ingredient selection impacts your Love Letter Pastries outcome significantly. Understanding what to look for when shopping ensures consistent success every time you prepare these romantic treats. Let’s examine each component in detail to help you make informed choices.
Selecting Quality Puff Pastry
All-butter puff pastry creates superior Love Letter Pastries with rich flavor and golden color that versions made with vegetable shortening cannot match. Check ingredient labels when shopping, looking for products that list butter as the primary fat. Some premium brands specify the butter percentage, with higher percentages generally indicating better quality.
Frozen puff pastry sheets typically come in packages containing two sheets. Each sheet makes multiple Love Letter Pastries depending on how large you cut your squares. Store unopened packages in the freezer for up to several months. Once thawed, use the pastry within a few days and never refreeze it, as this damages the delicate layered structure.
Choosing the Perfect Jam
Jam selection offers opportunity to customize your Love Letter Pastries for different occasions and preferences. Strawberry jam provides classic romantic appeal with its bright red color and familiar sweet flavor. The color shows beautifully through the pastry layers and communicates love and passion. Raspberry jam offers similar visual appeal with slightly more sophisticated tartness that balances the rich pastry.
Apricot jam creates elegant golden appearance perfect for non-Valentine occasions. Blueberry jam contributes deep purple hue and complex berry flavor. Mixed berry jams provide visual interest with varied colors and multidimensional taste. For special occasions, consider using high-end preserves with whole fruit pieces for added texture and premium appearance in your Love Letter Pastries.
Understanding Jam Consistency
Jam consistency affects how well it stays contained within your Love Letter Pastries during baking. Very loose, runny jams may leak out during cooking, creating mess and reducing the filling in finished pastries. Very thick preserves with large fruit chunks may not spread evenly or may create bulges that prevent proper sealing.
If your jam seems too runny for Love Letter Pastries, you can thicken it by cooking it briefly in a small saucepan over medium heat until it reduces slightly. Cool completely before using. If your jam is too thick, thin it with a teaspoon of water or lemon juice stirred in thoroughly. The ideal consistency is spreadable but not runny, similar to softened butter.
Selecting Quality Butter
Unsalted butter works best for brushing these Love Letter Pastries before baking. Unsalted allows you to control salt levels precisely without risking oversalted results. European-style butter with higher fat content creates richer flavor and more beautiful golden browning. However, standard American unsalted butter produces excellent results at lower cost.
Melt the butter completely for brushing your Love Letter Pastries. Melted butter spreads easily and evenly across the pastry surface without tearing delicate layers. You can add a pinch of salt to the melted butter if you enjoy the sweet-salty contrast. The butter contributes to browning and creates glossy finish that makes these pastries look professionally baked.
Understanding Powdered Sugar
Powdered sugar serves dual purposes for these Love Letter Pastries. Dusting before baking helps the butter adhere and contributes to golden coloring. Dusting after baking creates attractive snowy finish that suggests homemade quality and adds extra sweetness. Use confectioners’ sugar rather than granulated sugar, as the fine texture distributes evenly and dissolves slightly into the warm pastry.
For most attractive presentation, dust powdered sugar over cooled Love Letter Pastries just before serving. Sugar applied too far in advance can absorb moisture and disappear into the pastry. A fine-mesh strainer works perfectly for creating even, professional-looking sugar dusting that enhances rather than overwhelms your beautiful pastries.
Step-by-Step Instructions
Follow these detailed instructions to create perfect Love Letter Pastries every single time. Each step has been carefully developed to ensure consistent success regardless of your baking experience level. Take your time and enjoy the simple process of creating these romantic treats.
Preparation Phase
Begin your Love Letter Pastries by preheating your oven to 400 degrees Fahrenheit. Proper preheating ensures even baking from the moment the pastries enter the oven. Line a large baking sheet with parchment paper to prevent sticking and make cleanup easier. The parchment also helps create evenly browned bottoms on your pastries.
Remove your frozen puff pastry from the freezer and thaw according to package directions. Most brands recommend overnight refrigerator thawing or thirty to forty minutes at room temperature. The pastry is ready when it unfolds easily without cracking but still feels cool and slightly firm. If the pastry becomes too warm, refrigerate it briefly before proceeding.
Unfold your thawed puff pastry sheet on a lightly floured work surface. Very lightly dust the top of the pastry with flour to prevent your rolling pin from sticking. If the pastry has creases from folding, you can gently roll it with a rolling pin to smooth them out, but avoid rolling so much that you compress the delicate layers.
Cutting the Pastry
Using a sharp knife or pizza cutter, cut your puff pastry sheet into equal squares for your Love Letter Pastries. The size depends on how large you want your finished pastries. Squares measuring approximately four inches create good-sized pastries perfect for individual servings. Smaller three-inch squares make dainty pastries ideal for tea parties or elegant receptions.
Cut decisively with single smooth motion rather than sawing back and forth. Clean cuts preserve the layered structure better than ragged edges. If you notice your knife dragging or tearing the pastry, it may be too warm. Refrigerate the pastry briefly to firm it up before continuing with your Love Letter Pastries.
Rotate each square to create a diamond orientation, with points facing up, down, left, and right. This diamond position makes the folding process more intuitive and creates the characteristic envelope shape. Arrange your diamond-shaped pastry pieces with some space between them to make filling and folding easier.

Adding the Filling
Place approximately one teaspoon of jam in the center of each pastry diamond. The exact amount depends on your square size and personal preference. Start conservatively, as too much filling can ooze out during baking and create mess. You want visible filling in the finished Love Letter Pastries but not so much that it overwhelms the buttery pastry.
Leave adequate border around the jam for sealing the pastry edges. At least half an inch of clear pastry around the filling ensures proper sealing and prevents leaking. If you accidentally add too much jam, remove some with a spoon before proceeding. Better to err on the side of too little filling than risk messy leaking during baking.
Consider using a small offset spatula or the back of a spoon to spread the jam slightly rather than leaving it in a tall mound. Flatter filling creates neater appearance and makes folding easier. The jam will melt and spread slightly during baking, so it doesn’t need to cover the entire center area at this stage.

Folding the Love Letters
Fold the left and right points of each diamond toward the center, overlapping them slightly over the jam. The points should meet in the middle or overlap by about half an inch. Press gently to help them adhere to each other. These folds create the sides of your envelope shape.
Next, fold the bottom point up toward the center, covering the overlapped side points. This fold creates the envelope flap that seals the Love Letter Pastries. Press gently but firmly along all the seams to help seal them. The pastry doesn’t need elaborate sealing techniques, as the heat will fuse the layers during baking.
Leave the top point unfolded, creating the characteristic open envelope appearance. This exposed area shows glimpses of the jam filling and creates visual interest. The open top also allows steam to escape during baking, preventing the pastries from becoming soggy or exploding from pressure buildup.

Adding Heart Decorations
If you have puff pastry scraps remaining after cutting your squares, gather them and gently press together without overworking. Roll the scraps slightly to create thin sheet. Use a small heart-shaped cookie cutter to cut decorative hearts for your Love Letter Pastries. Mini heart cutters approximately one inch wide work perfectly for this application.
Place one small pastry heart in the center of each folded pastry, positioning it where the side folds overlap. The heart sits like a seal on an envelope, adding charming decorative element. Press the heart very gently to help it adhere. The butter you’ll brush on later helps secure it during baking.
If you don’t have heart-shaped cutters, you can create hearts freehand with a sharp knife. Draw a heart shape on paper as a template if needed. Alternatively, skip the heart decoration entirely for simpler but still attractive Love Letter Pastries. The envelope shape alone communicates the romantic message effectively.

Final Preparation and Baking
Arrange your assembled Love Letter Pastries on the prepared baking sheet, leaving at least two inches between them. The pastries expand during baking and need space to grow without touching. Crowded pastries may stick together or bake unevenly.
Melt your butter and use a pastry brush to coat each Love Letter Pastries generously. The butter adds rich flavor, promotes golden browning, and creates glossy finish. Make sure to brush the heart decorations as well. Dust the buttered pastries lightly with powdered sugar before baking. This pre-baking sugar contributes to caramelization and beautiful color.
Bake your Love Letter Pastries in the preheated oven for fifteen to twenty minutes, until they puff dramatically and turn deep golden brown. The exact time depends on your oven and pastry thickness. Watch carefully during the final few minutes, as puff pastry can go from perfect to burnt quickly. The pastries should look crispy and golden with visible flaky layers.

Finishing Touches
Remove the baked Love Letter Pastries from the oven and let them cool on the baking sheet for five minutes. This brief cooling allows them to firm up slightly without becoming cold. Transfer the pastries to a wire cooling rack using a spatula. Let them cool for another ten to fifteen minutes before adding final sugar dusting.
Once the Love Letter Pastries reach room temperature or are just barely warm, dust them generously with powdered sugar using a fine-mesh strainer. Hold the strainer several inches above the pastries and tap it gently to create even, snow-like coverage. The sugar adds sweetness and creates attractive finish that makes these pastries look bakery-perfect.
Serve your Love Letter Pastries within a few hours of baking for optimal texture. The pastries taste best when fresh, though they remain enjoyable for up to two days when stored properly. Present them on a pretty plate or in a decorative box for gift-giving. Include a handwritten note for extra romantic impact that complements these edible love letters.
Professional Tips for Perfect Results
These expert techniques will help you achieve consistently excellent Love Letter Pastries every time you prepare this romantic recipe. Professional bakers use these methods to ensure quality results.
Achieving Maximum Puff
For the most dramatic rise in your Love Letter Pastries, ensure your oven reaches full temperature before baking. A properly preheated oven creates immediate heat that generates steam rapidly, pushing the layers apart for maximum puffiness. Cold oven starts result in less impressive rise and denser texture.
Avoid opening the oven door during the first ten minutes of baking. Each time you open the door, hot air escapes and temperature drops significantly. This temperature fluctuation can cause the pastries to collapse or rise unevenly. Trust the process and let the Love Letter Pastries bake undisturbed until nearly done.
Preventing Soggy Bottoms
Nobody wants soggy-bottomed pastries ruining their Love Letter Pastries experience. Ensure your baking sheet is completely dry before lining it with parchment. Any moisture can create steam that softens the pastry bottoms. Using parchment paper rather than greasing the pan directly also helps create crispy bottoms.
Bake your Love Letter Pastries on the middle or upper-middle rack of your oven. Bottom rack placement can result in overly brown or soft bottoms before the tops finish baking. If your oven tends to brown bottoms too quickly, place a second baking sheet underneath the one holding your pastries to insulate them slightly.
Managing Jam Leakage
Some jam leakage is normal and even desirable, creating caramelized spots that add flavor. Excessive leakage, however, makes mess and reduces filling. Use jam that’s neither too runny nor too thick. Test the consistency by tilting the jar; it should flow slowly rather than pouring freely or refusing to move.
Don’t overfill your Love Letter Pastries. Start with less filling than you think you need. You can always add more to the next batch if the first seems sparse. Properly sealed edges prevent most leaking. Press the folded portions together firmly but gently, ensuring good contact between layers.
Creating Even Browning
Rotate your baking sheet halfway through cooking time to compensate for oven hot spots. Most home ovens have areas that run hotter than others. This simple rotation ensures all your Love Letter Pastries brown evenly regardless of their position on the pan.
If some pastries brown faster than others despite rotation, you can tent the darker ones loosely with aluminum foil during the final few minutes of baking. This protects them from excessive browning while allowing slower pastries to finish cooking. Understanding your specific oven’s quirks helps you adjust technique for perfect results.
Common Mistakes to Avoid
Learning from typical errors helps you perfect your Love Letter Pastries technique quickly. These common pitfalls can compromise your results, but awareness and prevention ensure success every time.
Working with Warm Pastry
One of the most frequent mistakes when making Love Letter Pastries is working with pastry that’s too warm. Warm pastry becomes sticky and difficult to handle. The butter layers soften and merge, destroying the structure that creates flakiness. If your pastry feels soft or sticky at any point, refrigerate it for ten minutes before continuing.
Work in a cool kitchen when possible, especially during warm weather. Air conditioning helps maintain ideal conditions for puff pastry work. If your kitchen is very warm, consider chilling your work surface by placing ice packs on it for a few minutes before starting, then wiping it completely dry before adding pastry.
Inadequate Sealing
Poorly sealed Love Letter Pastries leak jam during baking, creating mess and reducing the filling in finished products. Press the folded edges together firmly enough to create good contact without squashing the layers flat. The edges should touch each other completely rather than just meeting at isolated points.
If you’re having trouble getting edges to stick, lightly brush them with water using your fingertip or a pastry brush before pressing together. The moisture helps the pastry layers adhere to each other. Don’t use too much water, as excess moisture can make the pastry soggy and prevent proper browning.
Incorrect Oven Temperature
Baking Love Letter Pastries at incorrect temperature significantly affects results. Too-low temperature produces pale, underbaked pastries that don’t puff properly and may have doughy interiors. Too-high temperature burns the outside before the inside cooks through, creating acrid flavor and unpleasant texture.
Use an oven thermometer to verify your actual oven temperature matches the setting. Many home ovens run ten to twenty-five degrees hotter or cooler than their displays indicate. This variation makes consistent baking nearly impossible without verification. Adjust your temperature setting based on thermometer readings rather than relying solely on oven controls.
Cutting with Dull Tools
Dull knives or pizza cutters tear puff pastry rather than cutting cleanly through it. These ragged edges don’t rise properly and can create tough spots in your Love Letter Pastries. Keep your cutting tools sharp, or use kitchen shears for easier cutting with less pressure required.
After cutting pastry, examine the edges. They should look cleanly severed with visible distinct layers. If edges look compressed or smashed, your tool needs sharpening or you’re applying too much pressure. Light, confident strokes with sharp tools create best results for puff pastry work.
Creative Variations to Try
Once you’ve mastered basic Love Letter Pastries, these creative variations offer exciting ways to customize the recipe for different occasions or preferences. Each variation maintains the charming envelope shape while introducing new flavor dimensions.
Alternative Fillings
While jam creates classic Love Letter Pastries, other fillings work beautifully. Nutella spread creates chocolate lover’s dream with hazelnut richness. Lemon curd provides bright, tangy contrast to buttery pastry. Cream cheese sweetened with powdered sugar and vanilla creates cheesecake-inspired filling.
Fruit preserves with visible fruit pieces add textural interest and homemade appearance. Apple butter creates autumn-appropriate flavor perfect for fall celebrations. Pumpkin butter makes seasonal variation for Thanksgiving. Cookie butter spread offers unique caramelized flavor that many find addictive. Experiment with different fillings to find your favorite Love Letter Pastries variation.
Savory Versions
Transform Love Letter Pastries into savory appetizers for different entertaining occasions. Fill with herbed cream cheese and smoked salmon for elegant brunch option. Sun-dried tomato pesto with mozzarella creates Italian-inspired variation. Caramelized onions with gruyere cheese offer sophisticated flavor for wine parties.
For savory Love Letter Pastries, omit the powdered sugar and brush with egg wash instead of melted butter. Sprinkle with seeds, herbs, or grated cheese before baking for extra flavor and visual appeal. These savory versions work beautifully for cocktail parties, afternoon tea, or as accompaniments to soups and salads.
Glaze Options
Instead of simple powdered sugar dusting, finish your Love Letter Pastries with various glazes for different effects. Simple vanilla glaze made from powdered sugar, milk, and vanilla extract creates translucent coating with extra sweetness. Lemon glaze adds bright citrus notes that complement fruit fillings beautifully.
Chocolate drizzle transforms Love Letter Pastries into decadent dessert. Melt chocolate with a small amount of cream, then drizzle over cooled pastries using a spoon or piping bag. White chocolate drizzle creates elegant appearance perfect for weddings or showers. Match your glaze flavor to your filling for cohesive taste profile.
Seasonal Adaptations
Customize Love Letter Pastries for different seasons and holidays throughout the year. Use red jam and heart decorations for Valentine’s Day. Switch to pastel-colored icings and spring fruit preserves for Easter. Patriotic red, white, and blue berries make perfect Independence Day treats.
For autumn, use pumpkin or apple butter filling with cinnamon sugar sprinkled on top. Winter holidays call for cranberry or mincemeat filling with festive sugar decorations. Match your filling flavors and decorative elements to the season or occasion for Love Letter Pastries that feel perfectly appropriate year-round.
Storage and Serving Guidelines
While Love Letter Pastries taste absolutely best fresh from the oven, proper storage techniques help you enjoy them for up to two days. Understanding these methods prevents waste and allows some advance preparation.
Short-Term Storage
Store completely cooled Love Letter Pastries in an airtight container at room temperature for up to two days. Layer them carefully with parchment paper between levels to prevent sticking. The pastries gradually lose their crispy texture during storage as they absorb moisture from the air and filling.
For best results, store Love Letter Pastries unfrosted if you plan to keep them overnight. Add the final powdered sugar dusting just before serving for freshest appearance. Sugar applied too far in advance can dissolve into the pastry or blow away when the container is opened.
Reheating Methods
Restore crispness to stored Love Letter Pastries by reheating briefly in a moderate oven. Preheat your oven to 350 degrees Fahrenheit. Place pastries on a baking sheet and warm for five to seven minutes until heated through and the exterior crisps slightly. Don’t overheat, as this can dry out the pastries.
Avoid microwaving Love Letter Pastries, as this creates soggy, rubbery texture that’s quite unpleasant. The microwave heats from the inside out, steaming the pastry rather than crisping it. If you must use a microwave for convenience, heat in very short bursts and accept that texture won’t match oven-refreshed pastries.
Make-Ahead Strategy
You can assemble Love Letter Pastries completely several hours before baking, then refrigerate them until ready to cook. Cover the assembled pastries loosely with plastic wrap to prevent drying. When ready to bake, brush with butter and dust with sugar, then bake directly from cold. Add a few extra minutes to the baking time to compensate for the cold start.
Unbaked assembled pastries can also be frozen for up to one month. Arrange them on a baking sheet and freeze until solid, then transfer to freezer bags. Bake directly from frozen, adding three to five extra minutes to the cooking time. This make-ahead option allows you to have fresh Love Letter Pastries any time with minimal effort.
Frequently Asked Questions
These common questions about Love Letter Pastries help address concerns and provide additional guidance for achieving perfect results with this charming recipe.
Can I Use Homemade Puff Pastry?
Absolutely, homemade puff pastry creates exceptional Love Letter Pastries with unmatched flavor and texture. However, making puff pastry from scratch requires significant time, skill, and patience. Most home bakers find store-bought options perfectly acceptable and much more practical for this recipe.
If you do make homemade puff pastry, ensure you complete all the turns properly and allow adequate resting time between folds. Roll it to approximately one-eighth inch thickness before cutting squares. The process and baking instructions remain the same as using store-bought pastry for these Love Letter Pastries.
What If My Pastry Doesn’t Puff?
Several factors can prevent proper puffing in your Love Letter Pastries. Most commonly, the pastry was too warm when it entered the oven, causing the butter to melt before steam could form. The pastry needs to be cool so the butter remains solid initially, then melts and creates steam during baking.
Insufficient oven temperature also prevents puffing. Verify your oven reaches the correct temperature using a thermometer. Finally, old puff pastry that’s been frozen too long may lose its ability to puff properly. Check expiration dates and use pastry within recommended timeframes for best results with your Love Letter Pastries.
How Do I Prevent Burnt Bottoms?
Burnt bottoms on Love Letter Pastries typically indicate oven temperature is too high or the pastries are positioned too low in the oven. Use the middle or upper-middle rack position. If your oven tends to burn bottoms regardless of rack position, place a second baking sheet underneath your pastry sheet for insulation.
Dark-colored baking sheets absorb more heat than light-colored ones and can contribute to burnt bottoms. Use light-colored aluminum baking sheets for most even results. Parchment paper also provides slight insulation that protects bottoms while allowing proper browning.
Can I Make Mini Versions?
Mini Love Letter Pastries make adorable party treats or elegant afternoon tea accompaniments. Cut your puff pastry into smaller squares, approximately two to three inches. Use less filling, about half a teaspoon per pastry. The smaller size requires reduced baking time, typically ten to twelve minutes until golden and puffed.
Mini pastries cool faster than full-sized versions, so watch timing carefully. They’re perfect for serving large groups, as people can enjoy several without feeling overly full. The smaller size also makes them ideal for gift boxes or party favors that showcase your baking skills.
Final Thoughts
These Love Letter Pastries represent the perfect combination of romantic presentation, delicious flavor, and achievable technique that makes them ideal for expressing affection through baking. The charming envelope shape with heart decoration communicates love and thoughtfulness, while the flaky pastry and sweet jam filling deliver satisfying taste that lives up to the beautiful appearance. Whether you’re celebrating Valentine’s Day, anniversaries, or simply want to brighten someone’s day, these Love Letter Pastries create memorable moments.
The simplicity of this recipe makes it accessible even for novice bakers, while the elegant results impress everyone who sees and tastes these pastries. Using store-bought puff pastry eliminates intimidating dough preparation while still producing bakery-quality treats. The customizable filling options allow you to tailor the Love Letter Pastries to personal preferences or seasonal availability.
Don’t hesitate to make these Love Letter Pastries your go-to recipe for showing affection through homemade treats. Baking from scratch demonstrates care and effort that store-bought gifts simply cannot match. Share these charming pastries with family, friends, or romantic partners, creating sweet memories around your table while enjoying buttery, flaky treats that taste as good as they look. Gather your ingredients today and discover how easy it is to spread love one delicious pastry at a time with these delightful Love Letter Pastries.
If you’ve given this recipe a try and it won you over, please share your thoughts by leaving a rating and comment below! If you have any questions about this recipe, don’t hesitate to ask – I’m here to help and will respond promptly.
To see more recipes and behind-the-scenes, follow along on Youtube,Instagram&Tiktok!

Watch the recipe video for more clarity

People also like our these recipes:
- 1 puff pastry sheet thawed
- 6 tbsp strawberry jam or any kind of jam
- 3 tbsp melted butter
- Powdered sugar for dusting
Thaw the puff pastry according to the package instructions and then cut it into equal squares. Flip each square to form a diamond shape.
Add a dollop of jam to the center of each pastry square. Then, fold the sides over the jam and fold the bottom up to create a letter-like shape.
For an extra touch of love, use a mini heart cookie cutter to cut out hearts from additional puff pastry scraps. Place one heart in the middle of each pastry.
Arrange the prepared pastries on a lined baking sheet.
Brush with melted butter and top with powdered sugar
Bake the pastries in a preheated oven until they are golden brown and flaky.
inally, sprinkle the Love Letter Pastries with a dusting of icing sugar before serving. Voila! You're ready to enjoy these sweet and romantic treats with your loved ones.
If you've given this recipe a try and it won you over, please share your thoughts by leaving
a rating and comment below! If you have any questions about this recipe, don't hesitate to ask – I'm here to
help and will respond promptly.