Discover the Magic of Volcano Cheesecake Bombs
If you’re a fan of cheesecake and crave bite-sized treats, Volcano Cheesecake Bombs are your new best friend. These decadent desserts combine a creamy cheesecake filling with a crisp, golden exterior for an indulgent experience in every bite. Perfect for parties, quick desserts, or an anytime treat, Volcano Cheesecake Bombs are as fun to make as they are to eat.
The beauty of Volcano Cheesecake Bombs lies in their versatility and crowd-pleasing appeal. Whether you’re hosting a dinner party, looking for a unique dessert to bring to a potluck, or simply treating yourself to something special, these bombs deliver on every front. The combination of textures and flavors creates an unforgettable dessert experience that will have everyone asking for the recipe.
Why This Recipe is Special
What sets Volcano Cheesecake Bombs apart from traditional cheesecake is the innovative format and cooking method. Instead of baking a large cheesecake that requires hours of cooling time, these individual portions are ready much faster. The creamy filling features classic cheesecake ingredients like cream cheese, sour cream, and vanilla, while the exterior provides a satisfying crunch.
The recipe is incredibly forgiving for beginners while still offering enough sophistication to impress experienced bakers. The ingredient list is straightforward, with items you likely already have in your pantry. The process itself is therapeutic and fun, making Volcano Cheesecake Bombs an excellent choice for baking with family or friends.
Why They Are Called Volcano Cheesecake Bombs
These Volcano Cheesecake Bombs earn their name from the dramatic explosion of flavor and texture with every bite. Much like a volcano erupts with molten lava, Volcano Cheesecake Bombs feature a creamy, tangy cheesecake center that oozes out when you break into the crispy golden shell. The crackling exterior mimics the crust of cooled lava, while the warm, gooey filling mirrors the molten core.
It’s a dessert that’s as thrilling to eat as it is to name, with every bite offering a dynamic contrast of textures and flavors that erupts in your mouth. The visual appeal when you cut into them is equally impressive, as the creamy filling flows out like lava from an active volcano. This dramatic presentation makes them perfect for social media photos and special occasions.

Understanding the Components of Volcano Cheesecake Bombs
Creating perfect Volcano Cheesecake Bombs requires understanding the two main components: the filling and the coating. Each element plays a crucial role in achieving the signature texture and taste. The filling must be creamy enough to flow slightly when warm but firm enough to hold its shape during preparation.
The exterior coating provides structural integrity and textural contrast. Graham cracker crumbs or digestive biscuits create the base for the outer layer, which becomes golden and crispy during cooking. This combination ensures that every bite of your Volcano Cheesecake Bombs delivers both comfort and excitement.
The Cheesecake Filling Foundation
The filling for Volcano Cheesecake Bombs starts with high-quality cream cheese at room temperature. This ensures smooth blending without lumps. Sour cream or Greek yogurt adds tanginess and helps achieve the perfect consistency. The balance between richness and tang is what makes this recipe special.
Powdered sugar dissolves more easily than granulated sugar in the filling, creating a silky smooth texture. Vanilla extract enhances the overall flavor profile without overpowering the cheesecake taste. These carefully selected ingredients work together to create a filling that’s neither too dense nor too runny.
The Crispy Outer Shell
The exterior of Volcano Cheesecake Bombs relies on graham cracker crumbs or digestive biscuits mixed with melted butter. This creates a coating that adheres well and crisps up beautifully. The ratio of crumbs to butter is critical for achieving the right consistency.
Adding a small amount of granulated sugar to the coating mixture enhances browning and adds a subtle sweetness. The coating should be thick enough to provide protection during cooking but not so thick that it overwhelms the creamy center. This balance is key to perfecting your Volcano Cheesecake Bombs.

Choosing the Right Ingredients for Volcano Cheesecake Bombs
Ingredient quality directly impacts the final result of your Volcano Cheesecake Bombs. While the recipe is forgiving, using fresh, high-quality ingredients elevates the dessert from good to exceptional. Let’s explore each ingredient and why it matters.
Cream Cheese Selection
Full-fat cream cheese is essential for authentic Volcano Cheesecake Bombs. Low-fat or fat-free versions lack the richness and body needed for proper texture. Always bring cream cheese to room temperature before using, as cold cream cheese creates lumps that are difficult to eliminate.
Brand matters less than freshness and fat content. Store-brand cream cheese works perfectly well if it’s fresh. Check the expiration date and ensure the package isn’t damaged. Room temperature cream cheese should be soft enough to press your finger into easily but not warm or melty.
Sour Cream Versus Greek Yogurt
Both sour cream and Greek yogurt work beautifully in Volcano Cheesecake Bombs, though they produce slightly different results. Sour cream creates a richer, tangier filling with a slightly looser consistency. Greek yogurt offers a lighter option with more protein and a fresher taste.
For traditional Volcano Cheesecake Bombs, full-fat sour cream is recommended. If using Greek yogurt, choose whole milk varieties rather than low-fat options. The fat content ensures proper texture and prevents the filling from becoming grainy or separated during preparation.
Graham Crackers and Digestive Biscuits
Graham cracker crumbs are the classic American choice for Volcano Cheesecake Bombs, providing a honey-sweet flavor. Digestive biscuits offer a slightly more neutral, wheaty taste popular in European desserts. Both work equally well, so choose based on availability and preference.
Making your own crumbs ensures freshness and allows you to control the texture. Process whole crackers or biscuits in a food blender until finely ground but not powdery. Store-bought crumbs are convenient but check for freshness, as stale crumbs negatively impact the final taste of your Volcano Cheesecake Bombs.
Fresh Strawberry Enhancement
Fresh strawberries transform basic Volcano Cheesecake Bombs into something extraordinary. The fruit adds natural sweetness, vibrant color, and a burst of freshness that cuts through the richness. Choose firm, bright red strawberries without soft spots or mold.
Wash strawberries gently and pat completely dry before use. Excess moisture can make the filling too loose. Hull the strawberries and dice them into small pieces for even distribution. The strawberry component is optional but highly recommended for elevated Volcano Cheesecake Bombs.

Step-by-Step Instructions for Perfect Volcano Cheesecake Bombs
Creating Volcano Cheesecake Bombs involves several stages, each contributing to the final masterpiece. Follow these detailed instructions carefully for best results. Preparation is key, so have all ingredients measured and ready before beginning.
Preparation Phase
Start by bringing cream cheese and sour cream to room temperature, which takes about 30 minutes. Meanwhile, prepare your graham cracker crumbs by processing whole crackers until fine. Measure all ingredients accurately, as baking requires precision for consistent results.
Line a baking sheet with parchment paper and set aside. This prevents sticking and makes cleanup easier. If using fresh strawberries, wash, dry, hull, and dice them now. Set up your work station with all ingredients within easy reach to streamline the process of making Volcano Cheesecake Bombs.
Making the Cheesecake Filling
Beat room-temperature cream cheese in a large bowl until smooth and creamy with no lumps. Add powdered sugar and beat until fully incorporated. The mixture should be light and fluffy. Scrape down the sides of the bowl frequently to ensure even mixing.
Add sour cream or Greek yogurt and vanilla extract, beating until smooth. If including fresh strawberries, fold them in gently with a spatula. The filling should be thick enough to hold its shape but still creamy. Refrigerate the mixture for 15 minutes to make it easier to handle when forming your Volcano Cheesecake Bombs.
Forming the Bombs
Scoop about two tablespoons of chilled filling and quickly roll it into a ball between your palms. Work quickly, as the warmth of your hands can soften the mixture. Place each ball on the prepared baking sheet, spacing them about two inches apart.
Once all filling is shaped, freeze the balls for 30 minutes until firm. This crucial step ensures the Volcano Cheesecake Bombs hold their shape during coating and cooking. Don’t skip this freezing step, as soft filling will be impossible to coat properly.
Creating the Coating Mixture
Combine graham cracker crumbs with melted unsalted butter and granulated sugar in a shallow bowl. Mix thoroughly until the mixture resembles wet sand. The butter should coat all the crumbs evenly for consistent browning during cooking.
Set up a coating station with the crumb mixture, beaten eggs in a separate bowl, and a clean plate for finished Volcano Cheesecake Bombs. This assembly-line approach makes the coating process efficient and less messy. Have your lined baking sheet ready for the coated bombs.
Coating Process
Remove frozen filling balls from the freezer one at a time to prevent softening. Dip each ball first in beaten egg, allowing excess to drip off. Then roll thoroughly in the crumb mixture, pressing gently to ensure even coverage.
Place coated Volcano Cheesecake Bombs back on the baking sheet. For extra crispy results, repeat the egg and crumb coating process for a double layer. Freeze coated bombs for another 15 minutes before cooking to ensure the coating adheres properly.
Cooking Methods
Volcano Cheesecake Bombs can be deep-fried, air-fried, or baked depending on your preference and equipment. Deep-frying creates the crispiest exterior and takes only 2-3 minutes in oil heated to 350 degrees Fahrenheit. Air-frying at 375 degrees for 8-10 minutes offers a healthier alternative with excellent results.
Baking at 375 degrees for 15-18 minutes produces a slightly less crispy but still delicious exterior. Whichever method you choose, cook until the coating is golden brown. Let the bombs rest for 5 minutes before serving, allowing the filling to set slightly while remaining warm and creamy inside.
Professional Tips for Outstanding Volcano Cheesecake Bombs
These expert techniques will elevate your Volcano Cheesecake Bombs from homemade treats to bakery-quality desserts. Small details make significant differences in both appearance and taste. Implement these tips for impressive results every time.
Temperature Control
Maintaining proper temperatures throughout the process is crucial for successful Volcano Cheesecake Bombs. Room-temperature dairy blends smoothly without lumps, while freezing the formed balls prevents coating disasters. If the filling becomes too soft at any stage, return it to the freezer briefly.
When deep-frying, use a thermometer to monitor oil temperature accurately. Too cool, and the coating absorbs excess oil. Too hot, and the exterior burns before the inside warms. Consistent temperature ensures evenly cooked, perfectly golden Volcano Cheesecake Bombs.
Achieving Perfect Texture
The ideal texture for Volcano Cheesecake Bombs features a crispy, crackling exterior giving way to a creamy, slightly warm center. Avoid overmixing the filling, which incorporates excess air and creates a fluffy rather than dense texture. Mix just until ingredients combine smoothly.
For the crispiest coating, ensure crumbs are fine and evenly sized. Large pieces create an uneven texture, while powdery crumbs don’t provide enough crunch. Press the coating firmly onto each ball, eliminating gaps where steam could escape and make the coating soggy.
Presentation Techniques
Serve Volcano Cheesecake Bombs on individual plates with garnishes that enhance visual appeal. A dusting of powdered sugar adds elegance, while fresh strawberry slices and mint leaves provide color contrast. Drizzle with strawberry sauce or chocolate for extra indulgence.
For parties, arrange bombs on a tiered serving platter with decorative doilies. Provide small dessert forks or skewers for easy eating. The dramatic name deserves equally impressive presentation, so take time to plate your Volcano Cheesecake Bombs attractively.
Make-Ahead Strategies
Prepare Volcano Cheesecake Bombs up to one day ahead for stress-free entertaining. Form and coat the balls completely, then freeze them on a baking sheet. Once solid, transfer to an airtight container with parchment paper between layers.
Cook from frozen, adding 2-3 minutes to the cooking time. This make-ahead approach actually improves results, as thoroughly frozen bombs maintain their shape better during cooking. Your Volcano Cheesecake Bombs will taste just as fresh as if made the same day.
Common Mistakes to Avoid with Volcano Cheesecake Bombs
Even experienced bakers encounter challenges when making Volcano Cheesecake Bombs for the first time. Understanding common pitfalls helps you avoid them and achieve perfect results. Learn from these typical mistakes to ensure success.
Skipping the Freezing Steps
The most common mistake is not freezing the filling balls long enough before coating. Soft filling is impossible to coat evenly and tends to lose its shape during cooking. Always freeze for the full recommended time, even if it seems unnecessary.
Similarly, neglecting to freeze coated Volcano Cheesecake Bombs before cooking leads to coating that slides off or filling that leaks out. These freezing steps are not optional shortcuts but essential parts of the process for structurally sound bombs.
Incorrect Coating Thickness
Too much coating creates a thick shell that overwhelms the filling and may not cook through properly. Too little coating leads to cracks where filling escapes during cooking. Aim for an even coating about one-quarter inch thick all around.
Press the crumb mixture gently but firmly onto each ball, ensuring complete coverage without bare spots. Check each Volcano Cheesecake Bomb carefully before cooking and patch any thin areas with additional coating pressed on gently.
Improper Oil Temperature
When deep-frying Volcano Cheesecake Bombs, incorrect oil temperature causes the most problems. Too-cool oil results in greasy, soggy bombs that absorb excess oil. Too-hot oil burns the exterior before the filling warms, leaving you with a cold center and bitter coating.
Invest in a cooking thermometer and maintain oil temperature between 350-375 degrees Fahrenheit. Fry only a few bombs at a time, as adding too many at once drops the temperature significantly. Allow oil to return to proper temperature between batches.
Overcrowding During Cooking
Whether baking, air-frying, or deep-frying, overcrowding prevents proper heat circulation and even cooking. Leave adequate space between each Volcano Cheesecake Bomb for air or oil to circulate freely. Overlapping or touching bombs cook unevenly and may stick together.
Cook in batches if necessary rather than cramming everything in at once. Properly spaced bombs develop evenly golden exteriors and warm through consistently. Patience during this stage rewards you with superior Volcano Cheesecake Bombs.
Delicious Variations to Try
Once you’ve mastered basic Volcano Cheesecake Bombs, experiment with creative variations to keep this dessert exciting. These modifications maintain the core concept while introducing new flavors and textures. Try different combinations to find your favorite version.
Flavor Additions to the Filling
Enhance your Volcano Cheesecake Bombs with flavor extracts like almond, lemon, or orange. Add one teaspoon of extract to the basic filling recipe, adjusting to taste. Citrus zest adds bright flavor without extra moisture that might affect texture.
Fold mini chocolate chips, crushed cookies, or chopped nuts into the filling for added interest. Keep additions small and finely chopped so they don’t interfere with the smooth, creamy texture that makes Volcano Cheesecake Bombs special.
Alternative Coating Options
Replace graham crackers with vanilla wafer cookies, chocolate graham crackers, or gingersnaps for different flavor profiles. Each type of cookie creates a unique variation while maintaining the essential crispy exterior of Volcano Cheesecake Bombs.
Mix crushed freeze-dried strawberries or raspberries into the coating for fruity flavor and pink color. Add cocoa powder to the crumb mixture for chocolate lovers. These variations allow you to customize while keeping the basic technique the same.
Sauce and Topping Combinations
Serve Volcano Cheesecake Bombs with various sauces for different flavor experiences. Classic strawberry sauce complements the cheesecake beautifully, while chocolate ganache appeals to chocolate lovers. Caramel sauce adds rich sweetness, and berry compote provides fruity brightness.
Whipped cream, fresh berries, or vanilla ice cream make excellent accompaniments. Try a drizzle of balsamic reduction for sophisticated flavor, or keep it simple with powdered sugar. These additions transform your Volcano Cheesecake Bombs into restaurant-worthy plated desserts.
Seasonal Adaptations
Create holiday versions of Volcano Cheesecake Bombs with seasonal ingredients. Add pumpkin puree and spices for fall, peppermint extract for winter, or lemon and lavender for spring. Summer versions can feature fresh berries or tropical fruits.
Match coating flavors to the season as well. Gingersnap coatings work wonderfully for autumn, while coconut flakes add tropical flair. These seasonal variations keep Volcano Cheesecake Bombs fresh and exciting throughout the year.
Storage and Reheating Guidelines
Proper storage extends the enjoyment of your Volcano Cheesecake Bombs and maintains quality. While best enjoyed fresh, these treats can be stored and reheated successfully with the right techniques. Follow these guidelines for optimal results.
Short-Term Storage
Store leftover Volcano Cheesecake Bombs in an airtight container in the refrigerator for up to three days. Place parchment paper between layers to prevent sticking. The coating will soften slightly in the refrigerator, but reheating restores some crispness.
Bring refrigerated bombs to room temperature for 10 minutes before reheating for more even warming. Never store warm bombs, as condensation creates sogginess. Allow them to cool completely before refrigerating to maintain the best possible texture.
Freezing for Long-Term Storage
Freeze uncooked Volcano Cheesecake Bombs for up to three months in an airtight container with parchment between layers. Label with the date and cooking instructions. Cook directly from frozen, adding 2-3 minutes to the cooking time.
Cooked bombs can also be frozen, though the coating texture suffers slightly upon reheating. Wrap individually in plastic wrap, then place in a freezer bag. Thaw in the refrigerator overnight before reheating for best results with your Volcano Cheesecake Bombs.
Reheating Methods
Reheat refrigerated Volcano Cheesecake Bombs in a 350-degree oven for 5-7 minutes until warmed through and the coating crisps slightly. An air fryer works excellently for reheating, requiring only 3-4 minutes at 350 degrees.
Avoid microwaving, as it makes the coating soggy and heats unevenly. If you must use a microwave, do so in short 10-second bursts on medium power, checking frequently. The oven or air fryer method produces far superior results for reheated Volcano Cheesecake Bombs.
Frequently Asked Questions About Volcano Cheesecake Bombs
These common questions address concerns and curiosities about making and enjoying Volcano Cheesecake Bombs. Understanding these details helps you achieve perfect results and troubleshoot any issues that arise.
Can I Make Volcano Cheesecake Bombs Without Eggs?
Yes, you can make egg-free Volcano Cheesecake Bombs by substituting the egg wash with milk or cream for the coating process. The coating won’t adhere quite as well, but still works adequately. Some bakers use a mixture of flour and water as an egg-free binding agent.
Aquafaba, the liquid from canned chickpeas, works as an excellent egg substitute for coating. It provides similar binding properties without altering the flavor. Whisk aquafaba until slightly frothy before using just as you would beaten eggs for coating your bombs.
Why Did My Filling Leak Out?
Filling leaks from Volcano Cheesecake Bombs when they aren’t frozen adequately before cooking or when the coating has gaps. Ensure thorough freezing at both stages and check coating coverage carefully. Small cracks in the coating allow filling to escape during the temperature change of cooking.
Overfilling the balls also causes leaking, as too much filling puts pressure on the coating. Stick to the recommended two tablespoons per bomb. If leaking occurs, the filling is still delicious, even if presentation suffers. Learn from the experience for your next batch.
What’s the Best Way to Serve Volcano Cheesecake Bombs?
Serve Volcano Cheesecake Bombs warm for the best textural contrast between the crispy exterior and creamy interior. Wait about 5 minutes after cooking before serving, as they’re extremely hot immediately after cooking and the filling needs time to set slightly.
Plate individually for elegant presentation, or arrange on a serving platter for casual gatherings. Provide small plates and forks, as these treats can be messy to eat. The dramatic presentation of cutting into Volcano Cheesecake Bombs and revealing the creamy center is half the fun.
Can I Use Low-Fat Ingredients?
While you can use low-fat cream cheese and sour cream in Volcano Cheesecake Bombs, the results differ significantly from the full-fat version. Low-fat dairy products create a less rich, more crumbly filling that doesn’t achieve the signature creamy texture.
Fat-free options are not recommended, as they lack the body needed for proper structure. If you must reduce fat content, use reduced-fat rather than fat-free products and accept that your Volcano Cheesecake Bombs will have a lighter, less indulgent texture.
How Far Ahead Can I Prepare These?
You can prepare Volcano Cheesecake Bombs completely up to 24 hours before cooking and store them frozen. For longer storage, freeze uncooked bombs for up to three months. This make-ahead flexibility makes them perfect for entertaining.
The filling can be prepared up to two days ahead and kept refrigerated until you’re ready to form and coat the bombs. Formed but uncoated balls can be frozen for up to one week. Complete coating closer to cooking time for the crispiest results.
Are Volcano Cheesecake Bombs Difficult for Beginners?
Volcano Cheesecake Bombs are surprisingly beginner-friendly despite seeming complex. The recipe requires no special skills, just patience and attention to detail. Following instructions carefully ensures success even for novice bakers.
The most challenging aspect is maintaining proper temperatures and not rushing the freezing steps. If you can mix ingredients and roll balls, you can make beautiful Volcano Cheesecake Bombs. Start with a small batch to build confidence before making larger quantities.
Final Thoughts on Volcano Cheesecake Bombs
Creating Volcano Cheesecake Bombs at home is a rewarding experience that results in an impressive, delicious dessert. The combination of crispy coating and creamy cheesecake filling makes every bite special. Whether you’re an experienced baker or just starting out, this recipe offers satisfaction and flexibility.
The beauty of Volcano Cheesecake Bombs lies in their versatility and crowd appeal. Customize them with different flavors, serve them with various sauces, or keep them classic and simple. However you choose to make them, these bombs deliver on taste, texture, and presentation.
Don’t be intimidated by the multiple steps involved in creating Volcano Cheesecake Bombs. Each stage is straightforward, and the process becomes easier with practice. The joy on people’s faces when they bite into these treats makes every moment of preparation worthwhile.
Gather your ingredients, clear your schedule for an afternoon of baking, and create your own batch of Volcano Cheesecake Bombs. Share them with family and friends, or keep them all to yourself. Either way, you’re in for a delightful treat that combines the best of cheesecake with innovative presentation and texture.
If you’ve given this recipe a try and it won you over, please share your thoughts by leaving a rating and comment below! If you have any questions about this recipe, don’t hesitate to ask – I’m here to help and will respond promptly.
To see more recipes and behind-the-scenes, follow along on Youtube,Instagram&Tiktok!
Watch the recipe video for more clarity!
See our similar recipes:
People also like our these recipes:
FOR THE CHEESECAKE FILLING
- 300 g cream cheese (room temperature)
- 100 g granulated sugar
- 1 tsp vanilla extract
- 1 egg
- 50 g sour cream
FOR THE MOLTEN LAVA FILLING
- 150 g fresh strawberries (blended into a purée)
- 50 g granulated sugar
- 1 tsp cornstarch (dissolved in 2 tsp water)
- 1 tbsp lemon juice
FOR THE GOLDEN CRUST
- 200 g digestive biscuits (crushed into crumbs)
- 80 g unsalted butter (melted)
- 20 g powdered sugar
Prepare the Cheesecake Filling:
Preheat your oven to 160°C (320°F).
Beat cream cheese, sugar, and vanilla extract until smooth.
Add the egg and sour cream; mix until fully combined.
Pour the mixture into silicone half-sphere molds (about 4 cm diameter). Leave space for the molten filling.
Make the Molten Lava Filling:
Combine strawberry purée, sugar, lemon juice, and dissolved cornstarch in a saucepan.
Cook on medium heat until thick and glossy. Allow to cool slightly, then spoon into the cheesecake molds.
Assemble the Cheesecake Bombs:
Cover the filling with more cheesecake mixture to seal the bombs.
Bake for 15-18 minutes or until set. Let cool completely.
Create the Crust:
Mix the crushed biscuits, melted butter, and powdered sugar.
Coat each cheesecake bomb with the crust mixture and freeze for 1 hour.
Bake the Bombs:
Preheat your oven to 180°C (356°F). Bake the bombs until the crust turns golden, about 8-10 minutes.
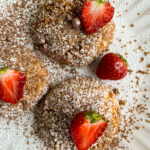
Dust with powdered sugar and add edible gold flakes. Slice open to reveal the molten strawberry center and enjoy the viral-worthy eruption!
If you've given this recipe a try and it won you over, please share your thoughts by leaving
a rating and comment below! If you have any questions about this recipe, don't hesitate to ask – I'm here to
help and will respond promptly.