Discover Delicious Fried Shrimp Balls
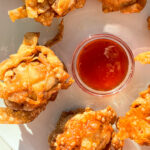
Here are our delicious Fried Shrimp Balls, a popular Chinese appetizer often featured on dim sum menus that brings restaurant-quality flavor to your home kitchen! Each bite reveals an irresistible contrast: a filling of soft and tender shrimp wrapped in crispy egg roll wrapper strips, fried to absolute perfection. Get ready to enjoy the incredible combination of flavors and textures in every mouthful of these addictive little parcels that disappear as quickly as you can make them.
These Fried Shrimp Balls are a much-loved dim sum classic, packed with authentic flavor that transports you straight to your favorite Chinese restaurant. The combination of succulent shrimp seasoned with garlic, soy sauce, oyster sauce, and sesame oil creates savory depth that makes these impossible to stop eating. The crispy coating provides satisfying crunch that gives way to tender, flavorful shrimp filling with perfect textural contrast. Serve with sweet chili sauce to recreate the authentic Chinese dim sum experience in your own kitchen.
What makes these Fried Shrimp Balls truly special is their versatility and crowd appeal. They work equally well as elegant appetizers for dinner parties, game day snacks, or as part of a larger dim sum spread. The preparation is surprisingly simple despite the impressive presentation and complex flavors. With proper technique and quality ingredients, you’ll create Fried Shrimp Balls that rival or surpass anything from a restaurant, all while controlling ingredients and customizing flavors to your preferences.
Why This Fried Shrimp Balls Recipe Works
This recipe delivers authentic Fried Shrimp Balls with restaurant-quality results through several key techniques. First, the shrimp mixture is properly seasoned and bound with cornstarch, creating cohesive filling that holds together during frying while remaining tender inside. The chilling period allows flavors to meld while making the mixture easier to shape into uniform balls.
The egg roll wrapper coating creates that signature crispy exterior that makes Fried Shrimp Balls so addictive. Cutting wrappers into thin strips and coating the shrimp balls before frying ensures complete coverage with maximum crunch. The high frying temperature creates immediate crust that seals in moisture, ensuring your shrimp stays juicy while the exterior becomes golden and crispy.
Key Ingredients Overview
Creating exceptional Fried Shrimp Balls starts with selecting quality ingredients that work together to deliver authentic flavor and ideal texture. Large shrimp provide the protein base that becomes sweet and tender when properly prepared. Fresh garlic adds pungent, aromatic depth that permeates the filling. Egg roll wrappers create the crispy coating that defines this dish.
Soy sauce contributes salty, umami richness while oyster sauce adds sweet-savory complexity characteristic of Cantonese cuisine. Sugar balances the savory elements and enhances natural shrimp sweetness. Sesame oil provides nutty, aromatic finishing note. Cornstarch binds the mixture and creates smooth texture. Each component in these Fried Shrimp Balls plays a specific role in creating the final delicious result.

Understanding Fried Shrimp Balls
Fried Shrimp Balls represent a beloved dim sum tradition with roots in Cantonese cuisine. Understanding the cultural context and technical requirements helps you appreciate why these little parcels are so popular and how to execute them successfully. The combination of tender seafood filling and crispy coating creates satisfying contrast that appeals across cultures.
The success of Fried Shrimp Balls depends on proper shrimp preparation, correct seasoning balance, effective coating technique, and precise frying temperature. When these elements align perfectly, you achieve shrimp balls that are crispy outside, tender inside, and bursting with flavor in every bite.
The Art of Shrimp Ball Making
Creating perfect Fried Shrimp Balls requires understanding shrimp preparation and binding. The shrimp must be finely minced but not turned into complete paste—you want some texture remaining for pleasant mouthfeel. Using a food processor makes this easy, but pulsing carefully prevents over-processing that creates gummy texture.
The cornstarch serves multiple crucial functions in Fried Shrimp Balls. It binds the minced shrimp together, absorbs excess moisture that would make balls fall apart, and creates smooth texture in the final filling. The proper ratio of shrimp to cornstarch ensures balls hold together during frying while remaining tender rather than rubbery or dense.
The Science of the Crispy Coating
The egg roll wrapper coating is what makes Fried Shrimp Balls so texturally interesting and visually appealing. Cutting wrappers into thin strips creates maximum surface area for crisping. When these strips adhere to the shrimp balls and hit hot oil, they immediately begin to crisp and brown, creating that signature shaggy, golden exterior.
The strips don’t completely cover every millimeter of the shrimp ball, which allows some steam to escape during frying. This prevents the interior from becoming waterlogged while ensuring the exterior achieves maximum crispiness. The result is Fried Shrimp Balls with perfect textural contrast between crunchy coating and tender filling.
Choosing the Right Ingredients
Every ingredient in your Fried Shrimp Balls plays a specific role in creating the final flavor and texture. Selecting quality components ensures the best possible results. Understanding why each ingredient matters helps you make informed choices and achieve consistent success.
The beauty of this recipe is that it uses accessible ingredients available at most grocery stores, though Asian markets offer wider selection and often better prices.
Shrimp Selection
For Fried Shrimp Balls, the size of shrimp matters less than freshness and quality. Large, jumbo, or even medium shrimp all work well since you’ll be mincing them. Fresh shrimp delivers best flavor, though properly thawed frozen shrimp produces excellent results and is often more practical.
Look for shrimp that smell clean and ocean-like, never fishy or ammonia-scented. They should be firm and translucent, not mushy or opaque. Peeled and deveined shrimp save time, though shell-on shrimp often have better flavor if you don’t mind the prep work. For authentic Fried Shrimp Balls, plan on about one pound of shrimp for 4 to 6 servings.
Egg Roll Wrapper Quality
Egg roll wrappers (also called spring roll wrappers) create the crispy coating for your Fried Shrimp Balls. Fresh wrappers from the refrigerated section work best, though frozen wrappers are acceptable if properly thawed. Look for thin, square wrappers approximately 7 to 8 inches per side.
Avoid wrappers that are dried out, cracked, or stuck together. Fresh wrappers should be pliable and slightly translucent. Store unused wrappers properly wrapped in plastic to prevent drying. The quality of wrappers directly impacts the crispiness and appearance of your Fried Shrimp Balls, so choose carefully.
Sauce Components
Soy sauce provides the salty, umami foundation for Fried Shrimp Balls seasoning. Use regular soy sauce rather than low-sodium, which lacks depth, or dark soy sauce, which is too strong. Chinese or Japanese soy sauce both work well—Chinese tends to be slightly saltier while Japanese is mellower.
Oyster sauce adds sweet-savory complexity that’s essential to authentic Cantonese flavor. Don’t substitute hoisin sauce, which tastes entirely different. Quality oyster sauce contains real oyster extract and has thick, rich consistency. Lee Kum Kee is a reliable, widely available brand that delivers consistent results in your Fried Shrimp Balls.
Aromatics and Seasonings
Fresh garlic is essential for Fried Shrimp Balls—don’t substitute garlic powder, which lacks the pungent brightness fresh garlic provides. Finely mince or grate the garlic so it distributes evenly throughout the shrimp mixture without creating chunks that burn during frying.
Toasted sesame oil adds distinctive nutty, aromatic character that completes the flavor profile. Use just a small amount as it’s very potent—too much overwhelms other flavors. Regular (light) sesame oil doesn’t provide the same toasted flavor, so seek out the dark, aromatic variety specifically for your Fried Shrimp Balls.

Step-by-Step Instructions for Perfect Fried Shrimp Balls
Creating exceptional Fried Shrimp Balls requires following specific steps in the correct order. While the process is straightforward, attention to detail ensures optimal results. Understanding the purpose of each step helps you execute the recipe confidently.
Organization is essential—prepare all ingredients before starting and have your workstation set up for efficient shaping and coating.
Preparing the Shrimp Mixture
Start by ensuring your shrimp are completely thawed if using frozen, and pat them thoroughly dry with paper towels. Excess moisture prevents proper binding and makes shaping difficult. Place dried shrimp in a food processor along with minced garlic, and pulse 8 to 10 times until shrimp are finely chopped but retain some texture. You want a consistency with small visible pieces, not a smooth paste.
Transfer minced shrimp mixture to a bowl and add soy sauce, oyster sauce, sugar, sesame oil, and cornstarch. Mix thoroughly using a spoon or your hands until all ingredients are evenly distributed and the mixture becomes slightly sticky. This sticky texture indicates proper binding that will hold your Fried Shrimp Balls together during frying. Taste the raw mixture and adjust seasoning if needed—it should taste well-seasoned and slightly salty.
Chilling the Mixture
Cover the shrimp mixture and refrigerate for at least 30 minutes, though 1 to 2 hours is even better. This chilling period serves multiple important purposes for your Fried Shrimp Balls. The cold temperature firms up the mixture, making it much easier to shape into uniform balls without sticking to your hands.
The chilling time also allows all flavors to meld and penetrate the shrimp, creating more complex, well-rounded taste. The cornstarch fully hydrates during this period, improving binding properties. Don’t skip this step—attempting to shape warm or room-temperature mixture results in sticky, difficult-to-handle balls that may fall apart during coating or frying.
Preparing the Wrapper Coating
While the shrimp mixture chills, prepare your egg roll wrapper coating. Stack 4 to 5 wrappers at a time and cut them into thin strips, approximately 1/4 inch wide. You can cut them into matchsticks or leave them in long strips—both work well for Fried Shrimp Balls. The key is creating thin strips that will crisp nicely when fried.
Separate the strips and spread them on a plate or tray so they’re ready for coating. Keep unused wrappers covered with a damp towel to prevent drying out. Prepare more strips than you think you’ll need—better to have extras than run short during assembly of your Fried Shrimp Balls.
Shaping and Coating
Remove the chilled shrimp mixture from the refrigerator. Wet your hands slightly to prevent sticking, then scoop about 1 tablespoon of mixture and roll it between your palms to form a smooth ball approximately 1 to 1.5 inches in diameter. Place formed balls on a plate as you work. For uniform Fried Shrimp Balls, try to make all balls the same size so they cook evenly.
Once all balls are formed, roll each one in the egg roll wrapper strips, pressing gently so the strips adhere to the surface. The strips should stick to the slightly tacky shrimp mixture. Don’t worry about complete, perfect coverage—the shaggy, uneven coating is part of the charm of Fried Shrimp Balls. The strips will expand and crisp during frying, creating that signature appearance.
Frying to Perfection
Heat 2 to 3 inches of neutral oil (vegetable, canola, or peanut oil) in a deep, heavy-bottomed pot or wok to 350°F (175°C). Use a thermometer to verify temperature—this is crucial for crispy Fried Shrimp Balls that aren’t greasy. If oil is too cool, balls absorb excess oil and become soggy. If too hot, the coating burns before shrimp cooks through.
Carefully lower 4 to 6 shrimp balls into the hot oil, working in batches to avoid overcrowding. Fry for 3 to 4 minutes, turning occasionally with a slotted spoon or spider strainer, until the coating is deep golden brown and crispy. The Fried Shrimp Balls should float and have beautiful golden color all over. Remove to a wire rack or paper towel-lined plate to drain. Let oil return to 350°F between batches for consistent results.

Professional Tips for Outstanding Results
Mastering Fried Shrimp Balls involves understanding subtle techniques that separate good from exceptional. These professional insights help you achieve dim sum restaurant-quality results at home every time you prepare this beloved appetizer.
Attention to small details makes a significant difference in the final quality, appearance, and flavor of your shrimp balls.
Achieving Perfect Texture
The texture of the shrimp filling makes or breaks Fried Shrimp Balls. You want tender, slightly bouncy filling with discernible shrimp pieces, not rubbery paste or mushy filling. The key is not over-processing the shrimp—pulse just until finely chopped with small visible pieces remaining.
Proper cornstarch ratio is also crucial. Too little and balls fall apart; too much and they become dense and gummy. The mixture should be sticky and cohesive but not so wet that it slides off your hands. If mixture seems too wet, add a bit more cornstarch. If too dry and crumbly, add a small splash of water or beaten egg white.
Maintaining Oil Temperature
Consistent oil temperature is perhaps the most critical factor for crispy Fried Shrimp Balls. Use a deep-fry or candy thermometer clipped to the pot to monitor temperature constantly. Between batches, allow oil to return to 350°F before adding more balls—this usually takes 1 to 2 minutes.
Adding too many balls at once dramatically lowers oil temperature, resulting in greasy, soggy coating. Patience with small batches produces superior results. Remove any loose wrapper strips floating in the oil between batches, as they burn and create bitter flavor that affects subsequent batches of Fried Shrimp Balls.
Uniform Sizing
Making all your Fried Shrimp Balls the same size ensures even cooking where all pieces finish simultaneously. Use a small cookie scoop or measuring spoon to portion mixture consistently. About 1 tablespoon of mixture per ball creates ideal appetizer-sized portions.
If some balls are significantly larger than others, they’ll need more cooking time, meaning smaller ones may overcook by the time large ones finish. Uniform sizing also creates more professional, attractive presentation that impresses guests when you serve your beautifully consistent Fried Shrimp Balls.
Preventing Sticking
Sometimes wrapper strips don’t want to stick to shrimp balls, creating frustration during coating. Several techniques improve adhesion for your Fried Shrimp Balls. First, ensure the shrimp mixture is slightly sticky from proper cornstarch binding. If it seems too dry, add a tiny bit of water.
Second, press wrapper strips gently but firmly onto balls rather than just rolling loosely. Third, if strips still won’t stick, very lightly brush balls with beaten egg white before rolling in strips. This acts as glue while adding protein that helps everything hold together during frying.
Common Mistakes to Avoid
Even straightforward recipes like Fried Shrimp Balls have potential pitfalls that can compromise your results. Understanding these common mistakes helps you avoid them and achieve perfect shrimp balls every time.
Learning what not to do is just as valuable as learning proper technique when mastering any new recipe.
Over-Processing the Shrimp
The most common mistake is over-processing shrimp into smooth paste rather than leaving some texture. When shrimp are ground too fine, the proteins break down excessively, creating dense, rubbery Fried Shrimp Balls with unpleasant, gummy texture instead of tender, slightly bouncy filling.
Pulse the food processor in short bursts, checking texture frequently. Stop when shrimp are finely chopped with small visible pieces still evident. If you accidentally over-process, it’s difficult to fix—prevention is key. Hand-chopping gives you more control though it takes longer to achieve fine, even consistency.
Skipping the Chilling Step
Attempting to shape Fried Shrimp Balls from warm or room-temperature mixture creates numerous problems. The mixture sticks to your hands excessively, making shaping difficult and frustrating. Balls don’t hold shape well and may fall apart during coating or frying. The flavors haven’t had time to meld properly, resulting in less complex taste.
Always refrigerate the mixture for at least 30 minutes, preferably 1 to 2 hours. This patience pays off dramatically in easier handling, better shape retention, and superior flavor in your finished Fried Shrimp Balls. You can even prepare the mixture a day ahead for maximum convenience.
Incorrect Oil Temperature
Frying at wrong temperature is disastrous for Fried Shrimp Balls. Oil that’s too cool (below 325°F) results in greasy, soggy shrimp balls that absorb excessive oil. They take longer to brown, giving more time for oil absorption. The coating never achieves proper crispiness.
Oil that’s too hot (above 375°F) burns the wrapper coating before the shrimp cooks through, creating bitter, charred exterior with raw interior. Use a thermometer religiously and adjust heat as needed to maintain 350°F throughout frying. Don’t guess—proper temperature is too important for successful Fried Shrimp Balls.
Overcrowding the Pot
Trying to fry too many Fried Shrimp Balls simultaneously lowers oil temperature dramatically, ruins coating texture, and makes even cooking impossible. Crowding also makes it difficult to turn balls for even browning. Each ball needs space around it for oil circulation and proper heat transfer.
Fry in small batches of 4 to 6 balls maximum, depending on pot size. Yes, this takes longer, but the superior results are worth the extra time. Guests will immediately notice the difference between properly fried, crispy Fried Shrimp Balls and greasy, soggy ones from overcrowding.
Not Drying the Shrimp
Failing to thoroughly dry shrimp before processing creates excess moisture that prevents proper binding and makes Fried Shrimp Balls fall apart. Wet shrimp also dilute seasonings, requiring more soy sauce and oyster sauce that make mixture too salty or create off-balanced flavor.
Pat shrimp completely dry with paper towels, then let them sit on fresh towels for a few minutes to ensure all surface moisture evaporates. This simple step dramatically improves binding, seasoning distribution, and final texture of your Fried Shrimp Balls.

Variations and Customizations
Once you’ve mastered basic Fried Shrimp Balls, exploring variations keeps the recipe exciting and allows personalization. These adaptations maintain the core technique while introducing new flavors or accommodating different preferences.
Experimenting with variations helps you understand the recipe’s flexibility and discover your perfect version.
Flavor Additions
Enhance basic Fried Shrimp Balls with additional aromatics and seasonings. Grated fresh ginger adds spicy, warming notes that complement shrimp beautifully. Finely minced green onions or scallions contribute fresh onion flavor and flecks of color. Diced water chestnuts provide pleasant crunch in the filling.
White pepper offers different heat profile than black pepper, more traditional in Chinese cuisine. A splash of Shaoxing rice wine adds depth and authentic flavor. Chopped cilantro mixed into the filling creates herbal brightness. These additions customize your Fried Shrimp Balls while maintaining their essential character.
Protein Combinations
While pure shrimp creates classic Fried Shrimp Balls, combining proteins produces interesting variations. Mix shrimp with minced pork (about 50/50 ratio) for richer, more substantial filling popular in many dim sum restaurants. The pork adds fattiness and depth that complements sweet shrimp.
Minced chicken creates lighter version with milder flavor. A small amount of minced bacon adds smoky richness. Even finely chopped crab meat works, creating luxurious seafood balls. These protein variations maintain the basic technique while offering different flavor experiences.
Coating Alternatives
Beyond traditional egg roll wrapper strips, other coatings create interesting textural variations for Fried Shrimp Balls. Coat balls in panko breadcrumbs for uniform golden crust with less shaggy appearance. Roll in crushed rice noodles before frying for extra-crispy, dramatic presentation.
Shredded phyllo dough creates delicate, flaky coating. Even crushed cornflakes work for American-Chinese fusion version. Traditional Cantonese restaurants sometimes coat shrimp balls in fine breadcrumbs mixed with sesame seeds. Experiment with different coatings to find your favorite Fried Shrimp Balls variation.
Dipping Sauce Options
While sweet chili sauce is traditional and delicious with Fried Shrimp Balls, other sauces create different flavor experiences. Spicy mayo (mayonnaise mixed with sriracha) offers creamy, tangy heat. Soy-ginger dipping sauce provides more authentic Chinese flavor profile.
Plum sauce contributes sweet-tart complexity. Thai peanut sauce creates fusion experience with nutty richness. Even simple soy sauce with a splash of rice vinegar works for purists. Offer multiple sauces so guests can choose their preferred pairing with your Fried Shrimp Balls.
Baked Version
For healthier Fried Shrimp Balls, try baking instead of deep-frying. Shape and coat as directed, then place on a wire rack over a baking sheet. Spray generously with cooking oil and bake at 400°F for 15 to 20 minutes, turning halfway, until golden brown and cooked through.
While not as crispy as fried, baked shrimp balls are still delicious and significantly lower in fat. The high oven temperature and oil spray create reasonable crispiness. This version works well for those watching calories or who prefer not to deep-fry at home.
Storage and Reheating
Proper storage extends the life of your Fried Shrimp Balls while maintaining quality. Understanding correct storage and reheating techniques prevents food waste and allows you to prepare components ahead for convenient entertaining.
Fried Shrimp Balls are best served fresh and hot, but both the mixture and cooked balls store reasonably well with proper handling.
Storing Uncooked Components
The shrimp mixture can be prepared up to 24 hours ahead and refrigerated in a covered container. This actually improves flavor as seasonings have more time to penetrate. Shape into balls up to 4 hours ahead, place on a parchment-lined tray without touching, cover with plastic wrap, and refrigerate until ready to coat and fry.
Don’t coat balls with wrapper strips more than 30 minutes before frying, as the strips may absorb moisture and become soggy. For best results with Fried Shrimp Balls, coat and fry right before serving. The ability to prep the mixture ahead makes this recipe more manageable for entertaining.
Storing Cooked Shrimp Balls
Allow leftover Fried Shrimp Balls to cool completely before storing, but don’t leave them at room temperature longer than 2 hours for food safety. Place in an airtight container with paper towels between layers to absorb excess oil. Refrigerate for up to 2 days.
The coating will lose significant crispiness during storage—this is unavoidable with fried foods. However, the flavor remains good and proper reheating can restore some crunch. Store any dipping sauces separately in covered containers. Fried Shrimp Balls are best enjoyed fresh but can be successfully stored if needed.
Reheating Methods
The oven method produces the best results when reheating Fried Shrimp Balls. Preheat oven to 375°F and place shrimp balls on a wire rack over a baking sheet. Bake for 8 to 10 minutes until heated through and coating re-crisps somewhat. This method won’t restore perfect original crispiness but comes close.
Air fryer reheating works excellently if you have one. Place Fried Shrimp Balls in the basket in a single layer and heat at 350°F for 5 to 7 minutes until hot and crispy. This method best restores the coating’s texture. Avoid microwaving, which makes the coating hopelessly soggy and rubbery.
Freezing Instructions
Fried Shrimp Balls freeze reasonably well for convenient future snacks. Freeze cooked, cooled shrimp balls on a parchment-lined tray until solid, then transfer to freezer bags. They keep for up to 2 months. Reheat from frozen in a 375°F oven for 12 to 15 minutes or in an air fryer for 8 to 10 minutes.
Alternatively, freeze uncooked shaped balls before coating. Freeze on a tray until solid, then store in bags. Thaw in refrigerator before coating and frying as directed. This approach yields fresher-tasting results since the coating and frying happen just before serving.
Frequently Asked Questions
These commonly asked questions address concerns and curiosities people have when preparing Fried Shrimp Balls. Understanding these details helps ensure success and builds confidence in the kitchen.
Can I use smaller or larger shrimp?
Absolutely! Any size shrimp works for Fried Shrimp Balls since you’ll be mincing them. Larger shrimp are sometimes easier to process to the right texture, while smaller shrimp may be more economical. The important factor is freshness and quality rather than size. Adjust cooking time slightly for significantly larger or smaller balls.
What if I don’t have a food processor?
You can finely mince shrimp by hand using a sharp knife and cutting board. Chop in multiple directions until shrimp are finely minced with small pieces remaining. This takes more time and effort than a food processor but works perfectly well. Some cooks actually prefer hand-chopping for better texture control in their Fried Shrimp Balls.
How do I know when they’re fully cooked?
Fried Shrimp Balls are done when the coating is deep golden brown all over and balls float in the oil. The internal temperature should reach 145°F for shrimp safety. Cut one open to check—the interior should be opaque white/pink throughout with no translucent areas. Cooking time is typically 3 to 4 minutes at proper temperature.
Can I make these gluten-free?
Yes! Use gluten-free wonton wrappers or rice paper instead of egg roll wrappers for the coating. Ensure your soy sauce is gluten-free (tamari works well). The rest of the ingredients are naturally gluten-free. These substitutions create delicious gluten-free Fried Shrimp Balls with similar texture and flavor.
What oil is best for frying?
Use neutral oils with high smoke points like vegetable, canola, or peanut oil. These oils can reach the 350°F needed for crispy Fried Shrimp Balls without burning or developing off-flavors. Avoid olive oil which has too low a smoke point and too strong a flavor. You’ll need 2 to 3 inches depth of oil for proper frying.
How many does this recipe make?
A standard recipe using 1 pound of shrimp typically yields 16 to 20 Fried Shrimp Balls, depending on size. This serves 4 to 6 people as an appetizer or part of a larger dim sum spread. The recipe easily doubles or triples for crowds. Each person usually eats 3 to 5 balls as an appetizer.
Final Thoughts
Fried Shrimp Balls represent the best of dim sum tradition—combining simple ingredients through proper technique to create something truly special. This recipe proves you don’t need to visit a restaurant to enjoy authentic Chinese appetizers. With basic kitchen equipment and accessible ingredients, you’ll create crispy, flavorful shrimp balls that impress everyone who tries them.
Whether you’re hosting a dim sum brunch, preparing appetizers for a party, or simply craving delicious Chinese food, these Fried Shrimp Balls deliver satisfaction on every level. The techniques you learn—proper shrimp preparation, binding, coating, and deep-frying—transfer to countless other recipes, building your skills and confidence in the kitchen. The customization options mean you can adapt this recipe to suit any taste preference or dietary need.
The beauty of Fried Shrimp Balls lies in their universal appeal and addictive quality. The contrast between crispy exterior and tender interior creates textural satisfaction while the savory seasoning delivers complex flavor in each bite. Serve them at your next gathering and watch them disappear faster than any other appetizer. The combination of impressive presentation and delicious taste makes people think you spent hours preparing, when actually the process is quite simple.
Don’t be intimidated by deep-frying if you haven’t done it before. With proper temperature control and attention to safety, frying is straightforward and produces results you simply cannot achieve through baking alone. The crispy coating and juicy interior of perfectly fried shrimp balls are worth mastering this technique. Make these Fried Shrimp Balls for your next celebration and discover why they’re a dim sum menu staple. Once you taste homemade shrimp balls done right, you’ll never settle for frozen or takeout versions again. This recipe delivers restaurant-quality results that make you proud to serve and thrilled to eat!