The Viral Dubai Chocolate Recipe Taking the World by Storm
If you’ve been scrolling through social media lately, you’ve definitely seen the Dubai chocolate recipe that has taken the internet by absolute storm. This luxurious confection combines velvety chocolate with crispy kadayif and rich pistachio cream, creating a texture and flavor experience unlike anything you’ve tasted before. What started as a regional Middle Eastern specialty has exploded into a worldwide phenomenon.
The Dubai chocolate recipe isn’t just another dessert trend. It represents the perfect marriage of traditional Middle Eastern ingredients with modern chocolate-making techniques. Every bite delivers a satisfying crunch from golden-baked phyllo strands, creamy richness from pistachio filling, and smooth decadence from premium chocolate. The combination has captured hearts and taste buds across continents.
Making this Dubai chocolate recipe at home is surprisingly achievable. You don’t need professional pastry skills or specialized equipment. With quality ingredients and careful attention to technique, you can create the same viral sensation that has millions of people obsessed. This guide walks you through every step, ensuring your homemade version rivals the expensive imported varieties.
Why This Recipe is Special
What sets this Dubai chocolate recipe apart from regular chocolate bars is the incredible textural contrast. The crispy kadayif provides a delicate crunch that shatters beautifully against your teeth. The pistachio cream adds luxurious smoothness and nutty depth. The chocolate shell brings everything together with its glossy, snappy exterior and melting quality.
The flavor profile of this Dubai chocolate recipe reflects centuries of Middle Eastern culinary tradition. Pistachios have been treasured in the region for millennia, prized for their distinctive taste and vibrant green color. Kadayif, the shredded phyllo dough, adds an authentic touch that connects this modern treat to traditional desserts like kunafa and baklava.
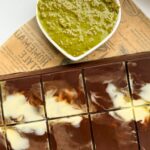
Another reason this Dubai chocolate recipe has gone viral is its stunning visual appeal. The contrast between dark chocolate exterior and bright green pistachio filling creates an Instagram-worthy cross-section. Optional decorations like white chocolate drizzle or edible gold flakes elevate the presentation to luxury gift status. People love sharing photos of their creations online.
Key Ingredients Overview
The Dubai chocolate recipe relies on just a handful of premium ingredients working in perfect harmony. High-quality chocolate forms the foundation, whether you prefer dark chocolate’s sophisticated bitterness or milk chocolate’s creamy sweetness. The chocolate quality directly impacts your final results, so choose the best you can afford.
Kadayif, also called kataifi, is shredded phyllo dough that looks like fine noodles. This ingredient gives the Dubai chocolate recipe its signature crunch. You’ll toast the kadayif with butter until golden and crispy, creating a texture that stays crunchy even when enrobed in chocolate. Find kadayif at Middle Eastern grocery stores or online.
Pistachio cream is the heart of this Dubai chocolate recipe’s flavor profile. This smooth, spreadable paste captures the essence of pistachios in concentrated form. While you can make pistachio cream from scratch by grinding pistachios with a little oil, purchasing pre-made pistachio spread simplifies the process without sacrificing quality.

Understanding the Viral Phenomenon
The Dubai chocolate recipe first gained attention through luxury chocolate shops in the UAE that sold handcrafted bars for premium prices. These exclusive treats featured unique flavor combinations that weren’t available anywhere else. As travelers visited Dubai and discovered these chocolates, word spread about their extraordinary quality.
Social media transformed this Dubai chocolate recipe from regional specialty to global obsession. Food influencers began posting videos showing the satisfying crunch and creamy filling when biting into the chocolate bars. The ASMR-worthy sounds and visually appealing cross-sections made perfect content for platforms like TikTok and Instagram.
What really propelled this Dubai chocolate recipe to viral status was accessibility. Once people realized they could recreate these expensive imported chocolates at home, the recipe spread like wildfire. Home cooks worldwide started experimenting, sharing their results, and inspiring others to try. The trend shows no signs of slowing down.
The Cultural Significance
Middle Eastern desserts have always featured pistachios prominently, making them a natural choice for this Dubai chocolate recipe. Countries like Iran, Turkey, and Syria produce some of the world’s finest pistachios. Their distinctive flavor has been incorporated into countless traditional sweets throughout the region’s culinary history.
Kadayif represents another pillar of Middle Eastern pastry tradition. This versatile ingredient appears in desserts across Turkey, Lebanon, Greece, and beyond. By incorporating kadayif into a Dubai chocolate recipe, modern chocolatiers bridge ancient techniques with contemporary tastes, creating something that honors tradition while feeling fresh and innovative.
The use of edible gold in some Dubai chocolate recipe variations reflects the UAE’s association with luxury and opulence. Gold leaf has decorated special occasion foods for centuries across various cultures. In Dubai, where architectural marvels and five-star experiences define the cityscape, adding gold to chocolate feels perfectly aligned with local aesthetics.
The Science Behind the Texture
Understanding why this Dubai chocolate recipe works so well requires looking at the science of texture combinations. Our brains are wired to find textural variety pleasurable. The contrast between crispy, creamy, and smooth creates a more engaging eating experience than any single texture could provide alone.
The kadayif in this Dubai chocolate recipe provides what food scientists call fracturability. When you bite down, the thin phyllo strands break cleanly with a satisfying snap. This contrasts beautifully with the pistachio cream’s smooth, spreadable consistency. Finally, the chocolate shell delivers both initial snap and gradual melt as it warms in your mouth.
Temperature plays a crucial role in this Dubai chocolate recipe’s success. Properly tempered chocolate creates a glossy finish and pleasant snap when broken. The filling remains stable at room temperature, preventing the chocolate from cracking or the filling from leaking. Getting these technical details right transforms good homemade chocolate into exceptional confections.
Choosing the Right Ingredients
Ingredient selection makes or breaks your Dubai chocolate recipe results. Starting with premium chocolate is non-negotiable for authentic taste and texture. Look for chocolate with at least sixty percent cocoa content for dark varieties, or thirty-five percent for milk chocolate. The higher quality chocolate contains more cocoa butter, which creates better snap and shine.
Kadayif quality varies significantly between brands. Fresh kadayif has a light, delicate texture that crisps beautifully when toasted. Stale or poorly stored kadayif becomes tough and loses its ability to achieve that perfect crunch. Check the expiration date and choose packages that feel light and airy rather than compressed and dense.
Pistachio cream should have a vibrant green color indicating real pistachio content. Some products use artificial coloring and flavoring, which won’t deliver the authentic taste this Dubai chocolate recipe deserves. Read ingredient labels carefully, choosing options where pistachios appear first in the list with minimal additives or fillers.
Chocolate Selection Guide
For dark chocolate in your Dubai chocolate recipe, Belgian and Swiss brands consistently deliver excellent results. Callebaut, Valrhona, and Lindt all produce chocolate specifically formulated for candy making. These chocolates contain the right balance of cocoa butter and cocoa solids for proper tempering and setting.
Milk chocolate creates a sweeter, more approachable Dubai chocolate recipe that appeals to those who find dark chocolate too intense. The creaminess of milk chocolate complements pistachio flavors beautifully. Choose brands with higher cocoa percentages for more chocolate flavor and less cloying sweetness. Thirty-five to forty percent cocoa content hits the sweet spot.
White chocolate can be incorporated into your Dubai chocolate recipe as decorative drizzle or even as the main shell for a completely different flavor profile. Pure white chocolate contains cocoa butter, sugar, and milk solids without any cocoa solids. Avoid compound coatings or candy melts, which use vegetable oils instead of cocoa butter and won’t provide authentic chocolate taste.
Sourcing Kadayif
Middle Eastern and Mediterranean grocery stores stock kadayif in their refrigerated or frozen sections. This Dubai chocolate recipe ingredient is also called kataifi, shredded filo, or angel hair pastry. The strands should be pale yellow or white, thin, and loosely packed. Avoid pre-baked or flavored varieties for this application.
Online retailers make kadayif accessible even if you don’t have specialty stores nearby. Purchasing frozen kadayif for your Dubai chocolate recipe works perfectly well. Thaw it completely at room temperature before using, and keep it covered with a damp towel to prevent drying. Dried-out kadayif won’t crisp properly when toasted.
If you absolutely cannot find kadayif for your Dubai chocolate recipe, shredded phyllo dough makes an acceptable substitute. Cut regular phyllo sheets into very thin strips using kitchen scissors or a sharp knife. The texture won’t be quite as delicate as authentic kadayif, but you’ll still achieve the essential crunch.
Pistachio Cream Options
Commercial pistachio spreads simplify this Dubai chocolate recipe significantly. Brands like Nutella’s pistachio version, Nocciolata, or specialty Turkish and Italian pistachio creams work wonderfully. These products blend ground pistachios with sugar and sometimes milk or oil to create smooth, spreadable consistency.
Making homemade pistachio cream for your Dubai chocolate recipe gives you complete control over sweetness and intensity. Process shelled, unsalted pistachios in a food processor until they release their oils and become smooth. This takes ten to fifteen minutes with occasional scraping. Add powdered sugar to taste and a neutral oil if needed for spreadability.
Some Dubai chocolate recipe variations incorporate tahini or other nut butters into the pistachio cream for added depth. A small amount of tahini introduces subtle sesame notes that complement pistachios beautifully. Almond butter can be mixed with pistachio paste to extend expensive pistachio cream while maintaining nutty flavor.

Step-by-Step Instructions
Creating this Dubai chocolate recipe requires working in stages, but each step is straightforward. Organization is key to success. Set out all ingredients and equipment before you begin. This preparation ensures smooth workflow and prevents mistakes caused by rushing or searching for items mid-process.
Read through all instructions for this Dubai chocolate recipe before starting. Understanding the complete process helps you anticipate each stage and manage timing effectively. Once chocolate tempering begins, you need to work efficiently, so knowing what comes next prevents hesitation and errors.
The entire Dubai chocolate recipe from start to finish takes approximately two hours, including setting time. Active hands-on work accounts for only thirty to forty minutes. The rest is passive time waiting for chocolate to set. Plan accordingly so you’re not rushed during critical stages requiring focus and precision.
Preparation
Begin your Dubai chocolate recipe by preparing the kadayif filling. Remove kadayif from packaging and gently separate the strands with your fingers. They should fall apart easily into loose, noodle-like threads. Measure out approximately one cup of loosely packed kadayif for standard chocolate molds.
Melt four tablespoons of butter in a large skillet over medium heat. Add the separated kadayif strands and toss to coat them evenly with butter. Toast the kadayif for this Dubai chocolate recipe, stirring frequently, until the strands turn golden brown and smell nutty and fragrant. This takes eight to ten minutes.
Remove the toasted kadayif from heat and spread it on a plate to cool completely. The strands will crisp as they cool, developing that signature crunch essential to this Dubai chocolate recipe. While the kadayif cools, you can begin preparing your chocolate and setting up your mold or work surface.
Tempering the Chocolate
Tempering chocolate is the most technical aspect of this Dubai chocolate recipe, but it’s not difficult with proper guidance. Tempering aligns the cocoa butter crystals, creating chocolate that’s glossy, snaps cleanly, and doesn’t bloom with white streaks. Untempered chocolate stays soft and looks dull.
For the seeding method of tempering your Dubai chocolate recipe chocolate, chop sixteen ounces of chocolate into small, uniform pieces. Set aside four ounces of the chopped chocolate. Melt the remaining twelve ounces in a heatproof bowl set over barely simmering water, stirring until completely smooth and reaching 115°F for dark chocolate or 110°F for milk chocolate.
Remove the bowl from heat and add the reserved four ounces of chopped chocolate. Stir continuously as the unmelted chocolate cools and tempers the melted chocolate. Continue stirring until all chocolate melts and the temperature drops to 88-90°F for dark chocolate or 86-88°F for milk chocolate. Your Dubai chocolate recipe chocolate is now properly tempered and ready to use.
Creating the Chocolate Shells
Prepare your molds for this Dubai chocolate recipe by ensuring they’re completely clean and dry. Any moisture or debris will mar the chocolate’s finish. Silicone chocolate bar molds work excellently, or you can use small rectangular baking molds or even shape chocolates freehand on parchment paper.
Pour tempered chocolate into each mold cavity, filling them completely. Tap the mold firmly on the counter several times to release air bubbles trapped in the chocolate. This creates smooth chocolate shells for your Dubai chocolate recipe without imperfections. Let the chocolate sit for one minute to start setting around the edges.
Invert the mold over your bowl of tempered chocolate, allowing excess chocolate to drain out. You want to create a shell about one-eighth inch thick for this Dubai chocolate recipe. Use an offset spatula or bench scraper to clean the top surface of the mold, removing excess chocolate. Place the mold in the refrigerator for five minutes to set the shells firmly.
Assembling the Filling
While your chocolate shells set, prepare the filling for this Dubai chocolate recipe. Mix your pistachio cream with the cooled, toasted kadayif strands. The ratio should be approximately two parts pistachio cream to one part kadayif by volume. This creates a mixture that’s creamy enough to spread but has plenty of crispy texture.
Fold the kadayif into the pistachio cream gently to avoid breaking up the toasted strands too much. You want to maintain as much of that delicate crunch as possible in your Dubai chocolate recipe. The mixture should be cohesive but not overly smooth. Visible strands of golden kadayif throughout the green pistachio cream create visual appeal.
Taste your filling mixture and adjust as needed for this Dubai chocolate recipe. If the pistachio cream is very sweet, you might add a tiny pinch of salt to balance flavors. Some cooks add a drop of rose water or orange blossom water for additional Middle Eastern character, though this is entirely optional.
Filling and Sealing
Remove the chocolate shells from the refrigerator. They should be firm and release easily from the mold edges. Spoon or pipe the pistachio-kadayif mixture into each shell, filling them nearly to the top but leaving about one-eighth inch of space. This space allows the sealing layer of chocolate in your Dubai chocolate recipe to bond properly.
Gently tap the filled mold on the counter to settle the filling and eliminate air pockets. Smooth the top of the filling with a small offset spatula if needed. The filling should be level with the top edge of the chocolate shell for professional-looking Dubai chocolate recipe results.
Spoon tempered chocolate over the filling in each cavity, spreading it to completely seal the bottom of each bar. Use your offset spatula or bench scraper to scrape excess chocolate from the mold surface, creating a clean, flat bottom for your Dubai chocolate recipe bars. Refrigerate for fifteen minutes until completely set.
Adding Decorative Touches
For elegant Dubai chocolate recipe presentation, consider adding white chocolate drizzle. Melt two ounces of white chocolate using the same tempering method. Transfer melted white chocolate to a small piping bag or plastic bag with a tiny corner snipped off. Drizzle in thin lines across the tops of your set chocolate bars.
Sprinkle chopped pistachios over the white chocolate drizzle before it sets, creating texture and reinforcing the pistachio flavor of your Dubai chocolate recipe. The bright green nut pieces against dark chocolate and white drizzle creates stunning visual contrast that photographs beautifully.
For special occasions, your Dubai chocolate recipe can be elevated with edible gold leaf. Use a clean, dry brush to gently place small pieces of gold leaf on the chocolate surface. The gold adheres to the chocolate and creates a luxurious finish worthy of the most expensive boutique chocolatiers in Dubai.
Professional Tips
Achieving professional-quality results with this Dubai chocolate recipe requires attention to small but important details. Temperature management throughout the process affects every element from kadayif crispness to chocolate tempering. Use a reliable instant-read thermometer to monitor chocolate temperature accurately, removing guesswork from the equation.
Work in a cool, dry environment when making this Dubai chocolate recipe. Humidity and heat are chocolate’s enemies, causing it to seize, bloom, or refuse to set properly. If your kitchen is warm, consider working near an air conditioner or in the coolest room available. Ideal chocolate-working temperature is 65-70°F.
Don’t rush any stage of this Dubai chocolate recipe. Proper cooling and setting times ensure structural integrity in your finished chocolates. Chocolates removed from molds too early may stick or lose their shape. Filling added before shells are fully set can create weak spots that crack when demolded.
Achieving Perfect Kadayif Texture
The kadayif component of this Dubai chocolate recipe requires vigilant attention during toasting. Butter burns easily, so medium heat is essential. Stir constantly to ensure even browning. The transformation from pale to golden happens quickly toward the end, so don’t walk away from the stove.
For maximum crispness in your Dubai chocolate recipe, spread toasted kadayif in a thin layer to cool rather than piling it in a bowl. Trapped steam softens the strands. A wide, flat surface allows air circulation, helping the kadayif stay crispy. Once completely cool, store in an airtight container until ready to mix with pistachio cream.
Some Dubai chocolate recipe variations add honey or sugar to the kadayif during toasting for extra sweetness and caramelization. If trying this, use only one tablespoon of honey or sugar per cup of kadayif. Too much creates sticky clumping rather than crispy individual strands. The addition is subtle but adds complexity.
Tempering Troubleshooting
If your chocolate for this Dubai chocolate recipe won’t come into temper, you may have overheated it initially. Chocolate heated beyond 120°F loses its temper completely and requires starting over. Maintain gentle heat and monitor temperature constantly to prevent this frustrating setback.
Chocolate that seems too thick when tempered might need a degree or two more heat. For this Dubai chocolate recipe, chocolate should be fluid enough to coat the back of a spoon but not so thin that it drips immediately. The consistency should resemble heavy cream. Adjust temperature in small one-degree increments.
If you see streaks or spots appearing on your set Dubai chocolate recipe bars, this indicates blooming caused by improper tempering or temperature fluctuations during setting. While cosmetically imperfect, bloomed chocolate tastes fine. For gift-giving, re-melt and re-temper affected chocolate for a second attempt.
Mold Release Techniques
Successfully releasing chocolates from molds is crucial for this Dubai chocolate recipe. Properly tempered chocolate naturally contracts slightly as it sets, pulling away from mold walls. When you turn the mold over, chocolates should drop out cleanly with minimal coaxing.
If chocolates stick in the mold, your Dubai chocolate recipe chocolate wasn’t fully set or wasn’t properly tempered. Place the mold in the refrigerator for ten additional minutes. Try again. Gentle flexing of silicone molds helps release stubborn pieces without damage. Avoid forcing chocolates out, which can cause cracking.
After demolding your Dubai chocolate recipe creations, handle them minimally with bare hands. Body heat and fingerprints mar the glossy surface. Use food-safe gloves or hold chocolates by their edges. This professional approach maintains pristine appearance, especially important if you’re gifting or selling your creations.
Common Mistakes to Avoid
Even following this Dubai chocolate recipe carefully, certain mistakes can undermine your results. Learning what commonly goes wrong helps you avoid these pitfalls. The most frequent error is attempting to rush the process. Chocolate work requires patience. Each stage needs adequate time to set before proceeding.
Another common Dubai chocolate recipe mistake is using low-quality ingredients. Chocolate coating compounds or artificial pistachio flavoring create inferior results that don’t justify the time investment. If you’re going to make these chocolates from scratch, use ingredients worthy of the effort. The quality difference is immediately apparent.
Temperature-related mistakes plague many first attempts at this Dubai chocolate recipe. Too-warm filling can melt chocolate shells. Improperly tempered chocolate won’t set correctly. A reliable thermometer and careful attention to temperature guidelines prevent most of these issues. Don’t estimate or guess temperatures.
Filling Consistency Issues
Filling that’s too loose creates problems in this Dubai chocolate recipe. Excess liquid from pistachio cream can leak through chocolate shells or make the filling unstable during setting. If your pistachio cream seems runny, refrigerate it briefly to firm up before mixing with kadayif.
Conversely, filling that’s too thick won’t spread into corners and create air gaps in your Dubai chocolate recipe. Filling should be spreadable but hold its shape. If it’s too stiff, warm pistachio cream slightly by letting it sit at room temperature for thirty minutes. Mix in a tiny amount of neutral oil if needed.
Overmixing the filling breaks down kadayif strands, losing the textural contrast that makes this Dubai chocolate recipe special. Fold ingredients together just until combined. You should see distinct golden kadayif threads throughout the green pistachio cream. Overmixed filling becomes uniform in color and loses crunch.
Chocolate Shell Thickness
Creating chocolate shells that are too thick wastes chocolate and creates unbalanced flavor in your Dubai chocolate recipe. The filling should be the star, with chocolate providing a complementary shell. Shells thicker than one-eighth inch overpower the pistachio-kadayif center.
Shells that are too thin present different problems for this Dubai chocolate recipe. They’re fragile and can crack when filled or handled. They may not provide adequate structural support for the filling. Finding the sweet spot requires practice. The inversion method of draining excess chocolate creates consistent thickness.
Uneven shell thickness creates weak spots in your Dubai chocolate recipe bars. Some areas might be paper-thin while others are too thick. This happens when chocolate isn’t evenly distributed before inverting the mold. Take time to ensure chocolate reaches all mold corners before draining. Tap thoroughly to eliminate air pockets.
Variations to Try
Once you’ve mastered the classic Dubai chocolate recipe, exploring variations keeps things exciting. The basic technique applies to countless flavor combinations. Middle Eastern ingredients offer particular inspiration, but don’t limit yourself. Creative experimentation often yields surprising and delicious results.
The beauty of this Dubai chocolate recipe framework is its versatility. The combination of crunchy element, creamy filling, and chocolate shell works with many ingredient swaps. Each variation creates a unique flavor profile while maintaining the textural contrast that makes these chocolates so appealing.
Document your Dubai chocolate recipe experiments, noting proportions and techniques used. This creates a personal recipe collection you can return to when you find a winning combination. Share your successful variations with the community online, contributing to the ongoing evolution of this viral trend.
Flavor Combinations
Hazelnut and praline make an excellent Dubai chocolate recipe variation. Replace pistachio cream with chocolate-hazelnut spread and mix with toasted kadayif. The combination evokes Turkish and Italian traditions. Top with chopped toasted hazelnuts for reinforcement. Dark chocolate shell provides sophisticated contrast.
For a date-based Dubai chocolate recipe, blend softened medjool dates with tahini to create a smooth paste. Mix with toasted kadayif and fill chocolate shells. This variation leans heavily into traditional Middle Eastern flavors. The dates’ natural sweetness means less added sugar. Sprinkle with sesame seeds for decoration.
Rose and cardamom transform this Dubai chocolate recipe into something truly exotic. Add rose water and ground cardamom to pistachio cream before mixing with kadayif. Use white chocolate for the shell to let delicate flavors shine. Garnish with dried rose petals for elegant presentation.
Alternative Textures
Swap kadayif for crushed kunafa in your Dubai chocolate recipe for similar but slightly different texture. Kunafa is coarser than kadayif and creates larger crispy pieces. Toast it the same way with butter until golden. The result is more rustic and equally delicious.
Toasted shredded coconut makes an interesting Dubai chocolate recipe variation that adds tropical notes. Mix toasted coconut with pistachio or cashew cream. The combination works particularly well with milk or white chocolate shells. Macadamia pieces can be added for extra richness.
For ultimate decadence, try incorporating halva into your Dubai chocolate recipe. Crumble tahini-based halva and mix with pistachio cream and a small amount of kadayif. The halva adds complex sesame flavor and interesting crumbly texture. This variation bridges multiple Middle Eastern dessert traditions.
Special Dietary Adaptations
Creating vegan Dubai chocolate recipe versions requires dairy-free chocolate and plant-based fillings. Dark chocolate is often naturally vegan, but check labels carefully. Replace pistachio cream with homemade version using just pistachios and neutral oil. Coconut oil can replace butter for toasting kadayif.
For sugar-free Dubai chocolate recipe adaptations, use sugar-free chocolate and unsweetened nut butter mixed with your preferred sugar substitute. The kadayif must be toasted without added sweeteners. The results won’t be identical to the original but provide an option for those avoiding sugar.
Gluten-free concerns are minimal with this Dubai chocolate recipe since kadayif, while made from dough, contains minimal gluten and some brands are gluten-free. However, for strict gluten-free requirements, shredded coconut toasted in butter creates similar texture without any gluten concerns. Check all product labels to ensure cross-contamination hasn’t occurred.
Storage and Reheating
Proper storage extends the life of your Dubai chocolate recipe creations while maintaining quality. These chocolates contain butter and nut cream, both of which can spoil if not stored correctly. Room temperature storage works for short periods, but refrigeration is better for longer keeping.
The Dubai chocolate recipe contains components with different storage needs. Chocolate prefers cool, dry conditions but not extreme cold. The filling benefits from refrigeration. Finding the balance ensures your chocolates remain delicious for as long as possible.
Unlike many desserts, these Dubai chocolate recipe treats don’t benefit from reheating. They’re designed to be enjoyed at cool room temperature, which showcases the textural contrast best. Proper storage focuses on maintaining that perfect eating temperature and protecting against spoilage.
Storing Instructions
Store your Dubai chocolate recipe bars in an airtight container to protect from moisture and odors. Chocolate absorbs surrounding flavors, so keep it away from strong-smelling foods. Layer chocolates between sheets of parchment paper to prevent them from sticking together if they warm slightly.
At room temperature in a cool environment, Dubai chocolate recipe bars keep for up to one week. Choose the coolest area in your home away from direct sunlight and heat sources. A pantry or cupboard works well if your home isn’t particularly warm. Check daily for any signs of melting or softening.
For longer storage, refrigerate your Dubai chocolate recipe in an airtight container for up to three weeks. Let chocolates come to room temperature before serving for best texture and flavor. Cold chocolate doesn’t showcase the filling’s creamy texture as effectively. The contrast between crispy kadayif and smooth cream is most apparent at room temperature.
Freezing Guidelines
This Dubai chocolate recipe freezes successfully for up to three months when properly wrapped. Wrap individual bars tightly in plastic wrap, then place in a freezer-safe container or bag. Remove as much air as possible to prevent freezer burn and protect chocolate quality.
Thaw frozen Dubai chocolate recipe bars in the refrigerator overnight rather than at room temperature. This gradual thawing prevents condensation from forming on the chocolate surface, which would create unsightly white spots. Once thawed in the fridge, let them warm to room temperature before serving.
Label your frozen Dubai chocolate recipe containers with the date so you track storage time. While chocolate technically remains safe indefinitely when frozen, quality gradually declines. Use within three months for optimal flavor and texture. The kadayif may lose some crispness after extended freezing.
Frequently Asked Questions
Making this Dubai chocolate recipe raises similar questions for many people. Understanding common concerns before you start helps ensure success. Most questions relate to ingredient substitutions, technique clarifications, or troubleshooting specific problems.
The most asked question about this Dubai chocolate recipe concerns finding kadayif. This ingredient isn’t mainstream in all countries, leading cooks to seek alternatives. Other frequent questions address tempering chocolate, which intimidates many home cooks despite being quite manageable.
Dietary restriction questions also commonly arise with this Dubai chocolate recipe. People want to know if variations work for vegan, gluten-free, or sugar-free diets. While adaptations exist, understanding how changes affect results helps set appropriate expectations.
Can I Use Chocolate Chips Instead?
Standard chocolate chips aren’t ideal for this Dubai chocolate recipe because they contain stabilizers that prevent proper melting and tempering. Chocolate chips are formulated to hold their shape during baking, which works against you when making molded chocolates.
However, high-quality chocolate chips or melting wafers specifically designed for candy making work fine in your Dubai chocolate recipe. Brands like Guittard and Ghirardelli make products intended for tempering and molding. Check packaging to confirm the chocolate is meant for candy making rather than baking.
If you only have standard chocolate chips, you can still make this Dubai chocolate recipe, but skip the tempering process. Simply melt the chips gently and work quickly to mold and fill your chocolates. They won’t have the same snap and shine as tempered chocolate, but they’ll still taste delicious.
How Do I Know If Chocolate Is Properly Tempered?
Testing temper is simple for this Dubai chocolate recipe. Dip a knife or spatula into your tempered chocolate and set it aside at room temperature. Properly tempered chocolate sets within three to five minutes with a glossy sheen and no streaks. It should snap cleanly when broken.
If the test piece remains soft or develops gray streaks after setting, your Dubai chocolate recipe chocolate isn’t properly tempered. The temperature might be off or the seeding ratio incorrect. You can re-temper the same chocolate by reheating and going through the process again.
Another temper test for your Dubai chocolate recipe involves touching a small amount to your lower lip. Properly tempered chocolate at working temperature should feel cool. If it feels warm or neutral, the temperature is too high. Let it cool slightly and test again before using.
What If I Don’t Have Pistachio Cream?
Making pistachio cream from scratch for this Dubai chocolate recipe is absolutely possible. Process two cups of raw, shelled pistachios in a food processor for ten to fifteen minutes, scraping down sides periodically. The nuts will eventually release oils and become smooth and spreadable.
Add powdered sugar to taste, usually about one-quarter cup for two cups of pistachios in your Dubai chocolate recipe. If the mixture remains too thick, add neutral oil like grapeseed or light olive oil one tablespoon at a time until spreadable. The homemade version tastes more intensely of pistachios than commercial spreads.
Alternatively, your Dubai chocolate recipe can use other nut butters as substitutes. Almond butter or cashew butter work well, though they obviously don’t provide authentic pistachio flavor. You could tint them green with a tiny amount of food coloring if visual appeal matters for your application.
Final Thoughts
The Dubai chocolate recipe has earned its viral status through pure deliciousness and stunning presentation. Making these luxurious treats at home proves surprisingly accessible despite their gourmet reputation. With quality ingredients and careful technique, you can create chocolates that rival expensive boutique versions.
This Dubai chocolate recipe represents more than just a trendy dessert. It connects you to Middle Eastern culinary traditions while participating in a global food phenomenon. The process of crafting these chocolates by hand provides satisfaction beyond just eating the finished product. Each perfectly shelled bar represents skill development and creative expression.
Don’t hesitate to make this Dubai chocolate recipe your own through variations and personal touches. The basic framework is solid, but your individual taste and creativity can shine through. Whether you stick to the classic pistachio-kadayif combination or explore new flavor territories, these chocolates will impress everyone lucky enough to taste them.
Gather your ingredients, set aside an afternoon, and join millions of home cooks worldwide who’ve fallen in love with making this Dubai chocolate recipe. Your kitchen will smell amazing, your hands will be busy with satisfying work, and the results will delight everyone who tries them.
Watch the recipe video for more clarity!
See our similar recipes:
People also like our these recipes:
- 1 Cup of pistachio cream
- 1/2 Cup kadayif or shredded phyllo pastry (cut into small pieces)
- 3 Cup milk or dark chocolate
- 2 tbsp nsalted butter, melted
- 1/4 Cup white chocolate, melted
In a pan, add the butter, chopped kadayif and cook till golden brown and crispy. Set aside to cool down.
After the kadayif has cooled down, add the pistachio cream to it and mix very well.
Meanwhile, melt your chocolate and make sure it is not hot.
In a chocolate mold, add in a little drizzle of white chocolate.
Then add half of the amount of the milk chocolate and shake it to make sure it covers the bottom and the sides.
Freeze for about 10-15 minutes.
Take the mold out and add in the pistachio filling almost all the way to the top.
Add in the rest of the milk chocolate and freeze again for about 10-15 minutes till it is hard.
Once set, you can enjoy it!
If you've given this recipe a try and it won you over, please share your thoughts by leaving
a rating and comment below! If you have any questions about this recipe, don't hesitate to ask – I'm here to
help and will respond promptly.