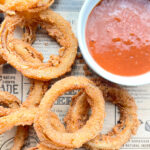
Make Delicious Crispy Onion Rings at Home
Make delicious, irresistibly Crispy Onion Rings with just a few simple ingredients that transform ordinary onions into extraordinary snacks! These golden beauties are perfect for grilling burgers, serving alongside chicken, complementing hot dogs, pairing with fish, or enhancing whatever you like. Add them to your burgers, salads, or sandwiches for an extra satisfying crunch that elevates every bite. These homemade rings deliver restaurant-quality results that surpass anything from a freezer bag or fast-food joint.
Crispy Onion Rings are a special treat, not an everyday indulgence, but that’s what makes them so wonderful. When grilling burgers with friends or hosting a backyard barbecue, having a batch of these extra crispy rounds ready to go creates instant excitement. They’re simple to bread ahead of time and keep waiting in the fridge, so all you have to do is fry them just before eating for maximum crispiness. This make-ahead capability makes entertaining stress-free while ensuring fresh, hot onion rings every time.
The secret to these super Crispy Onion Rings lies in using Panko breadcrumbs instead of traditional beer batter. While both approaches create delicious results, there’s something about that crispy, golden Panko coating that wins everyone over every single time. The Japanese-style breadcrumbs create larger, airier flakes that fry up incredibly crunchy and stay crispy longer than regular breadcrumbs. And the best part? This easy onion ring recipe requires only a few basic ingredients you probably already have in your pantry!
Why This Crispy Onion Rings Recipe Works
This recipe delivers exceptional Crispy Onion Rings through several key techniques that ensure consistent, restaurant-quality results. The flour-based batter creates adhesive coating that helps Panko stick while adding its own subtle flavor and structure. Cornstarch in the batter contributes extra crispiness and helps achieve that shatteringly crunchy texture everyone loves in perfect onion rings.
The seasoning blend of paprika, Italian herbs, salt, and pepper infuses flavor throughout the coating rather than just on the surface. This ensures your Crispy Onion Rings taste delicious in every bite, not just where seasoning happened to land. The double-coating technique—wet batter followed by dry breadcrumbs—creates substantial coating that protects the onion while developing maximum crunch during frying.
Key Ingredients Overview
Creating exceptional Crispy Onion Rings starts with selecting quality ingredients that work together to deliver ideal flavor and texture. Large sweet or yellow onions provide the best size rings and mild, sweet flavor when cooked. All-purpose flour forms the batter base that adheres to onions and holds breadcrumbs. Panko breadcrumbs create the signature extra-crispy coating that makes these rings so addictive.
Cornstarch adds crispiness and helps create light, crunchy texture rather than heavy coating. Smoked paprika contributes subtle smoky flavor and beautiful color. Italian herb blend adds aromatic complexity. Salt and pepper season throughout. Neutral frying oil with high smoke point ensures proper crisping without burnt flavors. Each component plays a specific role in creating perfect Crispy Onion Rings.

Understanding Crispy Onion Rings
Crispy Onion Rings represent American comfort food at its finest—simple ingredients transformed through proper technique into something irresistibly crunchy and delicious. Understanding the science behind coating and frying helps you achieve consistently excellent results. The key is creating coating that stays attached, becomes golden and crispy, and protects the onion inside.
The success of Crispy Onion Rings depends on proper onion preparation, effective coating adhesion, correct oil temperature, and strategic batch frying. When these elements align perfectly, you achieve rings that are crunchy outside and tender-sweet inside with coating that doesn’t fall off or become soggy.
The Science of Panko Coating
Panko breadcrumbs create superior Crispy Onion Rings compared to regular breadcrumbs due to their unique structure. Traditional breadcrumbs are fine and dense, creating compact coating that can become heavy. Panko consists of larger, airier flakes with irregular shapes that create more surface area for crisping and better texture.
When Panko hits hot oil, the large flakes crisp rapidly and develop that signature shatter-crisp texture. The air pockets in Panko structure allow steam to escape during frying, preventing sogginess. This explains why Panko-coated Crispy Onion Rings stay crunchier longer than those made with regular breadcrumbs—the coating structure promotes better moisture management.
Why Cornstarch Matters
Adding cornstarch to the flour batter significantly improves Crispy Onion Rings texture. Cornstarch creates lighter, crispier coating than flour alone because it absorbs less oil during frying. The starch granules gelatinize when heated, forming rigid structure that shatters pleasantly when bitten rather than becoming chewy or tough.
Cornstarch also helps the wet batter cling better to slippery onion surfaces. This improved adhesion means coating stays attached during frying instead of sliding off. The combination of flour for binding and cornstarch for crispiness creates ideal coating for your Crispy Onion Rings.
Choosing the Right Ingredients
Every ingredient in your Crispy Onion Rings plays a specific role in creating the final flavor and texture. Selecting quality components ensures the best possible results. Understanding why each ingredient matters helps you make informed choices and achieve consistent success.
The beauty of this recipe is its simplicity—just a handful of common ingredients create something extraordinary when combined with proper technique.
Onion Selection
Large sweet onions like Vidalia, Walla Walla, or Maui work beautifully for Crispy Onion Rings because they’re mild and naturally sweet when cooked. Yellow onions are the most common choice, offering good size and balanced flavor that becomes sweet and mellow when fried. White onions work too but can be slightly sharper in flavor.
Red onions create visually striking Crispy Onion Rings with beautiful purple rings, though they can be more pungent. Choose large, firm onions without soft spots or sprouting. The bigger the onion, the larger your rings and the easier they are to coat and handle. Look for onions at least 3 to 4 inches in diameter for best results.
Panko Breadcrumb Quality
Japanese-style Panko breadcrumbs are essential for authentic Crispy Onion Rings texture. Regular fine breadcrumbs create different, less desirable coating. Panko’s larger, flakier crumbs produce that signature extra-crispy texture everyone loves. Both plain and seasoned Panko work, though plain allows you to control seasoning yourself.
Choose fresh Panko rather than stale breadcrumbs for best results. Stale Panko won’t crisp as well and may taste off. Store Panko in an airtight container to maintain freshness. While you can make homemade Panko by processing bread and toasting it, commercial Panko delivers consistent results and is widely available for your Crispy Onion Rings.
Flour and Cornstarch
All-purpose flour provides structure and binding for your Crispy Onion Rings batter. It creates adhesive coating that helps Panko stick while adding subtle flavor. The gluten in flour develops when mixed with water, creating cohesive batter that clings to onions effectively.
Cornstarch is crucial for extra crispiness. Use pure cornstarch rather than cornmeal (which is entirely different). The ratio of flour to cornstarch affects texture—this recipe’s proportion creates optimal balance between binding and crispiness. Too much cornstarch makes coating brittle and too little doesn’t provide adequate crunch in your Crispy Onion Rings.
Oil for Frying
Use neutral oil with high smoke point for frying your Crispy Onion Rings. Vegetable oil, canola oil, or peanut oil all work excellently, reaching the 350-375°F needed for crispy coating without burning. Avoid olive oil, which has too low a smoke point and too strong a flavor that overwhelms the onions.
You’ll need sufficient oil depth—about 1 to 2 inches—for proper frying. Too shallow and rings won’t cook evenly; too deep wastes oil unnecessarily. Fresh, clean oil produces best-tasting Crispy Onion Rings. Reused oil with food particles burns easily and creates off-flavors.

Step-by-Step Instructions for Perfect Crispy Onion Rings
Creating exceptional Crispy Onion Rings requires following specific steps in the correct order. While the process is straightforward, attention to detail ensures optimal results. Understanding the purpose of each step helps you execute the recipe confidently.
Organization is key—set up your coating stations and have oil heating before you start breading for efficient workflow.
Cutting the Onions
Peel your large onions and slice them crosswise into rings approximately 1/4 to 1/2 inch thick. Thinner rings cook faster but may fall apart; thicker rings take longer but are sturdier. Aim for consistent thickness so all rings cook evenly. After slicing, separate the rings, discarding the small inner rings (save these for other cooking) and keeping the medium to large outer rings.
Pat the onion rings dry with paper towels to remove excess moisture. Wet onions prevent batter from adhering properly, causing coating to slide off during frying. This drying step is crucial for successful Crispy Onion Rings. Arrange dried rings on a plate or tray, ready for coating.
Preparing the Coating Stations
Set up your breading station with two shallow bowls or plates. In the first bowl, whisk together flour, cornstarch, water, smoked paprika, salt, pepper, and Italian herbs until you have smooth batter with consistency similar to pancake batter. If too thick, add a splash more water; if too thin, whisk in a bit more flour.
In the second bowl, pour Panko breadcrumbs. Season the Panko with additional salt, pepper, and any extra spices you desire for more flavorful coating. Having these stations prepared before you start coating ensures smooth, efficient process for creating your Crispy Onion Rings.
Coating the Rings
Working with one onion ring at a time, dip it into the flour batter, ensuring complete coverage on all surfaces. Let excess batter drip back into the bowl—too much batter creates thick, gummy coating rather than crispy one. Immediately transfer the battered ring to the Panko breadcrumbs.
Press Panko gently but firmly onto both sides of the ring, ensuring thorough, even coverage with no bare spots. The breadcrumbs should adhere well to the wet batter. Place coated ring on a wire rack or parchment-lined baking sheet. Repeat with remaining onion rings. You can coat all rings ahead of time and refrigerate for up to 4 hours before frying, which actually helps coating set and adhere better.
Heating the Oil
Pour 1 to 2 inches of neutral oil into a deep, heavy-bottomed pot, deep skillet, or Dutch oven. Heat over medium-high heat to 350-375°F, using a deep-fry or candy thermometer to monitor temperature accurately. Proper temperature is absolutely crucial for Crispy Onion Rings—too cool and they absorb excess oil, becoming greasy; too hot and coating burns before onion cooks.
Let oil reach full temperature before adding any rings. This usually takes 5 to 10 minutes depending on your stove and pot. While oil heats, set up a draining station with a wire rack over a baking sheet or a plate lined with paper towels.
Frying to Golden Perfection
Working in small batches of 4 to 6 rings, carefully lower coated onions into hot oil using tongs or a slotted spoon. Don’t overcrowd—rings need space for oil circulation and even cooking. Fry for 2 to 3 minutes, flipping halfway through, until coating is deep golden brown and gorgeously crispy on all sides.
The Crispy Onion Rings should float and have beautiful, even golden color. Remove with a slotted spoon or spider strainer and transfer to your draining station. Let oil return to 350-375°F between batches before adding more rings. Season fried rings immediately with a light sprinkle of salt while still hot. Serve as soon as all batches finish for maximum crispiness.
Professional Tips for Outstanding Results
Mastering Crispy Onion Rings involves understanding subtle techniques that separate good from exceptional. These professional insights help you achieve restaurant-quality results at home every time you prepare this beloved side dish.
Attention to small details makes a significant difference in the final quality, appearance, and crunchiness of your onion rings.
Maintaining Perfect Oil Temperature
Consistent oil temperature is perhaps the most critical factor for crispy, non-greasy onion rings. Use a thermometer clipped to the pot to monitor constantly. Temperature drops when you add cold onion rings, so don’t add too many at once. Between batches, wait for temperature to return to 350-375°F before continuing.
If oil gets too hot, reduce heat and wait for it to cool slightly. If struggling to maintain temperature, your pot may be too small or burner too weak. Proper temperature control ensures your Crispy Onion Rings emerge golden and crunchy, not pale and soggy or dark and burnt.
Preventing Coating from Falling Off
Sometimes coating slides off onion rings during frying, creating frustration and messy oil. Several techniques prevent this with Crispy Onion Rings. First, ensure onions are completely dry before coating—moisture prevents adhesion. Second, let coated rings rest for 10 to 15 minutes before frying so coating can set.
Third, don’t move rings around excessively in the oil—let them fry undisturbed except for one flip. Fourth, ensure your batter isn’t too thin or too thick—proper consistency creates good adhesion. These small attentions dramatically improve coating retention in your Crispy Onion Rings.
Keeping Rings Crispy
The biggest challenge with Crispy Onion Rings is maintaining that fresh-from-the-fryer crunch. Several strategies help. First, drain on a wire rack rather than paper towels alone—this allows air circulation underneath, preventing steam from making bottoms soggy.
Don’t stack hot rings or cover them, which traps steam. Serve immediately for maximum crispiness. If you must hold them briefly, keep in a 200°F oven on a wire rack—but no longer than 15 minutes. The unavoidable truth is Crispy Onion Rings are best enjoyed immediately while still hot and at peak crunchiness.
Achieving Even Golden Color
Beautiful, uniform golden-brown color makes Crispy Onion Rings visually appealing and indicates proper cooking. Ensure breadcrumb coating is even thickness with no thick or thin spots. Flip rings halfway through frying so both sides brown equally. Maintain consistent oil temperature for even browning.
If some areas brown faster than others, your oil may have hot spots. Adjust positioning in the pot or stir oil gently between batches. Remove any loose breadcrumbs floating in oil, as they burn and darken subsequent batches. Proper attention to these details creates gorgeously uniform Crispy Onion Rings.
Common Mistakes to Avoid
Even straightforward recipes like Crispy Onion Rings have potential pitfalls that can compromise your results. Understanding these common mistakes helps you avoid them and achieve perfect onion rings every time.
Learning what not to do is just as valuable as learning proper technique when mastering any new recipe.
Cutting Rings Too Thin or Thick
Ring thickness dramatically affects Crispy Onion Rings results. Rings cut too thin (less than 1/4 inch) become floppy, fall apart easily, and may overcook before coating browns properly. The onion itself becomes too soft and loses structure, creating unpleasant mushy texture.
Rings cut too thick (over 1/2 inch) take longer to cook, risking burnt coating before the onion interior softens. They’re also harder to eat and may have undercooked centers. Aim for consistent 1/4 to 1/2 inch thickness for ideal balance of crispy coating and tender onion in your Crispy Onion Rings.
Using Regular Breadcrumbs Instead of Panko
Regular fine breadcrumbs create dense, heavy coating that becomes soggy quickly and lacks that signature extra-crispy crunch. While you can make acceptable onion rings with regular breadcrumbs, they won’t match the superior texture of Panko-coated Crispy Onion Rings.
The unique structure of Panko—large, airy flakes—is specifically what creates that amazing crunch. Don’t substitute regular breadcrumbs if you want authentic results. Panko is widely available and worth seeking out for this recipe. The textural difference is dramatic and immediately noticeable.
Overcrowding the Fryer
Trying to fry too many Crispy Onion Rings simultaneously lowers oil temperature dramatically, resulting in greasy, soggy coating instead of crispy crunch. Crowding also makes rings stick together, creates uneven cooking, and makes flipping difficult. Each ring needs space for oil circulation and proper heat transfer.
Fry in small batches of 4 to 6 rings maximum, depending on pot size. Yes, this takes longer and requires patience, but the dramatically superior results make the extra time worthwhile. Your guests will immediately notice the difference between properly fried, crispy rings and greasy, crowded ones.
Not Drying the Onions
Failing to pat onion rings dry before coating creates excess moisture that prevents batter from adhering properly. Wet onions also dilute the batter, making it too thin to coat effectively. The result is Crispy Onion Rings with spotty coating that falls off during frying.
Take time to thoroughly dry onion rings with paper towels after cutting and separating them. This simple step dramatically improves coating adhesion and final results. Even a few minutes of air-drying after patting helps ensure onions are completely dry before coating.
Wrong Oil Temperature
Frying at incorrect temperature is perhaps the single biggest mistake with Crispy Onion Rings. Oil that’s too cool (below 325°F) means rings absorb excessive oil, becoming greasy and heavy. They take forever to brown, giving more time for oil absorption. The coating never achieves proper crispiness.
Oil that’s too hot (above 400°F) burns the breadcrumb coating before onion softens inside, creating bitter, charred exterior with raw, crunchy onion interior. Always use a thermometer—don’t guess. Proper temperature control is non-negotiable for successful Crispy Onion Rings.
Variations and Customizations
Once you’ve mastered basic Crispy Onion Rings, exploring variations keeps the recipe exciting and allows personalization. These adaptations maintain the core technique while introducing new flavors or accommodating different preferences.
Experimenting with variations helps you understand the recipe’s flexibility and discover your perfect version.
Seasoning Variations
While the basic seasoning is delicious, experimenting with different spice blends creates interesting Crispy Onion Rings variations. Cajun seasoning adds spicy, Louisiana-inspired flavor. Ranch seasoning mix creates tangy, herby coating. Old Bay seasoning provides classic American seafood spice profile.
Garlic powder and onion powder intensify savory flavors. Cayenne or chili powder adds heat for spice lovers. Dried herbs like rosemary, thyme, or oregano contribute aromatic complexity. Season both the batter and the Panko for maximum flavor impact in your customized Crispy Onion Rings.
Batter Variations
While the water-based batter works perfectly, other liquids create interesting variations. Beer batter (replacing water with beer) adds malty depth and extra lightness. Buttermilk creates tangy flavor and tenderizes onions slightly. Sparkling water or club soda contributes lightness and helps create airy coating.
For extra-thick coating, try double-dipping: coat in batter and Panko, then repeat the process. This creates substantial, super-crunchy coating perfect for those who love maximum crunch on their Crispy Onion Rings. Each variation offers slightly different texture and flavor.
Different Vegetables
The coating technique used for Crispy Onion Rings works beautifully with other vegetables. Try zucchini rounds, mushroom slices, or pickle chips for variety. Even jalapeño slices create spicy alternatives. Sweet potato or regular potato rounds work wonderfully.
Green beans coated and fried create crispy fries with different character. Cauliflower florets make excellent crispy bites. The versatile Panko coating adapts to virtually any vegetable, though cooking times adjust based on vegetable density and moisture content.
Baked Version
For healthier Crispy Onion Rings, try oven-baking instead of deep-frying. Coat rings as directed, place on a wire rack over a baking sheet, and spray generously with cooking oil. Bake at 425°F for 20 to 25 minutes, flipping halfway, until golden brown and crispy.
While not as crunchy as fried, baked onion rings are still delicious and significantly lower in fat. The high oven temperature and oil spray create reasonable crispiness. This version works well for those watching calories or who prefer not to deep-fry at home.
Dipping Sauce Options
While classic ketchup works perfectly with Crispy Onion Rings, other sauces create different flavor experiences. Ranch dressing offers creamy, tangy complement. BBQ sauce provides sweet-smoky contrast. Sriracha mayo adds creamy heat. Honey mustard contributes sweet-tangy complexity.
Blue cheese or buttermilk dressing creates indulgent pairing. Garlic aioli offers sophisticated option. Even simple malt vinegar works for British-style chips and rings. Offer multiple sauces so guests can choose their preferred pairing with your Crispy Onion Rings.
Storage and Reheating
Proper storage extends the life of your Crispy Onion Rings while maintaining quality as much as possible. Understanding correct storage and reheating techniques prevents food waste and allows some advance preparation.
Crispy Onion Rings are absolutely best served fresh and hot, but both uncooked breaded rings and cooked rings can be stored with proper handling.
Storing Uncooked Breaded Rings
One major advantage of this recipe is the ability to bread Crispy Onion Rings ahead of time. After coating in batter and Panko, arrange rings in a single layer on a parchment-lined baking sheet without touching. Cover loosely with plastic wrap and refrigerate for up to 4 hours before frying.
This make-ahead capability is invaluable for entertaining—do the messy coating work earlier, then simply fry when ready to serve. The refrigeration actually helps coating set and adhere better. Don’t bread more than 4 hours ahead, as moisture from onions may make coating soggy.
Storing Cooked Onion Rings
Allow leftover Crispy Onion Rings to cool completely before storing, but don’t leave at room temperature longer than 2 hours for food safety. Place in an airtight container with paper towels between layers to absorb excess oil. Refrigerate for up to 2 days.
The coating will lose significant crispiness during storage—this is unavoidable with fried foods. However, proper reheating can restore some crunch. Store any dipping sauces separately in covered containers. Be realistic about expectations—leftover Crispy Onion Rings won’t match fresh ones but can still be quite good.
Reheating Methods
The oven method produces best results when reheating Crispy Onion Rings. Preheat oven to 400°F and place rings on a wire rack over a baking sheet. Bake for 5 to 8 minutes until heated through and coating re-crisps somewhat. This method won’t restore perfect original crispiness but comes reasonably close.
Air fryer reheating works excellently if you have one. Place Crispy Onion Rings in the basket in a single layer and heat at 375°F for 3 to 5 minutes until hot and crispy. This method best restores coating texture. Avoid microwaving, which makes coating hopelessly soggy and rubbery.
Freezing Instructions
Crispy Onion Rings freeze reasonably well. Freeze cooked, cooled rings on a parchment-lined tray until solid, then transfer to freezer bags. They keep for up to 2 months. Reheat from frozen in a 400°F oven for 10 to 12 minutes or in an air fryer for 6 to 8 minutes.
Alternatively, freeze uncooked breaded rings using the same method. Fry from frozen, adding 1 to 2 extra minutes to cooking time. This approach yields fresher-tasting results since the frying happens just before serving, though coating may be slightly less crispy than fresh.
Frequently Asked Questions
These commonly asked questions address concerns and curiosities people have when preparing Crispy Onion Rings. Understanding these details helps ensure success and builds confidence in the kitchen.
Can I use a different type of onion?
Yes! Yellow onions are most common and economical. Sweet onions like Vidalia create milder, sweeter Crispy Onion Rings perfect for those who don’t love strong onion flavor. White onions work but can be sharper. Red onions create visually striking purple rings with more pungent flavor. All work—choose based on your preference.
What if I don’t have Panko breadcrumbs?
While Panko creates superior texture, you can use regular breadcrumbs in a pinch. The coating won’t be quite as crispy or have that signature crunch, but it still works. For best results with regular breadcrumbs, pulse them briefly in a food processor to create slightly larger, more irregular pieces that crisp better.
How do I know when the oil is hot enough?
Use a deep-fry or candy thermometer for accuracy—oil should be 350-375°F. Without a thermometer, test by dropping a small piece of bread or breadcrumb into oil. It should sizzle immediately and brown within 30-60 seconds. If it sinks without sizzling, oil is too cool. If it instantly burns, oil is too hot.
Can I make these gluten-free?
Yes! Use gluten-free all-purpose flour blend and gluten-free Panko-style breadcrumbs (several brands make these). The rest of the ingredients are naturally gluten-free. These substitutions create delicious gluten-free Crispy Onion Rings with similar texture and flavor to the original.
Why is my coating falling off?
Coating falls off due to wet onions, too-thin batter, incorrect oil temperature, or moving rings too much during frying. Ensure onions are completely dry, batter has proper pancake-like consistency, oil is 350-375°F, and you flip rings only once during frying. These precautions prevent coating loss.
How many servings does this recipe make?
One large onion typically yields enough Crispy Onion Rings to serve 4 people as a side dish or appetizer. Appetites vary significantly—some people eat just a few rings while others consume many. For a crowd, plan on one large onion per 3-4 people to ensure adequate quantity.
Final Thoughts
Crispy Onion Rings represent comfort food perfection—transforming simple onions through proper technique into irresistibly crunchy, golden treats that everyone loves. This recipe proves you don’t need a deep fryer or restaurant kitchen to create exceptional onion rings. With basic equipment, accessible ingredients, and careful attention to technique, you’ll produce rings that surpass anything from a freezer bag or fast-food chain.
Whether you’re serving these Crispy Onion Rings alongside burgers at a backyard barbecue, offering them as appetizers at a party, or simply treating yourself to a special snack, they deliver satisfaction on every level. The techniques you learn—proper coating, temperature control, and frying—transfer to countless other recipes, building your confidence and competence in the kitchen. The customization options mean you can adapt this recipe to suit any taste preference or dietary need.
The beauty of Crispy Onion Rings lies in their universal appeal and addictive quality. The contrast between crunchy exterior and sweet, tender interior creates textural satisfaction while the savory seasoning delivers flavor in each bite. Make them once and they’ll become a regular request from family and friends who can’t get enough of that golden, crispy perfection.
Don’t be intimidated by deep-frying if it’s new to you. With proper temperature control and attention to safety, frying is straightforward and produces results you simply cannot achieve through baking alone. The extra-crispy coating and tender onion of perfectly fried rings are worth mastering this technique. Prepare these Crispy Onion Rings for your next gathering and watch them disappear faster than any other side dish. Once you taste homemade onion rings done right, you’ll never settle for frozen or fast-food versions again. This recipe delivers the real deal—golden, crunchy, absolutely irresistible onion rings that make you proud to serve!
Watch the recipe video for more clarity

People also like our these recipes:
- 1 large onion chopped into rings
- 1/4 cup flour
- 4 tbsp cornstarch
- 1/2 tsp salt
- 1 tsp paprika
- 1/2 tsp Italian seasoning
- 1/2 tsp black pepper
- 1/4 cup water
- Frying oil
- Breadcrumbs
Start by slicing a large onion into discs between ¼" and ½" wide. Separate them into individual rings.
Prepare dredging stations: Set up two shallow bowls. In one, mix flour, cornstarch, water, smoked paprika, salt, pepper, and mixed herbs. Place Panko breadcrumbs in the second.
Dip each onion ring in the flour mixture, then into the breadcrumbs. Toss to coat evenly, pressing gently to adhere.
Heat oil: Heat 1- to 2-inches of oil in a skillet or deep fryer to 350-375°F over medium-high heat.
Fry onion rings: Working in batches, fry 4-6 rings at a time for 2-3 minutes or until golden brown and crispy. Transfer to a wire rack set over a baking sheet lined with paper towels to drain.
Serve with your favorite dipping sauce! Enjoy your crispy homemade onion rings with ketchup or any other sauce!
If you've given this recipe a try and it won you over, please share your thoughts by leaving
a rating and comment below! If you have any questions about this recipe, don't hesitate to ask – I'm here to
help and will respond promptly.