Create the Ultimate Zinger Chicken Burger at Home
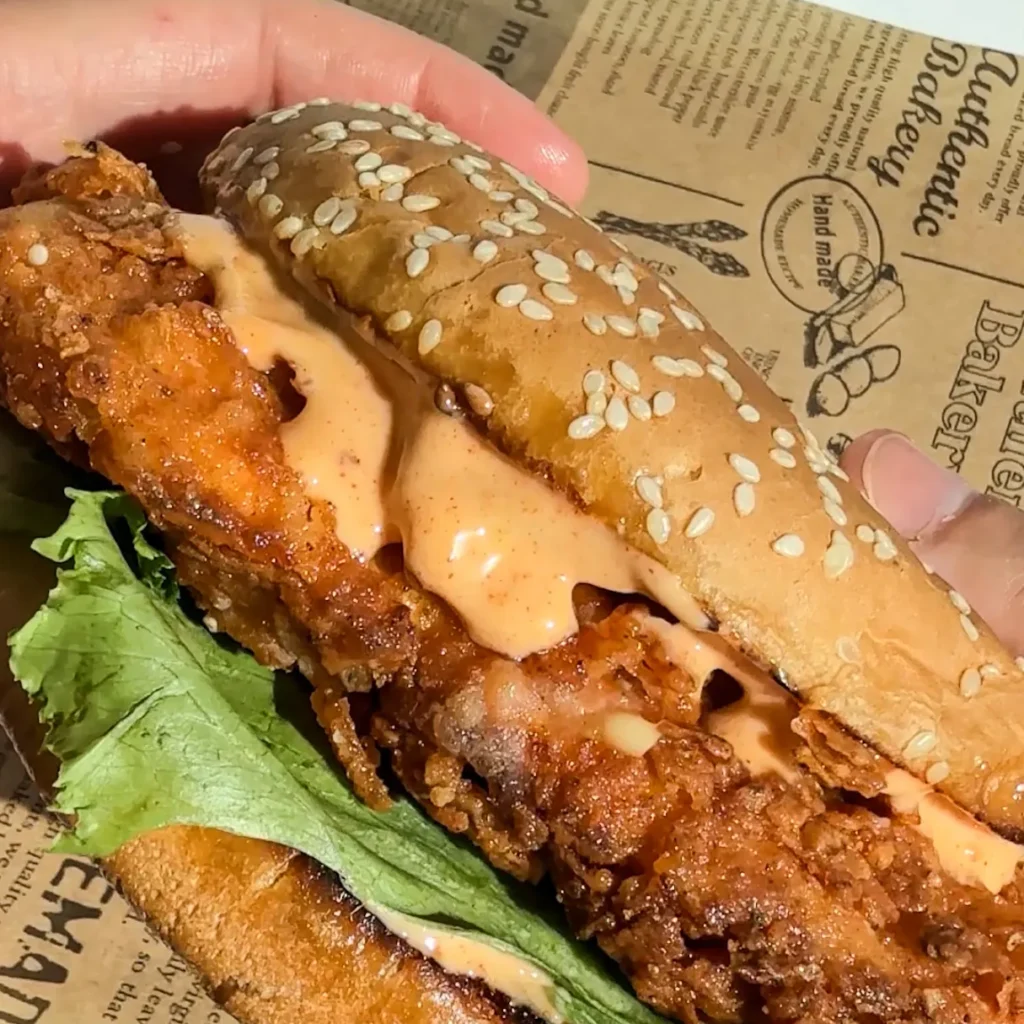
Zinger chicken burger represents one of the most iconic fast food creations, and for good reason. That unmistakable crunch when you bite through the coating. The juicy, perfectly spiced chicken inside. The soft bun giving way to crispy, crunchy textures. The creamy sauce cooling the heat just enough to make you reach for another bite. When you master how to make Zinger chicken burger at home, you’re creating something even better than the original.
This homemade version delivers crispier coating, juicier chicken, and customizable spice levels that let you control every element. No bland breading, no dry meat, and no compromises. Just proper buttermilk marination, well-seasoned coating, and correct frying technique that produces spectacular results. In this comprehensive guide, I’ll walk you through achieving that iconic crunch, explain why marination matters profoundly, show you how to create craggy crispy bits, and teach you to assemble the perfect spicy chicken burger every single time. Whether you’re craving Zinger chicken burger for dinner or planning to impress guests, this recipe delivers consistently.
Why This Recipe is Special
What makes this Zinger chicken burger stand out from other fried chicken sandwich recipes is attention to authentic technique. Many homemade versions skip crucial steps like extended marination or proper coating method, resulting in disappointing texture and flavor. This recipe respects the fundamentals that make restaurant-style fried chicken extraordinary. You’ll learn the secret to creating those craggy, extra-crispy bits that define great Zinger chicken burger. The double-seasoning approach ensures flavor in every layer, not just on the surface. The buttermilk marinade tenderizes while building flavor foundation.
Key Ingredients Overview
Creating exceptional Zinger chicken burger requires relatively simple ingredients used correctly. You’ll need boneless chicken breasts for the protein base. Buttermilk provides the acidic marinade that tenderizes and flavors. All-purpose flour creates the coating structure. Cornstarch lightens the texture for maximum crispiness. Bold spices including chili powder, cayenne, paprika, garlic powder, and onion powder build complex heat and flavor. Soft burger buns provide the tender base. Mayonnaise, hot sauce, and seasonings create the cooling spicy sauce. Fresh lettuce adds essential crunch and freshness. Each component serves specific purposes in building the complete Zinger chicken burger experience.

Understanding What Makes Zinger Chicken Burger Iconic
The Zinger chicken burger isn’t just another fried chicken sandwich. It represents a specific style defined by aggressive crunch, bold spice, and perfect balance between heat and cooling elements.
Defining Characteristics
Authentic Zinger chicken burger features ultra-crispy coating covered in craggy, crunchy bits that shatter when you bite. The chicken inside stays remarkably juicy despite being cooked through completely. The heat level is noticeable and builds gradually without overwhelming. The creamy sauce provides cooling relief while adding its own flavor. The soft bun compresses around the crispy chicken, creating textural contrast. Fresh vegetables add brightness and moisture. Every element works together to create that addictive quality that keeps you coming back.
The Role of Contrast
What makes Zinger chicken burger so satisfying is the deliberate contrast built into every component. Heat from cayenne and chili powder contrasts with cooling mayonnaise-based sauce. Ultra-crispy coating contrasts with tender, juicy chicken. Soft bun contrasts with crunchy breading. Fresh lettuce contrasts with rich fried chicken. Understanding these contrasts helps you appreciate why each step matters and why shortcuts compromise the final result.
Building Flavor Through Buttermilk Marination
The marinade is where flavor development begins for Zinger chicken burger. This step cannot be rushed or skipped without significant impact.
Why Buttermilk Works Perfectly
Buttermilk provides acidity that breaks down proteins in chicken, resulting in incredibly tender meat. The lactic acid tenderizes without making the chicken mushy like some other acids. Buttermilk’s thickness allows spices to cling to the chicken surface, ensuring deep flavor penetration. It also helps the flour coating adhere better during breading, creating thicker, crispier crust on your Zinger chicken burger. Regular milk lacks these benefits, so buttermilk is essential for authentic results.
Spice Blend in the Marinade
The wet marinade for Zinger chicken burger contains bold seasonings that infuse directly into the meat. Chili powder and cayenne pepper provide the signature heat. Smoked paprika adds depth and subtle smokiness without overpowering. Garlic powder and onion powder build savory foundation. Dried oregano contributes warmth and herbal complexity. Salt ensures the chicken is seasoned throughout, not just on the surface. These spices work together to create complex flavor rather than one-dimensional heat.
Marination Time Requirements
Minimum marination time for Zinger chicken burger is two hours, though four to six hours produces better results. Overnight marination is ideal for maximum tenderness and flavor development. The extended time allows acids to work while spices penetrate deeply. Quick marination of thirty minutes or less won’t deliver the same juicy, flavorful results. Plan ahead and give your chicken the time it needs for exceptional Zinger chicken burger.

Creating the Perfect Crispy Coating
The dry coating mixture determines whether your Zinger chicken burger achieves that signature crunch or falls flat.
Flour and Cornstarch Combination
All-purpose flour provides structure and body for the coating. Cornstarch is the secret ingredient that creates lighter, crispier texture than flour alone. The cornstarch also helps achieve that crackly, shattering quality that defines great Zinger chicken burger. Use roughly three parts flour to one part cornstarch for optimal balance. This combination fries up incredibly crispy and stays crispy longer than pure flour coating.
Double Seasoning Method
Seasoning appears in both wet marinade and dry coating for Zinger chicken burger. This double-seasoning approach ensures every layer carries flavor. Many home cooks season only the marinade or only the flour, resulting in bland breading. When you season both components, the coating itself tastes delicious rather than acting as mere texture. Use the same spice blend in both for flavor coherence, adjusting quantities based on desired heat level.
The Secret to Craggy Crunchy Bits
Here’s the game-changing technique for authentic Zinger chicken burger texture. Add two to three tablespoons of wet buttermilk marinade directly into your seasoned flour mixture. Use your fingers to work it in, creating small clumps and chunks of seasoned flour. These clumps adhere to the chicken during coating and fry into incredibly crunchy, jagged bits. This is what creates that iconic craggy crust with varied textures. Without this step, your coating will be relatively smooth and lack that signature crunch.
Coating Chicken for Maximum Adhesion
Proper coating technique ensures your breading stays attached during frying rather than falling off into the oil.
The Coating Process
Remove marinated chicken from buttermilk, allowing excess to drip off but keeping the chicken quite wet. Place each piece into your seasoned flour mixture with the craggy bits. Press the flour firmly onto all surfaces of the chicken. Really pack it on, ensuring complete coverage with no bare spots. The flour should adhere thickly to create substantial coating on your Zinger chicken burger.
Resting Before Frying
After coating, let the breaded chicken rest on a wire rack for five to ten minutes before frying. This resting period allows the coating to hydrate slightly from the moisture in the chicken. The flour absorbs some of that buttermilk, creating better adhesion. This prevents the coating from sliding off during frying and produces more even, complete coverage on your finished Zinger chicken burger.
Mastering the Frying Technique
Frying determines whether your Zinger chicken burger achieves crispy, golden perfection or turns out greasy and undercooked.
Oil Selection and Temperature
Use neutral oil with high smoke point for frying Zinger chicken burger. Vegetable oil, canola oil, or peanut oil all work excellently. Avoid oils with low smoke points like olive oil or butter. Heat your oil to between 340 and 350 degrees Fahrenheit. This temperature range is crucial. Too low, and the chicken absorbs oil becoming greasy. Too high, and the coating burns before the chicken cooks through. Use a thermometer to monitor temperature accurately.
Frying Process and Timing
Carefully place coated chicken into hot oil without crowding the pan. Overcrowding drops oil temperature, resulting in soggy coating on your Zinger chicken burger. Fry in batches if necessary. Cook for approximately six to eight minutes per side, depending on chicken thickness. The coating should become deeply golden brown and incredibly crispy. The chicken should reach internal temperature of 165 degrees Fahrenheit. Use a meat thermometer to verify doneness.
Maintaining Crispiness After Frying
Remove fried chicken from oil and place it on a wire rack rather than paper towels. Wire racks allow air circulation around the entire piece, preventing steam from softening the bottom. Paper towels trap steam, making the coating soggy. Let the chicken rest on the rack for two to three minutes before assembling your Zinger chicken burger. This brief rest redistributes juices while maintaining maximum crispiness.

Preparing the Spicy Mayo Sauce
The sauce is essential for balancing heat and adding creamy richness to Zinger chicken burger.
Building the Sauce Base
Start with good quality mayonnaise as your foundation. The mayonnaise provides creaminess and richness that cools the spicy chicken. Add a small amount of vinegar or lemon juice for brightness and tanginess. This acidity cuts through the richness and prevents the sauce from feeling heavy on your Zinger chicken burger.
Adding Heat and Flavor
Incorporate hot sauce to taste, starting conservatively and building up. Different hot sauces vary in heat level, so adjust accordingly. Add paprika to reinforce the chicken’s seasoning and provide color. A pinch of garlic powder adds savory depth. Mix everything thoroughly until completely smooth and uniform. The sauce should taste creamy, tangy, slightly spicy, and flavorful without overpowering the chicken in your Zinger chicken burger.
Customizing Heat Levels
The beauty of homemade sauce for Zinger chicken burger is complete control over spice. Want it mild? Reduce or omit hot sauce. Prefer it fiery? Add extra cayenne or use hotter sauce varieties. Taste as you mix and adjust to your preference. The sauce should cool the heat from the chicken while adding its own complementary spice.
Selecting the Ideal Bun
The bun choice significantly impacts the eating experience of Zinger chicken burger.
Best Bun Options
Soft burger buns or brioche buns work perfectly for Zinger chicken burger. The softness is essential because it compresses around the thick, crispy chicken without overwhelming the filling. Brioche offers slight sweetness and buttery richness that complements spicy chicken beautifully. Standard sesame seed burger buns provide classic flavor. Avoid hard-crusted buns or ciabatta-style bread, which compete with the chicken’s texture rather than complementing it.
Toasting for Structure
Lightly toast your buns before assembling Zinger chicken burger. Toasting serves multiple purposes. It adds pleasant warmth and slight crispness. The toasted surface provides barrier against moisture from sauce and vegetables, preventing sogginess. Toast just until lightly golden, not hard or crunchy. You want warmth and structure, not competing crunch that detracts from the chicken’s crispy coating.
Assembling the Perfect Zinger Chicken Burger
Assembly order matters for achieving ideal flavor distribution and structural integrity in Zinger chicken burger.
Layer by Layer Construction
Start with the bottom bun half. Spread generous amount of spicy mayo sauce directly on the toasted surface. This creates moisture barrier while delivering flavor. Place one or two crisp lettuce leaves on the sauce. The lettuce adds fresh crunch and prevents direct contact between sauce and chicken, which could soften the coating. Place your hot, crispy fried chicken on the lettuce. If using cheese, add the slice now while the chicken is still hot enough to melt it slightly. Add another dollop of spicy mayo on top of the chicken. Place the top bun to complete your Zinger chicken burger.
Optional Additions
While the classic version is simple, you can customize your Zinger chicken burger with additions. Sliced tomatoes add juicy freshness. Pickles provide acidic crunch. Sliced onions add sharp bite. Cheese melts beautifully from the chicken’s residual heat. Keep additions moderate to avoid overwhelming the star attraction, the crispy spiced chicken.
Serving Immediately
Serve your Zinger chicken burger immediately after assembly while the chicken remains hot and crispy. As time passes, steam from the chicken softens the coating and the textures blur together. Freshly assembled burgers deliver maximum textural contrast and flavor impact.
Customizing Heat Levels
One major advantage of homemade Zinger chicken burger is complete control over spiciness.
Adjusting Marinade Heat
For milder versions, reduce cayenne pepper in the marinade while keeping chili powder moderate. For extra heat, increase cayenne significantly or add a pinch of ghost pepper powder. The marinade’s heat infuses throughout the chicken, so changes here affect the entire Zinger chicken burger from inside out.
Modifying Coating Spice
The dry coating contributes surface heat that hits immediately when you bite. Adjust cayenne and chili powder in the flour mixture independently from the marinade. This allows you to create chicken that’s mild inside but spicy on the surface, or vice versa, depending on preferences for your Zinger chicken burger.
Sauce Heat Control
The spicy mayo provides final heat adjustment. Keep it mild for cooling effect, or make it quite spicy to amplify overall heat. This is the easiest place to customize because you can taste and adjust before assembling your Zinger chicken burger.
Perfect Serving Suggestions
Zinger chicken burger pairs beautifully with various sides and works for multiple occasions.
Classic Accompaniments
Serve your Zinger chicken burger with crispy French fries or potato wedges for classic fast food experience. Coleslaw provides cooling, crunchy contrast that balances the heat. Pickle spears add acidic brightness. Iced beverages or thick milkshakes help cool the palate between bites. These traditional pairings enhance the overall meal without competing with the star attraction.
Occasion Ideas
Zinger chicken burger works perfectly for casual weeknight dinners when you want something special. They’re ideal for game day gatherings or sports watching parties. Weekend lunch or dinner becomes an event when you serve these. Consider them for casual entertaining where you want impressive food without formal plating. The burgers feel indulgent and special while remaining approachable and fun.
Common Mistakes and How to Avoid Them
Understanding common errors helps you achieve perfect Zinger chicken burger every time.
Skipping Marination
The biggest mistake is inadequate marination time. Quick fifteen or thirty minute marinades don’t tenderize the chicken or develop flavor properly. Your Zinger chicken burger needs minimum two hours, preferably longer, for the buttermilk and spices to work their magic. Plan ahead and give the chicken proper time.
Underseasoning the Flour
Many home cooks season the marinade well but forget to season the flour coating adequately. This creates bland breading that tastes only of fried flour. Season your flour mixture boldly for Zinger chicken burger that delivers flavor in every layer, not just the chicken underneath.
Wrong Frying Temperature
Frying at incorrect temperature ruins otherwise perfect preparation. Too low, and your Zinger chicken burger absorbs oil becoming greasy with soft coating. Too high, and the outside burns while the inside remains undercooked. Invest in a thermometer and maintain proper temperature throughout frying.
Overcrowding the Pan
Adding too much chicken at once drops oil temperature significantly. The coating becomes soggy instead of crispy. The chicken steams rather than fries. Work in batches for your Zinger chicken burger, allowing temperature to recover between batches.
Using Dry or Stale Buns
The bun is just as important as the chicken in Zinger chicken burger. Dry, stale, or hard buns ruin the eating experience. Use fresh, soft buns and toast them lightly for best results. The bun should yield and compress, not fight against your bite.
Storage and Make-Ahead Strategies
Understanding what can be prepared ahead helps with planning for Zinger chicken burger meals.
Marinating Ahead
The chicken can marinate for up to twenty-four hours. In fact, longer marination within this timeframe improves results for your Zinger chicken burger. Prepare the marinade and chicken the night before, then fry and assemble the next day for maximum convenience.
Coating Mixture Preparation
The seasoned flour mixture can be prepared several hours or even a day ahead and stored in an airtight container. This doesn’t compromise quality and actually saves time when you’re ready to cook your Zinger chicken burger.
Frying in Advance
Fried chicken can be kept warm in a low oven for short periods if necessary, though fresh-fried produces the absolute best results. If you must fry ahead, place cooked chicken on a wire rack in a 200-degree oven for up to thirty minutes. Quality decreases over time, so this should be last resort for your Zinger chicken burger.
Leftover Storage
Store leftover fried chicken in the refrigerator for up to two days in an airtight container. Reheat in a 375-degree oven for ten to fifteen minutes to restore some crispiness. The coating won’t match fresh-fried quality, but this method produces acceptable results. Assemble fresh Zinger chicken burger with reheated chicken rather than storing assembled burgers.
Frequently Asked Questions
Can I bake instead of frying?
Baking produces different results than frying for Zinger chicken burger. You can bake the coated chicken at 425 degrees Fahrenheit for twenty-five to thirty minutes, flipping halfway through. Spray the coating with cooking spray for browning. However, baked chicken won’t achieve the same ultra-crispy, shattering texture that defines authentic fried versions. Baking works for healthier preparation but creates a different style entirely.
What if I don’t have buttermilk?
Make homemade buttermilk substitute by adding one tablespoon of lemon juice or white vinegar to one cup of regular milk. Let it sit for five minutes until it curdles slightly. This provides similar acidity for tenderizing chicken in your Zinger chicken burger marinade. The flavor differs slightly from real buttermilk but works acceptably.
How do I know when the chicken is fully cooked?
Use an instant-read thermometer inserted into the thickest part of the chicken. It should read 165 degrees Fahrenheit for safe consumption. Visual cues include deeply golden coating and clear juices when pierced. However, thermometer measurement is most reliable for ensuring your Zinger chicken burger chicken is cooked through without being dried out.
Can I use chicken thighs instead of breasts?
Yes, boneless skinless chicken thighs work excellently for Zinger chicken burger. They’re harder to overcook and stay juicier than breasts. The slightly higher fat content makes them more forgiving. Use the same marination and frying technique. Cooking time may vary slightly depending on thickness.
How do I store and reheat leftover sauce?
Store spicy mayo sauce in an airtight container in the refrigerator for up to one week. The ingredients are stable and safe for this duration. Stir before using if any separation occurs. The sauce tastes the same or better after flavors meld overnight, making it perfect for preparing ahead for your Zinger chicken burger.
Why is my coating falling off during frying?
Coating falls off when the chicken is too wet when coated, when coating isn’t pressed firmly enough, or when the chicken is moved too much during early frying. Ensure you press flour firmly onto chicken. Let coated chicken rest before frying. Don’t flip or move the chicken until the coating sets, usually after three to four minutes. These steps prevent coating loss on your Zinger chicken burger.
Final Thoughts
Mastering Zinger chicken burger at home represents a worthwhile achievement that delivers restaurant-quality results under your complete control. By understanding proper marination technique, creating perfectly seasoned coating with craggy crispy bits, maintaining correct frying temperature, and assembling components thoughtfully, you can consistently produce spectacular spicy chicken burgers. The satisfaction of biting into that ultra-crispy coating and juicy, flavorful chicken cannot be overstated. Whether you’re making Zinger chicken burger for family dinner or entertaining guests, this recipe impresses every time.
The customizable heat levels let you adjust to any preference, while the straightforward technique ensures success even for less experienced cooks. These burgers deliver indulgent satisfaction that justifies the effort. Once you master the technique, you’ll find yourself craving and creating Zinger chicken burger regularly. Your perfect crispy, spicy chicken burger awaits.
Watch the recipe video for more clarity

People also like our these recipes:

BIG MAC FRIES
BIG MAC TACOS
SPICY MAYO BAKED CHICKEN
CRUNCHY HOMEMADE ONION RINGS
DOUBLE CHEESEBURGER
HEALTHY CHICKEN BURGER
Chicken Marinade (Wet Mix)
- 1 cup buttermilk
- 1 tbsp chili powder
- 2 tsp salt
- ½ tsp black pepper
- ½ tsp garlic powder
- ½ tsp onion powder
- ½ tsp smoked paprika
- ½ tsp oregano
- Cayenne pepper to taste optional
- Mix everything add chicken breasts, and marinate for a few hours or overnight.
Dry Coating Mix
- 1 cup all-purpose flour
- ½ cup cornstarch
- 1 tbsp chili powder
- ½ tsp smoked paprika
- ½ tsp garlic powder
- ½ tsp onion powder
- ½ tsp oregano
- ½ tsp salt
- ½ tsp black pepper
- Add around 3 tbsp of the wet marinade to the dry mixture to create crunchy clumps.
- Coat chicken very well.
For Frying & Assembly
- Oil for frying
- Burger buns or brioche buns
- Lettuce
- Cheese slices
Spicy Mayo
- ¼ cup mayonnaise
- 1 –2 tsp hot sauce
- ½ tsp paprika
- Pinch of garlic powder
- Pinch of vinegar
Marinate chicken in the wet mix for several hours or overnight.
Prepare the dry coating mix and add a few tablespoons of the marinade to create clumps.
Coat chicken thoroughly, pressing flour onto the surface.
Fry in hot oil until golden,and fully cooked.
Mix all spicy mayo ingredients.
Toast buns lightly.
Assemble burgers with lettuce, chicken, cheese, and spicy mayo.
Serve immediately and enjoy.
If you've given this recipe a try and it won you over, please share your thoughts by leaving
a rating and comment below! If you have any questions about this recipe, don't hesitate to ask – I'm here to
help and will respond promptly.