Discover the Magic of Japanese Chicken Karaage
Crispy on the outside, tender and juicy on the inside, Japanese Chicken Karaage represents the pinnacle of fried chicken perfection. This beloved dish from Japan transforms simple chicken pieces into golden morsels of deliciousness through expert marinating and a special double-frying technique. Once you master Japanese Chicken Karaage, you’ll understand why it appears on menus at izakayas, ramen shops, and bento boxes throughout Japan and around the world.
The beauty of Japanese Chicken Karaage lies in its versatility and crowd-pleasing appeal. Whether served hot straight from the fryer or enjoyed cold in a packed lunch, this Japanese Chicken Karaage delivers satisfying crunch and deep flavor with every bite. The recipe comes together quickly using accessible ingredients, making Japanese Chicken Karaage perfect for weeknight dinners, party platters, or special celebrations like New Year’s gatherings.
What sets Japanese Chicken Karaage apart from other fried chicken styles is the carefully balanced marinade and precise cooking method. The ginger-garlic marinade penetrates the meat, infusing it with savory umami flavors that complement rather than overwhelm. The double-frying technique ensures your Japanese Chicken Karaage achieves the ideal texture contrast between the ultra-crispy coating and succulent interior.
Why This Recipe is Special
This Japanese Chicken Karaage recipe delivers restaurant-quality results in your home kitchen without requiring special equipment or hard-to-find ingredients. The marinade uses pantry staples you likely already have, while the coating comes together with basic cornstarch and flour. Despite this simplicity, the Japanese Chicken Karaage you create will rival anything served at high-end Japanese restaurants.
The double-frying method makes all the difference in achieving authentic Japanese Chicken Karaage texture. This technique, perfected over generations in Japan, ensures the coating stays shatteringly crisp even as the chicken rests. Many fried chicken recipes result in soggy coating after a few minutes, but properly made Japanese Chicken Karaage maintains its crunch for much longer.
Another advantage of this Japanese Chicken Karaage recipe is its adaptability to different serving situations. Squeeze fresh lemon over the hot pieces for bright acidity, drizzle with creamy Kewpie mayonnaise for richness, or enjoy it plain to appreciate the perfectly seasoned coating. The Japanese Chicken Karaage works equally well as an appetizer, main course, or portable lunch option.
Key Ingredients Overview
Creating exceptional Japanese Chicken Karaage starts with selecting quality chicken. Boneless, skinless chicken thighs provide the best results due to their higher fat content and tender texture. The marinade combines soy sauce for salty umami depth, fresh ginger for aromatic bite, and garlic for pungent complexity. These elements work together to create the signature Japanese Chicken Karaage flavor profile.
The coating for Japanese Chicken Karaage uses cornstarch mixed with a small amount of water to create a crumbly texture. This unique preparation method ensures maximum crispiness when fried. Some variations use plain flour or a combination of cornstarch and flour, but cornstarch alone produces the crispiest Japanese Chicken Karaage coating.

Understanding Karaage Beyond Chicken
While most people associate the term exclusively with fried chicken, karaage actually encompasses a broader category of Japanese cooking. The word refers to foods fried with or without flour coating, and can apply to various proteins beyond chicken. Understanding this helps appreciate the flexibility and history behind Japanese Chicken Karaage.
The technique originated from Chinese cooking methods introduced to Japan during the early Edo period. Initially, karaage meant frying meat or fish without any marinade. Over time, Japanese cooks adapted the method, creating what we now know as Japanese Chicken Karaage with its characteristic marinade and coating.
Historical Development of Karaage
The evolution of Japanese Chicken Karaage reflects Japan’s talent for adopting and refining culinary techniques from other cultures. The term “kara” in karaage derives from the Chinese word meaning “Tang,” referring to China’s Tang dynasty. Japanese pronunciation and writing systems transformed this into the modern term we use for Japanese Chicken Karaage today.
Traditional Japanese cooking distinguishes between karaage and tatsuta-age, another fried chicken preparation. Tatsuta-age specifically requires marinating the meat before coating it with wheat flour. Japanese Chicken Karaage has looser requirements, allowing cooks more flexibility in preparation methods while still achieving delicious results.
Modern Karaage Variations
Contemporary Japanese Chicken Karaage appears in countless variations across Japan and internationally. Some regions prefer lighter coatings, while others favor thicker, crunchier crusts. Certain izakayas serve Japanese Chicken Karaage with special dipping sauces, while others stick to traditional lemon wedges.
The popularity of Japanese Chicken Karaage has spread globally, with adaptations appearing on fusion menus worldwide. Despite these variations, the core elements remain consistent: marinated chicken pieces fried to crispy perfection. This Japanese Chicken Karaage foundation allows for creative interpretation while maintaining authentic flavor.
Choosing the Right Ingredients
Ingredient selection significantly impacts your Japanese Chicken Karaage results. Understanding what to look for when shopping ensures you create the most delicious version possible.
Selecting the Best Chicken
Chicken thighs produce superior Japanese Chicken Karaage compared to breast meat. The higher fat content in thighs keeps the meat moist and tender during frying, while breasts tend to dry out more easily. Look for boneless, skinless thighs with consistent thickness for even cooking.
You can use skin-on thighs if you prefer extra richness in your Japanese Chicken Karaage. The skin adds another layer of crispy texture and fatty flavor. However, skin-on pieces require slightly longer frying time and can splatter more during cooking, so adjust your technique accordingly.
Fresh chicken always produces better Japanese Chicken Karaage than previously frozen meat. Fresh chicken absorbs marinades more effectively and maintains better texture during cooking. If you must use frozen chicken, thaw it completely in the refrigerator and pat it thoroughly dry before marinating.
Understanding Coating Options
Cornstarch creates the crispiest coating for Japanese Chicken Karaage. Its fine texture and low protein content produce a delicate, shattering crust when fried at the proper temperature. Pure cornstarch coating stays crispy longer than flour-based alternatives.
All-purpose flour works as a substitute if cornstarch is unavailable for your Japanese Chicken Karaage. The coating will be slightly thicker and softer, but still delicious. Some cooks prefer mixing equal parts cornstarch and flour to balance crispiness with substantial coating.
The unique preparation method for Japanese Chicken Karaage coating involves adding small amounts of water to the cornstarch. This creates clumpy, crumbly textures that adhere better to the marinated chicken. These irregular clumps create more surface area, resulting in extra-crispy Japanese Chicken Karaage.
Marinade Component Selection
Soy sauce forms the foundation of Japanese Chicken Karaage marinade. Use regular soy sauce rather than low-sodium varieties, as the salt content is essential for proper seasoning and moisture retention. Japanese soy sauce tends to be slightly sweeter and less salty than Chinese varieties.
Fresh ginger makes a noticeable difference in Japanese Chicken Karaage flavor compared to dried or powdered ginger. Grate the ginger finely to release maximum juice and aromatic oils. The fresh ginger adds bright, spicy notes that cut through the richness of fried chicken.
Fresh garlic cloves, minced or grated, provide pungent depth to Japanese Chicken Karaage marinade. Avoid garlic powder, which tastes flat and lacks the complexity of fresh garlic. One or two cloves sufficiently flavors a batch without overwhelming the other ingredients.

Step-by-Step Instructions
Follow these detailed steps to create perfect Japanese Chicken Karaage every time. Precision matters, especially regarding marinating time and oil temperature.
Preparing the Chicken
Begin by cutting your chicken thighs into uniform bite-sized pieces, approximately one and a half inches square. Consistent sizing ensures even cooking throughout your Japanese Chicken Karaage batch. Trim away any excess fat or connective tissue that might affect texture.
Place the chicken pieces in a large mixing bowl. Season generously with salt and freshly ground black pepper, tossing to distribute the seasoning evenly. This initial seasoning step enhances the Japanese Chicken Karaage flavor before adding the liquid marinade components.
Creating and Applying the Marinade
Combine soy sauce, freshly grated ginger, and minced garlic in a small bowl. Mix these marinade ingredients thoroughly to ensure even distribution of flavors. Pour this mixture over your seasoned chicken pieces, tossing everything together until each piece gets coated completely.
Cover the bowl with plastic wrap and refrigerate your Japanese Chicken Karaage for at least thirty minutes. Longer marinating times, up to two hours, deepen the flavor penetration. Avoid marinating longer than four hours, as the soy sauce can make the chicken too salty and affect texture.
Preparing the Coating
While the chicken marinates, prepare your Japanese Chicken Karaage coating. Place cornstarch in a shallow bowl or plate. Add one tablespoon of water to a small portion of the cornstarch and mix with your fingers until it forms crumbly clumps rather than smooth paste.
Continue adding water one tablespoon at a time, working it into approximately half the cornstarch. The goal is creating a mixture with varied textures, from fine powder to pebble-sized clumps. This irregular coating produces the signature crispy texture of Japanese Chicken Karaage.
Coating the Chicken
Remove the marinated chicken from the refrigerator. Add beaten egg and a small amount of flour to the bowl with the chicken, mixing thoroughly. This binding mixture helps the cornstarch coating adhere properly to create perfect Japanese Chicken Karaage.
Working with a few pieces at a time, press each chicken piece firmly into the prepared cornstarch mixture. Ensure complete coverage, pressing the crumbly coating into all surfaces. Shake off any excess coating gently, as too much cornstarch can create overly thick crust on your Japanese Chicken Karaage.
First Frying Phase
Heat vegetable oil in a deep, heavy pot or deep fryer to exactly 180 degrees Celsius or 356 degrees Fahrenheit. Use a cooking thermometer to verify temperature accuracy, as proper heat is crucial for Japanese Chicken Karaage success. Maintain consistent temperature throughout frying.
Carefully lower coated chicken pieces into the hot oil, working in batches to avoid overcrowding. Overcrowding drops oil temperature and results in greasy, soggy Japanese Chicken Karaage. Fry for two to three minutes until the coating turns light golden brown and the chicken cooks about ninety percent through.
Remove the chicken pieces using a slotted spoon or spider strainer. Transfer them to a wire rack set over a baking sheet to drain excess oil. Allow your Japanese Chicken Karaage to rest for three to four minutes while the oil reheats for the second frying.
Second Frying Phase
Increase the oil temperature to 200 degrees Celsius or 392 degrees Fahrenheit. This higher temperature is essential for achieving the characteristic crispy exterior of Japanese Chicken Karaage. Wait until the thermometer confirms the oil has reached the proper temperature before proceeding.
Return the partially fried chicken to the hot oil for the second frying. This time, fry for only one to two minutes until the coating turns deep golden brown and becomes intensely crispy. The higher temperature quickly sears the outside of your Japanese Chicken Karaage without overcooking the interior.
Remove the finished Japanese Chicken Karaage pieces and return them to the wire rack. The rack allows air circulation around all sides, preventing steam from softening the bottom of the coating. Let the chicken rest for one to two minutes before serving to allow the coating to set completely.
Professional Tips for Perfect Results
These expert techniques elevate your Japanese Chicken Karaage from good to exceptional. Small details make significant differences in the final outcome.
Temperature Control Mastery
Maintaining precise oil temperature represents the most critical factor in Japanese Chicken Karaage success. Invest in a reliable cooking thermometer rather than guessing temperatures. Even twenty-degree variations significantly affect coating texture and oil absorption.
Between batches, allow the oil to return to the proper temperature before adding more chicken. Adding the next batch too quickly drops the oil temperature, resulting in greasy Japanese Chicken Karaage with soft coating. Patience during frying yields much better results.
Chicken Preparation Techniques
Pat your chicken pieces dry before marinating for better Japanese Chicken Karaage results. Excess surface moisture dilutes the marinade and prevents proper seasoning penetration. Dry chicken also browns more effectively during frying.
Cut chicken pieces slightly smaller than you think necessary. The coating adds bulk, and smaller pieces cook through more reliably during the short frying times. Undercooked Japanese Chicken Karaage poses health risks, so err on the side of smaller pieces.
Coating Application Strategies
Press the coating firmly onto each chicken piece rather than simply tossing them together. This pressure ensures the cornstarch adheres properly and creates the irregular, craggy surface that makes Japanese Chicken Karaage so crispy. Loose coating falls off during frying.
Let coated chicken pieces rest on a rack for five minutes before frying. This brief rest allows the coating to set, reducing the likelihood of it washing off when the chicken hits the hot oil. This step produces cleaner-looking Japanese Chicken Karaage with more even coating.
Oil Management
Use fresh oil for the best Japanese Chicken Karaage results. Previously used oil contains particles and degraded fats that affect flavor and appearance. While you can strain and reuse oil once or twice, fresh oil always produces superior results.
Choose oils with high smoke points for frying Japanese Chicken Karaage. Vegetable oil, canola oil, or rice bran oil all work excellently. Avoid olive oil or butter, which smoke at temperatures too low for proper frying.

Common Mistakes to Avoid
Understanding frequent errors helps you prevent them when making Japanese Chicken Karaage. Learn from these common pitfalls to ensure success.
Overcrowding the Fryer
Adding too many chicken pieces at once dramatically lowers oil temperature, the most common mistake when making Japanese Chicken Karaage. Lower temperature means longer frying time, which allows more oil absorption and produces greasy, soggy results instead of crispy coating.
Fry in small batches, even if it takes longer. Your Japanese Chicken Karaage will taste significantly better, and the extra time spent is worth the superior results. Plan accordingly and start frying early enough to accommodate multiple batches.
Inadequate Marinating Time
Rushing the marinating process produces bland Japanese Chicken Karaage that lacks the characteristic savory depth. The chicken needs at least thirty minutes to absorb the soy sauce, ginger, and garlic flavors properly. Shorter marinating times result in one-dimensional taste.
However, marinating too long also causes problems with Japanese Chicken Karaage. More than four hours in soy sauce makes the chicken overly salty and can affect the meat’s texture negatively. Follow the recommended marinating window for best results.
Incorrect Oil Temperature
Frying at too low temperature produces greasy Japanese Chicken Karaage with pale, soft coating. The chicken absorbs excessive oil when the temperature stays below the recommended range. This results in heavy, unpleasant texture rather than light crispiness.
Conversely, oil that’s too hot burns the coating before the chicken cooks through. Your Japanese Chicken Karaage will look dark and crispy outside while remaining raw inside. Always use a thermometer to verify temperatures rather than guessing.
Skipping the Double Fry
Some cooks attempt to simplify Japanese Chicken Karaage by frying only once at a single temperature. This shortcut prevents achieving the ideal texture contrast between crispy exterior and juicy interior. The double-fry technique exists for important reasons.
The first frying cooks the chicken through gently without over-browning the coating. The second frying at higher temperature creates the signature crunch of Japanese Chicken Karaage. Skipping either step compromises the final result significantly.
Variations to Try
Once you master basic Japanese Chicken Karaage, these variations add interest and allow customization for different preferences.
Spicy Karaage Options
Add heat to your Japanese Chicken Karaage by incorporating chili elements into the marinade. Mix in a teaspoon of chili oil or a tablespoon of gochugaru for Korean-inspired spice. You can also dust finished pieces with shichimi togarashi, a Japanese seven-spice blend.
For extremely spicy Japanese Chicken Karaage, add fresh minced chili peppers to the marinade along with the ginger and garlic. Start with one small pepper and adjust to your heat tolerance. The spice penetrates the meat during marinating, creating consistent heat throughout.
Alternative Protein Versions
While chicken defines traditional Japanese Chicken, the technique works beautifully with other proteins. Try the same method with boneless pork shoulder cut into bite-sized pieces. The pork version offers richer, deeper flavor that some people prefer.
Fish karaage represents another popular variation in Japan. Firm white fish like cod or halibut, cut into chunks, works excellently. The fish requires shorter frying times than chicken, so adjust accordingly. This seafood Japanese Chicken variation offers lighter flavor.
Flavor Profile Modifications
Experiment with different marinade additions to create unique Japanese Chicken variations. A tablespoon of sake or mirin adds subtle sweetness and helps tenderize the meat. A teaspoon of sesame oil contributes nutty complexity.
Some cooks add a small amount of curry powder to the coating for Japanese Chicken Karaage with Indian influence. This fusion approach creates interesting flavor combinations while maintaining the crispy texture. Start with half a teaspoon mixed into the cornstarch.
Serving Style Innovations
Transform Japanese Chicken Karaage into a complete meal by serving it over rice with vegetables. The crispy chicken contrasts beautifully with steamed rice and pickled vegetables. Add a soft-cooked egg and you have a complete Japanese-style donburi bowl.
Create Japanese Chicken Karaage sandwiches by tucking the fried pieces into soft buns with shredded cabbage and tonkatsu sauce. This popular street food variation offers convenient, portable eating. Add Kewpie mayonnaise and pickles for extra flavor layers.
Storage and Reheating
Proper storage techniques help you enjoy leftover Japanese Chicken while maintaining quality as much as possible.
Storing Instructions
Allow Japanese Chicken to cool completely before storing to prevent condensation from making the coating soggy. Place cooled pieces in an airtight container lined with paper towels. The paper towels absorb any residual oil and moisture.
Refrigerate Japanese Chicken for up to three days. Layer paper towels between pieces if stacking them in the container. Replace the paper towels if they become saturated with oil, as wet towels won’t prevent sogginess.
For longer storage, freeze Japanese Chicken Karaage in a single layer on a baking sheet until solid, then transfer to freezer bags. Frozen pieces keep for up to one month. This method prevents pieces from sticking together and allows you to remove only what you need.
Reheating Methods
The oven provides the best method for reheating Japanese Chicken Karaage while restoring crispiness. Preheat your oven to 180 degrees Celsius or 350 degrees Fahrenheit. Place the chicken on a wire rack over a baking sheet and heat for ten to twelve minutes until crispy and hot throughout.
An air fryer works excellently for reheating Japanese Chicken Karaage. Set it to 180 degrees Celsius and heat for five to seven minutes. The circulating hot air crisps the coating effectively while heating the interior evenly.
Avoid microwaving Japanese Chicken Karaage, as this method makes the coating irreversibly soggy. If you have no other option, microwave briefly to warm the chicken, then finish in a very hot oven or under the broiler to attempt crisping the coating.
Frequently Asked Questions
Can I use chicken breast instead of thighs?
You can substitute chicken breast for thighs in Japanese Chicken Karaage, though the results will differ. Breast meat contains less fat and tends to dry out more easily during frying. If using breast meat, cut pieces slightly smaller and watch frying time carefully to prevent overcooking. The coating technique remains the same.
Why do I need to fry twice?
The double-frying technique is essential for authentic Japanese Chicken texture. The first frying at lower temperature cooks the chicken through without over-browning the coating. The second frying at higher temperature creates the characteristic crispy, golden exterior. Skipping the second fry produces softer coating that becomes soggy quickly.
What oil temperature is best for karaage?
First frying should occur at 180 degrees Celsius or 356 degrees Fahrenheit for Japanese Chicken. This moderate temperature cooks the chicken without burning the coating. The second frying requires 200 degrees Celsius or 392 degrees Fahrenheit to achieve maximum crispiness. Use a cooking thermometer to verify temperatures accurately.
How can I make the coating extra crispy?
Maximize crispiness in Japanese Chicken by using pure cornstarch for coating and preparing it with the water technique described in the recipe. Ensure oil reaches proper temperature before frying, and avoid overcrowding the pan. The double-fry method is crucial, and letting pieces drain on a wire rack rather than paper towels helps maintain crispiness.
What should I serve with karaage?
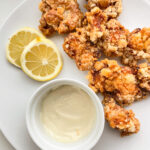
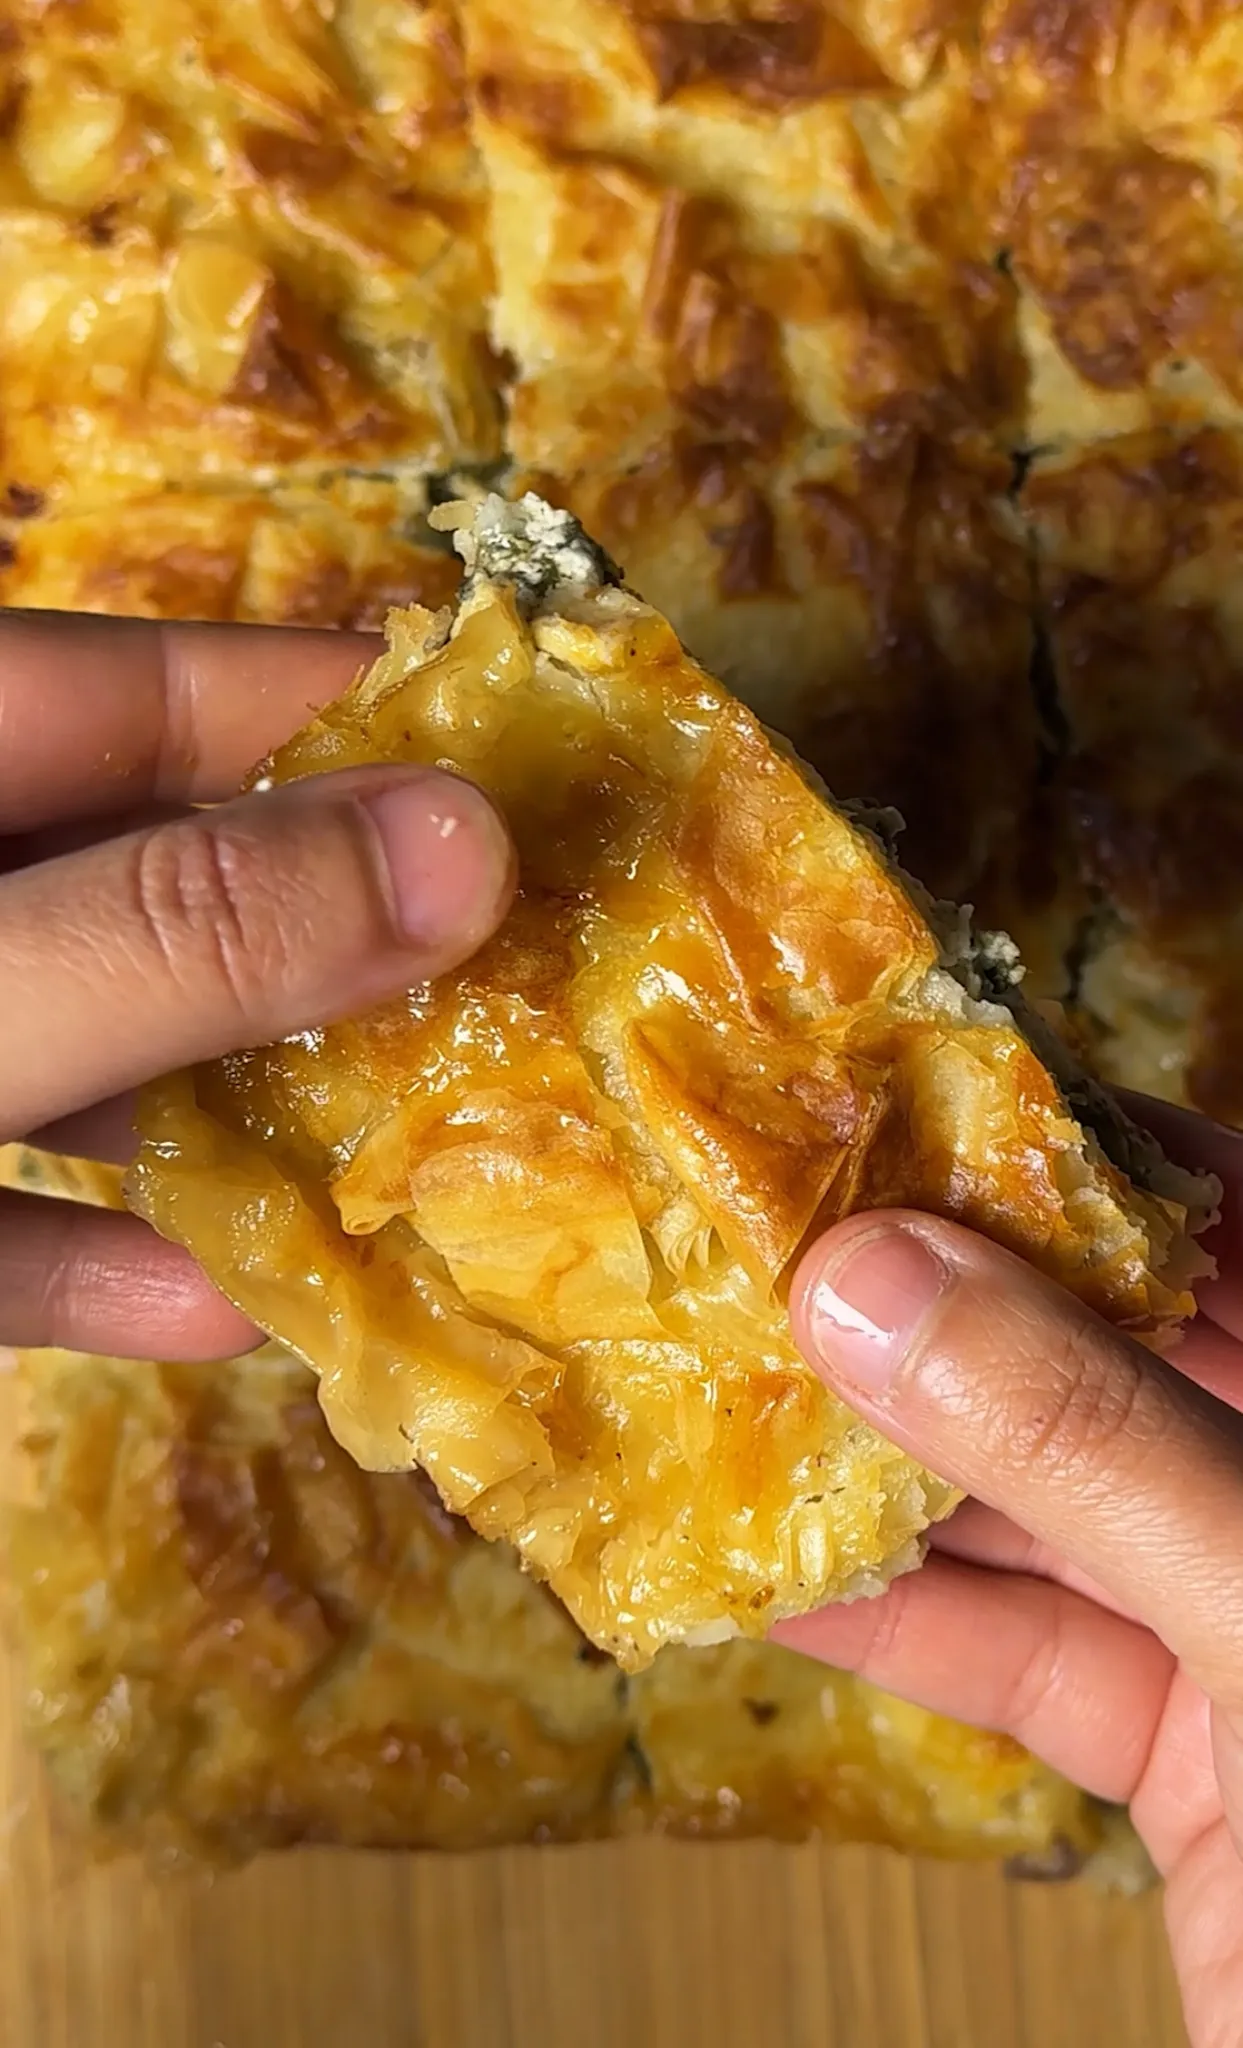
Traditional accompaniments for Japanese Chicken Karaage include lemon wedges for squeezing over the hot chicken and Kewpie mayonnaise for dipping. Serve alongside shredded cabbage, steamed rice, and Japanese pickles for a complete meal. In izakaya settings, cold beer pairs perfectly with this fried chicken.
Can I prepare karaage ahead of time?
While Japanese Chicken Karaage tastes best immediately after frying, you can prepare components in advance. Marinate the chicken up to four hours ahead and keep refrigerated. Coat pieces and refrigerate for up to one hour before frying. For parties, fry the chicken and keep warm in a low oven for up to thirty minutes, though crispiness decreases over time.
Final Thoughts
Mastering Japanese Chicken Karaage opens up a world of delicious possibilities in your cooking repertoire. This versatile dish works beautifully for casual family dinners, impressive party appetizers, or portable lunch options. The combination of savory marinade and ultra-crispy coating creates addictive flavor that keeps people coming back for more.
The techniques you learn making Japanese Chicken Karaage apply to many other fried foods. Understanding proper oil temperature, coating methods, and double-frying principles improves all your frying endeavors. These fundamental skills translate into better results across numerous recipes.
Don’t feel intimidated by the double-frying technique or specific temperatures required for Japanese Chicken Karaage. With a reliable thermometer and attention to detail, anyone can achieve professional results. The recipe forgives small variations while still producing delicious chicken that rivals restaurant versions.
Start with this basic Japanese Chicken Karaage recipe and make it your own through experimentation. Try different marinades, adjust spice levels, or explore alternative proteins using the same technique. Once you experience the satisfying crunch and juicy interior of properly made Japanese Chicken Karaage, you’ll understand why this dish has achieved worldwide popularity.
Watch the recipe video for more clarity
People also like our these recipes:
FOR THE CHICKEN
- 3 boneless chicken breasts cut into cubes
- 2 tsp ginger powder
- 1 garlic clove finely minced
- 3 tbsp soy sauce
- Salt and pepper
- 1 cup cornstarch
- 1/4 cup flour
- 1 egg
- Frying oil
FOR THE GARLIC LEMON DIP
- 1/4 cup kewpie mayo
- 1 tsp lemon juice
- 1 tsp garlic powder
- 1/4 tsp salt
FOR THE CHICKEN
Prepare the chicken marinade by whisking together ginger, garlic, soy sauce, black pepper, and salt in a large bowl. Add chicken breasts, ensuring they're well-coated, then cover with plastic wrap and refrigerate for at least 30 minutes, preferably overnight for maximum flavor.
Create the cornstarch crumble by adding cornstarch to a shallow bowl. Gradually, mix in 1 tbsp. of water at a time until crumbles form, repeating this step around 8 times until half the cornstarch is transformed.
Once the chicken is marinated, add flour and egg, mixing thoroughly. Lightly press the chicken into the cornstarch crumble, shaking off the excess, then transfer to a wire rack.
Heat 4 cups of oil to 350°F. For the first-fry, gently submerge 4 to 5 chicken pieces at a time, ensuring not to overcrowd the pot. Fry for 2-3 minutes until lightly golden, adjusting heat if necessary. Transfer the fried chicken to a wire rack and repeat with the remaining pieces, cleaning oil between batches.
For the second fry, raise the oil temperature to 380°F. Deep-fry 4 to 5 pieces of chicken for another 1-2 minutes until golden brown and crispy. Drain the excess oil on a wire rack and repeat with the remaining chicken.
FOR THE GARLIC LEMON MAYO DIP
For the lemon garlic mayo dip, whisk together mayo, garlic powder, lemon juice, and salt in a small bowl. Transfer to a dipping bowl and serve!
If you've given this recipe a try and it won you over, please share your thoughts by leaving
a rating and comment below! If you have any questions about this recipe, don't hesitate to ask – I'm here to
help and will respond promptly.