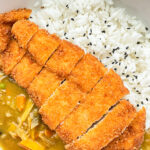
The Ultimate Japanese Chicken Katsu Experience
Few dishes capture the essence of Japanese comfort food quite like Japanese Chicken Katsu curry. This beloved meal combines perfectly crispy panko-breaded chicken cutlets with a rich, aromatic curry sauce served over steaming white rice. The Japanese Chicken Katsu delivers an irresistible combination of textures and flavors that has made it a staple in restaurants and home kitchens across Japan and beyond.
When you prepare Japanese Chicken Katsu at home, you’re creating more than just dinner. You’re crafting an experience that engages all your senses with the satisfying crunch of golden breading, the complex aromatics of curry spices, and the comforting warmth of a perfectly balanced sauce. This Japanese Chicken Katsu recipe breaks down every step to ensure your success, whether you’re a beginner or an experienced cook looking to perfect your technique.
The beauty of Japanese Chicken Katsu lies in its accessible sophistication. While it tastes like something from your favorite Japanese restaurant, the preparation is surprisingly straightforward. With the right ingredients and techniques, your homemade Japanese Chicken Katsu will rival anything you’d find at a specialty eatery. The golden, crispy exterior gives way to tender, juicy chicken inside, while the curry sauce provides depth and richness that ties everything together beautifully.
Why This Recipe is Special
This Japanese Chicken Katsu recipe stands out because it focuses on authenticity while remaining achievable for home cooks. Many versions simplify the curry sauce too much or skip crucial steps in the breading process. This recipe honors traditional methods while offering practical guidance that ensures consistent results every time you make Japanese Chicken Katsu.
The curry component of this Japanese Chicken Katsu differs from other curry styles you might know. Japanese curry has its own unique character with sweeter, milder notes compared to Indian or Thai varieties. The sauce incorporates unexpected ingredients like apple juice that create complex flavor layers without overwhelming heat. This balanced approach makes Japanese Chicken Katsu appealing to a wide range of palates, including those who typically avoid spicy foods.
Key Ingredients Overview
Creating exceptional Japanese Chicken Katsu requires attention to ingredient selection. The chicken breasts should be fresh and of good quality, as they form the centerpiece of the dish. Panko breadcrumbs are non-negotiable for authentic Japanese Chicken Katsu, as regular breadcrumbs simply cannot achieve the same light, crispy texture that makes this dish special.
The curry sauce for your Japanese Chicken Katsu builds flavor through a carefully crafted roux and a combination of aromatics, stock, and subtle sweetness. Japanese curry powder differs from other curry blends, offering a specific flavor profile that defines authentic Japanese Chicken Katsu. While you can find it at Asian markets, some grocery stores now carry it in their international sections.

Understanding Japanese Chicken Katsu
Japanese Chicken Katsu, or chicken katsu as it’s commonly called, belongs to a category of Japanese dishes known as yoshoku, which refers to Western-influenced Japanese cuisine. The word katsu comes from the English word cutlet, reflecting the dish’s origins in European breaded meat preparations that were adapted to Japanese tastes in the late 19th century.
What makes Japanese Chicken Katsu distinctly Japanese is the use of panko breadcrumbs and the specific preparation method. The cutlets are pounded thin for even cooking, breaded in a particular sequence, and fried to achieve maximum crispiness. When served with Japanese curry sauce, the dish becomes katsu curry, one of the most popular comfort foods in Japan.
The Origins of Katsu Curry
The history of Japanese Chicken Katsu curry represents a fascinating culinary evolution. Tonkatsu, or breaded pork cutlet, came first and gained popularity in Tokyo during the Meiji era. The chicken version followed as a lighter alternative. The addition of curry sauce created an entirely new dish that combined two beloved foods into one satisfying meal.
Today, Japanese Chicken Katsu curry appears on menus everywhere from casual family restaurants to school cafeterias throughout Japan. Its popularity has spread globally, with Japanese curry houses opening in major cities worldwide. Making authentic Japanese Chicken Katsu at home allows you to enjoy this restaurant favorite whenever the craving strikes.
What Makes Panko Special
Panko breadcrumbs are essential for authentic Japanese Chicken Katsu texture. Unlike regular breadcrumbs made from ground bread, panko consists of bread that’s been processed into large, airy flakes. These flakes create a lighter, crispier coating that stays crunchy even when paired with sauce.
When you bread your Japanese Chicken Katsu with panko, you’ll notice the crumbs are larger and more irregular than standard breadcrumbs. This structure creates more surface area and air pockets, which translates to superior crispiness when fried. The coating on Japanese Chicken Katsu should shatter delicately when you bite into it, and panko makes this possible.
Choosing the Right Ingredients
Success with Japanese Chicken Katsu starts at the grocery store. Each component plays a specific role, so selecting quality ingredients makes a measurable difference in your final results. Let’s examine what to look for when shopping for your Japanese Chicken Katsu ingredients.
Selecting Chicken for Katsu
Boneless, skinless chicken breasts work best for Japanese Chicken Katsu. Choose breasts of similar size so they cook evenly. The meat should look pink and fresh, with no discoloration or strong odor. Organic or free-range chicken offers better flavor and texture, though standard chicken breasts produce good results too.
For the best Japanese Chicken Katsu, avoid chicken breasts that have been enhanced with sodium solutions, as these can affect texture and make the meat too salty. Check the packaging carefully and choose natural chicken whenever possible. Each breast should weigh between six and eight ounces for ideal portion sizes.
Panko Breadcrumb Options
Japanese Chicken Katsu requires panko breadcrumbs, which you’ll find in most grocery stores these days. Look for them in the Asian foods section or near regular breadcrumbs. Traditional panko comes in plain versions, though some brands offer seasoned varieties. For this Japanese Chicken Katsu recipe, plain panko works best as you’ll season the flour instead.
Some panko brands create finer flakes than others. For the crispiest Japanese Chicken Katsu, choose panko with larger, more irregular flakes. The packaging should show you the crumb size. Avoid anything labeled as breadcrumbs or bread crumbs without the panko designation, as these won’t give you the right texture.
Curry Powder Selection
Japanese curry powder has a unique blend of spices that differs from Indian curry powder. For authentic Japanese Chicken Katsu curry, look for S&B or House brand curry powder in Asian markets. These blends contain the right proportions of turmeric, coriander, cumin, and other spices that define Japanese curry flavor.
If you cannot find Japanese curry powder for your Japanese Chicken Katsu, you can substitute mild curry powder, though the flavor will differ slightly. Avoid using strong or hot curry powders, as Japanese curry typically has a sweeter, milder profile. The curry in Japanese Chicken Katsu should complement rather than overpower the crispy chicken.
Additional Ingredients Guide
Fresh garlic and onion form the aromatic base of your Japanese Chicken Katsu curry sauce. Choose firm onions without soft spots and garlic cloves that feel solid when squeezed. These ingredients should smell fresh and pungent, not musty or off.
Quality chicken stock makes a significant difference in your Japanese Chicken Katsu curry sauce. Homemade stock provides the best flavor, though good quality store-bought versions work well too. Avoid stocks with excessive sodium, as you’ll add soy sauce which contains plenty of salt. Apple juice adds subtle sweetness to the curry that balances the savory elements perfectly.

Step-by-Step Instructions
Creating perfect Japanese Chicken Katsu requires attention to technique and timing. Following these detailed instructions ensures your chicken comes out crispy and golden while the curry sauce develops complex, satisfying flavors. Have all your ingredients measured and ready before you begin, as the process moves quickly once you start frying.
Preparing the Curry Sauce
Begin making your Japanese Chicken Katsu curry sauce by creating the roux. Melt three tablespoons of butter in a medium saucepan over medium heat. Once the butter foams, add three tablespoons of all-purpose flour and stir constantly with a wooden spoon. Cook this mixture for three to four minutes until it turns a light brown color and smells nutty.
Add three tablespoons of Japanese curry powder to your roux and continue cooking for five minutes while stirring constantly. This step blooms the spices and removes any raw flavor from the curry powder. The mixture will become very thick and aromatic. Transfer this curry roux to a small bowl and set it aside while you prepare the rest of the sauce for your Japanese Chicken Katsu.
In the same saucepan, add one tablespoon of vegetable oil and heat over medium flame. Add two cloves of minced garlic and one large diced onion to the pan. Saute these aromatics for five minutes until the onion becomes translucent and soft. The garlic should smell fragrant but not burned. This aromatic base provides essential flavor to your Japanese Chicken Katsu curry.
Return the curry roux to the pan with the onions and garlic, stirring well to combine everything. Pour in three cups of chicken stock and one cup of apple juice, whisking constantly to prevent lumps. Add two tablespoons of soy sauce, one tablespoon of sugar, and one tablespoon of rice vinegar. These ingredients balance the flavors in your Japanese Chicken Katsu curry perfectly.
Bring the sauce to a gentle simmer and add your choice of vegetables. Traditional options include carrots, potatoes, and peas, though you can customize based on preference. Reduce the heat to low and let the curry sauce simmer for forty-five minutes to one hour, stirring occasionally. The sauce will thicken considerably and the flavors will meld together beautifully for your Japanese Chicken Katsu.
Preparing the Chicken
While your curry sauce simmers, prepare the chicken for your Japanese Chicken Katsu. Place each chicken breast between two sheets of plastic wrap or parchment paper. Using a meat mallet or rolling pin, gently pound the chicken to an even thickness of about one centimeter throughout. This ensures the Japanese Chicken Katsu cooks evenly and quickly.
Even thickness is crucial for Japanese Chicken Katsu because it prevents some parts from overcooking while others remain undercooked. Take your time with this step and check the thickness as you work. The flattened chicken should be roughly the same width as your palm and feel uniformly thin when you touch it through the plastic.
Setting Up Your Breading Station
Proper breading station setup makes coating your Japanese Chicken Katsu efficient and less messy. You’ll need three shallow dishes arranged in a row. In the first dish, combine one cup of all-purpose flour with one teaspoon of salt and half a teaspoon of black pepper. This seasoned flour adds flavor to your Japanese Chicken Katsu and helps the egg adhere better.
In the second dish, beat two large eggs with one tablespoon of water until completely combined. The water thins the egg slightly, creating a better coating for your Japanese Chicken Katsu. In the third dish, spread two cups of panko breadcrumbs in an even layer. Having everything ready before you start breading makes the process smoother.
Breading the Chicken
Take one pounded chicken breast and coat it completely in the seasoned flour, shaking off any excess. The flour layer should be thin and even across the entire surface of your Japanese Chicken Katsu. Dip the floured chicken into the beaten egg, allowing any excess to drip back into the dish. Make sure the egg covers the chicken completely with no dry spots showing.
Finally, press the egg-coated chicken into the panko breadcrumbs, turning it over and pressing gently to ensure the crumbs adhere well. The coating on your Japanese Chicken Katsu should look thick and even, with no bare patches. Set the breaded cutlet on a clean plate and repeat the process with remaining chicken breasts. Let them rest for ten minutes before frying, which helps the coating stick better.
Frying the Katsu
Heat about two inches of vegetable oil in a large, deep skillet or Dutch oven to 350 degrees Fahrenheit. Use a thermometer to check the temperature, as proper heat is essential for crispy Japanese Chicken Katsu. Too cool and the chicken absorbs oil and becomes greasy. Too hot and the outside burns before the inside cooks through.
Carefully lower one breaded chicken breast into the hot oil using tongs. The oil should bubble vigorously around the chicken. Fry for four to five minutes on the first side without moving the chicken. You’ll see the edges start to turn golden brown. Flip the Japanese Chicken Katsu carefully and fry for another four to five minutes on the second side.
The Japanese Chicken Katsu is done when both sides are deep golden brown and an instant-read thermometer inserted into the thickest part reads 165 degrees Fahrenheit. Transfer the cooked cutlet to a wire rack set over a baking sheet to drain. The rack keeps the bottom from getting soggy while you fry the remaining pieces. Repeat the frying process with all chicken breasts.
Professional Tips for Perfect Results
Mastering Japanese Chicken Katsu becomes easier when you understand professional techniques. These tips come from experience and help you achieve restaurant-quality results consistently.
Oil Temperature Management
Maintaining consistent oil temperature is crucial for crispy Japanese Chicken Katsu. The temperature will drop when you add cold chicken to the pan, so allow it to recover between batches. If you’re frying multiple pieces, wait two to three minutes between cutlets to let the oil heat back up to 350 degrees.
Monitor the temperature throughout frying your Japanese Chicken Katsu. If the oil gets too hot, reduce the heat temporarily. If it drops below 325 degrees, increase the heat and wait before adding more chicken. Consistent temperature produces evenly golden, crispy results.
Achieving Maximum Crispiness
For the crispiest Japanese Chicken Katsu, avoid crowding the pan during frying. Fry one or two pieces at a time depending on pan size. Crowding lowers the oil temperature too much and creates steam, both of which prevent proper crisping. Patience with this step pays off in superior texture.
After frying your Japanese Chicken Katsu, resist the temptation to stack the pieces. Keep them separated on the wire rack so air can circulate around all sides. This prevents trapped steam from softening the crispy coating you worked hard to achieve.
Timing and Coordination
The curry sauce for your Japanese Chicken Katsu can be made ahead and reheated, which helps with timing. Make the sauce earlier in the day or even the day before. The flavors actually improve with time as the spices continue to develop. Reheat gently on the stovetop while you fry the chicken.
Cook your rice while the curry sauce simmers so everything finishes around the same time. Japanese short-grain rice works best with Japanese Chicken Katsu, though any white rice serves the dish well. Time the rice to finish just before you start frying the chicken for the best results.
Resting the Chicken
After pounding your chicken for Japanese Chicken Katsu, let it rest at room temperature for fifteen minutes before breading. This allows the meat to relax and come to room temperature, which helps it cook more evenly. Cold chicken from the refrigerator takes longer to cook through and may burn on the outside before the inside finishes.
Similarly, let the breaded Japanese Chicken Katsu rest for ten minutes before frying. This rest period allows the coating to set and adhere better, reducing the chance of the breading falling off during frying. The wait time also lets any excess moisture from the egg dry slightly, which improves crispiness.

Common Mistakes to Avoid
Understanding common problems with Japanese Chicken Katsu helps you prevent them and ensures success with every batch you make.
Breading That Falls Off
One of the most frustrating issues with Japanese Chicken Katsu involves breading that separates from the chicken during frying. This usually happens when the chicken is too wet or when you skip the flour layer. Always pat the chicken dry before starting the breading process and ensure each layer adheres properly before moving to the next.
Another cause of fallen breading on Japanese Chicken Katsu is moving the chicken too much during frying. Once you place the cutlet in the oil, resist the urge to flip or move it until the proper cooking time has elapsed. Premature flipping can dislodge the coating before it sets.
Greasy Results
Greasy Japanese Chicken Katsu indicates oil that’s too cool during frying. When the temperature drops below 325 degrees, the breading absorbs oil instead of crisping properly. Always verify your oil temperature with a thermometer rather than guessing based on visual cues.
After frying Japanese Chicken Katsu, proper draining is essential. Using a wire rack instead of paper towels prevents the bottom from steaming and getting soggy. The elevated position allows air circulation and excess oil to drip away completely.
Dry Chicken
Overcooked Japanese Chicken Katsu becomes dry and tough, losing the juicy tenderness that makes this dish so appealing. This problem often results from chicken that’s pounded too thin or cooked at too high a temperature. Aim for one-centimeter thickness and maintain oil at 350 degrees.
Using a meat thermometer takes the guesswork out of cooking Japanese Chicken Katsu. Remove the chicken when it reaches exactly 165 degrees internally. Carryover cooking will bring it up a few more degrees as it rests, so pulling it right at temperature prevents overcooking.
Lumpy Curry Sauce
Lumpy curry sauce ruins the smooth, velvety texture that should coat your Japanese Chicken Katsu rice. This issue typically occurs when you add liquid to the roux too quickly or fail to whisk constantly. Always add stock gradually while whisking vigorously to incorporate the roux smoothly.
If your Japanese Chicken Katsu curry sauce develops lumps despite your best efforts, you can fix it by straining through a fine-mesh sieve before serving. This removes any lumps and produces a perfectly smooth sauce, though prevention is always easier than correction.
Variations to Try
Once you master basic Japanese Chicken Katsu, exploring variations keeps the dish interesting and allows customization based on preferences and dietary needs.
Pork Katsu Alternative
Traditional tonkatsu uses pork instead of chicken and makes an excellent variation of this dish. Substitute boneless pork loin chops for the chicken breasts, following the same pounding, breading, and frying process. Pork katsu has a richer flavor and slightly different texture than Japanese Chicken Katsu.
The cooking time for pork katsu may differ slightly from Japanese Chicken Katsu depending on thickness. Pork should also reach 145 degrees internally for safe consumption. The crispy coating and curry sauce pair just as beautifully with pork as they do with chicken.
Vegetable Katsu Options
Creating a vegetarian version of Japanese Chicken Katsu works wonderfully with thick-cut vegetables. Eggplant slices, portobello mushroom caps, or thick-cut sweet potato rounds all take beautifully to the panko breading and frying method. Season the vegetables well since they have milder flavor than meat.
The breading process for vegetable katsu remains the same as for Japanese Chicken Katsu, though frying time may be shorter. Watch the vegetables carefully and remove them when golden and tender. These variations prove that the crispy panko coating and curry sauce work with almost anything.
Spicy Curry Variations
While traditional Japanese Chicken Katsu curry has mild heat, you can increase spiciness to suit your preferences. Add cayenne pepper or red pepper flakes to the curry sauce while it simmers. Start with small amounts and taste as you go, since it’s easier to add heat than remove it.
Another option for spicy Japanese Chicken Katsu involves adding fresh chilies like serrano or jalapeño to the curry sauce with the onions and garlic. Remove the seeds for less heat or leave them in if you prefer serious spice. The creamy curry base balances heat nicely.
Sauce Modifications
The curry sauce for Japanese Chicken Katsu welcomes creativity with additional ingredients. Grated apple or pear adds natural sweetness and body to the sauce. Some cooks add a square of dark chocolate at the end for depth and richness that complements the spices beautifully.
For a thicker curry sauce on your Japanese Chicken Katsu, simmer it longer to reduce further or add a slurry of cornstarch and water near the end of cooking. For a thinner sauce, simply add more stock until you reach desired consistency.
Storage and Reheating
Proper storage techniques help you enjoy leftover Japanese Chicken Katsu while maintaining the best possible quality, though this dish definitely tastes best freshly made.
Storing the Curry Sauce
The curry sauce component of Japanese Chicken Katsu stores beautifully in the refrigerator for three to four days. Transfer cooled sauce to an airtight container and refrigerate promptly. The sauce will thicken considerably as it cools, which is completely normal.
For longer storage, freeze Japanese Chicken Katsu curry sauce for up to one month. Portion it into freezer-safe containers or bags, leaving some headspace for expansion. Remove as much air as possible before sealing to prevent freezer burn. Label containers with the date so you can track freshness.
Storing Fried Chicken
Fried Japanese Chicken Katsu presents more storage challenges since the coating loses crispiness over time. Store leftover cutlets in an airtight container in the refrigerator for up to two days. Place parchment paper between pieces to prevent them from sticking together.
Freezing fried Japanese Chicken Katsu is not recommended, as the texture deteriorates significantly upon thawing and reheating. If you must freeze it, wrap each piece tightly in plastic wrap and then aluminum foil. Use within one month for best quality.
Reheating Methods
Reheat Japanese Chicken Katsu curry sauce gently on the stovetop over low heat, stirring frequently. Add a splash of water or stock if the sauce seems too thick, as it thickens when refrigerated. The sauce reheats well in the microwave too, though stovetop reheating produces better results.
For the chicken portion of Japanese Chicken Katsu, oven reheating works better than microwaving. Preheat your oven to 350 degrees Fahrenheit and place the cutlets on a wire rack over a baking sheet. Heat for ten to fifteen minutes until warmed through. This method helps restore some crispiness to the coating.
A toaster oven also works well for reheating Japanese Chicken Katsu in smaller quantities. Use the same temperature and watch carefully to prevent burning. While reheated katsu never quite matches freshly fried, these methods produce the best possible results.
Frequently Asked Questions
Can I bake instead of frying the chicken?
You can bake Japanese Chicken Katsu for a lighter version, though the texture will differ from traditional fried cutlets. Place breaded chicken on a wire rack over a baking sheet and spray generously with cooking oil. Bake at 400 degrees Fahrenheit for twenty to twenty-five minutes, flipping halfway through. The coating won’t achieve the same crispiness as deep-fried Japanese Chicken Katsu, but it still tastes delicious.
What kind of rice should I serve with this dish?
Japanese short-grain rice pairs most authentically with Japanese Chicken Katsu. This rice variety has a slightly sticky texture that works perfectly with curry sauce. Regular white rice also works well if you don’t have short-grain available. Cook the rice according to package directions and serve it steaming hot alongside the katsu and curry.
Can I make the curry sauce ahead of time?
Yes, making the curry sauce ahead actually improves the flavor of your Japanese Chicken Katsu. Prepare the sauce up to two days in advance and store it refrigerated in an airtight container. The spices continue to develop and mellow over time, creating even more complex flavors. Reheat gently before serving.
Why is my breading not staying crispy?
Breading on Japanese Chicken Katsu loses crispiness when it gets wet from sauce or steam. Serve the curry sauce on the side or over the rice rather than directly on the chicken to maintain maximum crispiness. Store any leftovers with the sauce separate from the chicken. Proper draining on a wire rack immediately after frying also helps preserve crispiness.
Can I use chicken thighs instead of breasts?
Boneless, skinless chicken thighs work as an alternative to breasts in Japanese Chicken Katsu. Thighs have more fat and flavor, though they’re also smaller and less uniform in shape. You may need more thighs to serve the same number of people. The cooking time remains similar since you’ll pound them to the same thickness.
How do I know when the oil is hot enough?
The most reliable way to check oil temperature for Japanese Chicken Katsu is using a deep-fry or instant-read thermometer. The oil should read 350 degrees Fahrenheit. Without a thermometer, drop a few panko crumbs into the oil. If they sizzle immediately and turn golden within thirty seconds, the temperature is right.
Final Thoughts
Japanese Chicken Katsu curry represents the perfect combination of comforting flavors and satisfying textures. This beloved dish brings together crispy fried chicken, aromatic curry sauce, and fluffy rice in a meal that pleases both family and guests. While it may seem complex at first, breaking down the process into manageable steps makes Japanese Chicken Katsu accessible to cooks of all skill levels.
The key to exceptional Japanese Chicken Katsu lies in attention to detail throughout the cooking process. From pounding the chicken to uniform thickness to maintaining proper oil temperature during frying, each step contributes to the final result. The curry sauce requires patience as it simmers and develops its complex flavor profile, but the wait is absolutely worthwhile.
Don’t be intimidated by making Japanese Chicken Katsu at home. Start with this recipe and follow the instructions carefully. Once you master the basic technique, you can experiment with variations and make the dish your own. The satisfaction of creating restaurant-quality Japanese Chicken Katsu in your own kitchen makes every bit of effort worthwhile. Gather your ingredients, set aside an afternoon, and prepare to enjoy one of Japan’s most beloved comfort foods.
Watch the recipe video for more clarity.

People also like our these recipes:
FOR THE CHICKEN
- 2 chicken breasts
- 2 cups breadcrumbs
- 1 egg
- 1/4 cup flour
FOR THE CURRY ROUX
- 50 g butter
- 1/4 cup flour
- 3 tbsp curry powder
FOR THE CURRY SAUCE
- 2 tbsp vegetable oil
- 4 garlic cloves minced
- 1 onion diced
- 1 tbsp soy sauce
- 1 tsp sugar
- 1 tsp vinegar
- 2 cups chicken stock
- 1/2 cup apple juice
- Chinese vegetables
- Salt
FOR THE CURRY ROUX
In a saucepan, melt some butter over medium heat, add some flour and cook until brown.
Stir in the curry powder, and cook for 5 minutes. Transfer to a bowl and set aside.
In the same pan, sauté the garlic and onion for 5 minutes. Add the curry roux, and mix well.
Add in the chicken stock, apple juice, sugar, vinegar, soy sauce and vegetables. Simmer for an hour or until it is thickened. Add in some salt and mix. Now your sauce is done!
FOR THE CHICKEN
For the chicken, pound the chicken breasts to an even 1 cm thick. Set up the breading station with a beaten egg, panko breadcrumbs and seasoned flour with salt and pepper.
Coat each breast in flour, then in the beaten egg, then in the breadcrumbs.
Fry until golden and serve alongside with white rice and the curry roux sauce!
If you've given this recipe a try and it won you over, please share your thoughts by leaving
a rating and comment below! If you have any questions about this recipe, don't hesitate to ask – I'm here to
help and will respond promptly.